
Javaweb
HTML & CSS
入门程序

1 | <h1>HTML入门程序<h1> |
HTML快速入门
1 | <html> |
新手程序:
1 | <html> |
tip:注释:ctrl+/
央视新闻
1. 标题及超链接
1 | <!DOCTYPE html> |
a: 超链接标签:
1 | href: 链接地址 -url地址 |
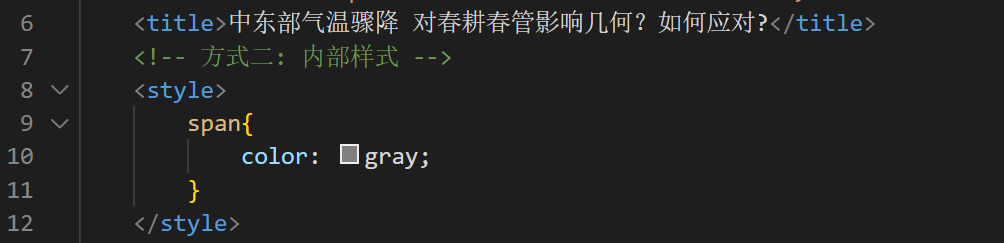
2. CSS样式
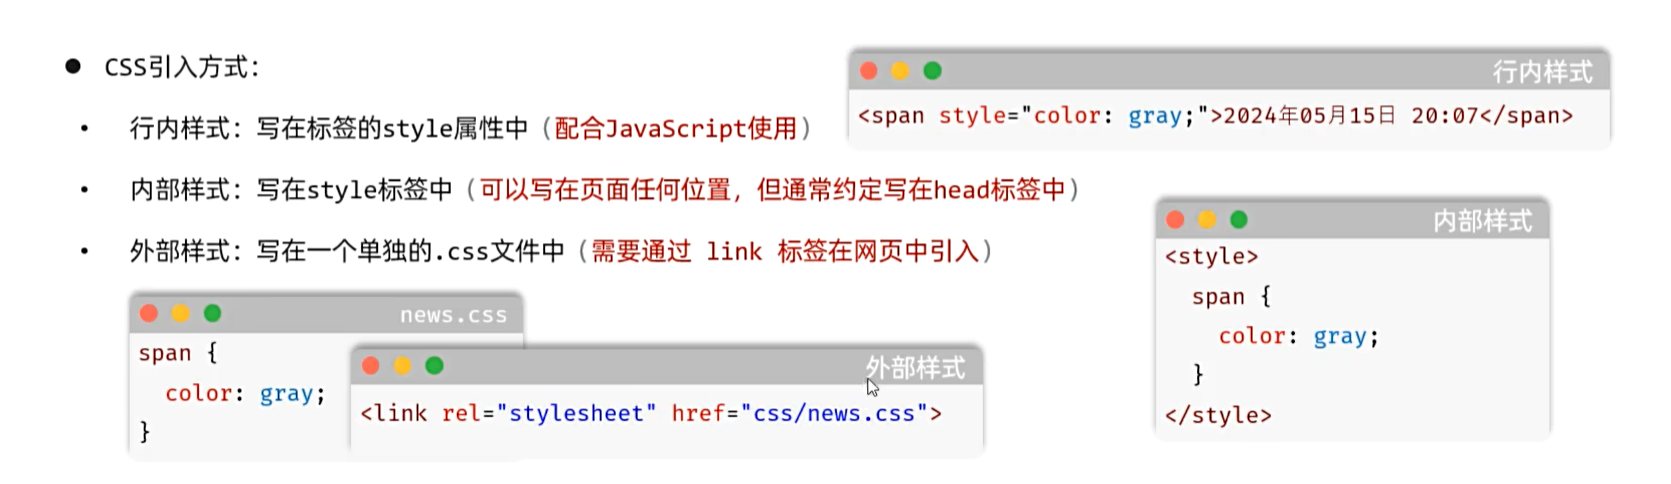
行内样式
1
2<!-- 方式一:行内样式 -->
<span style="color:gray">2025年03月28日 00:14:44</span>内部样式
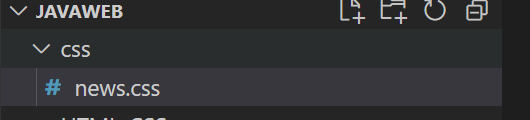
外部样式
先创建css文件
把内部样式里的拷贝过来,style不要
最后在html加上
1
<link rel="stylesheet" href="css/news.css">
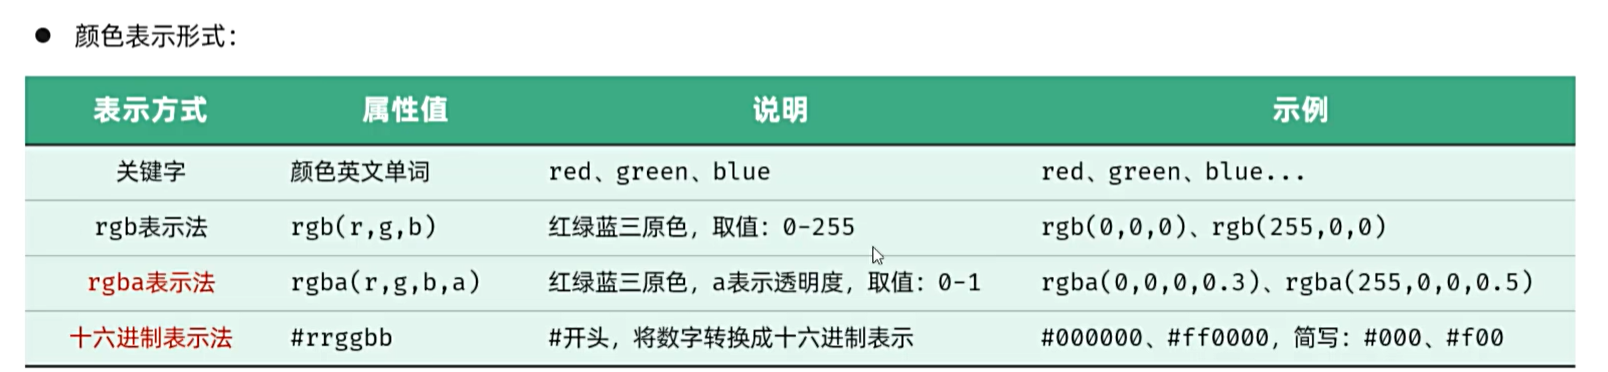
颜色描述形式
3. 选择器
元素选择器
1
2
3
4
5<style>
span{
color: gray;
}
</style>类选择器
1
2
3
4
5<style>
.cls{
color: #ff0000;
}
</style>ID选择器
1
2
3
4
5
6<style>
#time{
color: #0000ff;
}
</style>
优先级:ID->类->元素
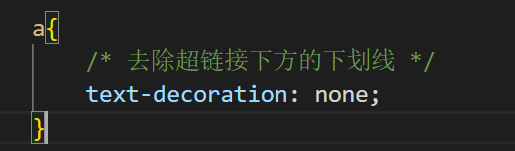
4. 去除超链接下方的下划线
换行:
1
<br>
5. 引入视频/音频
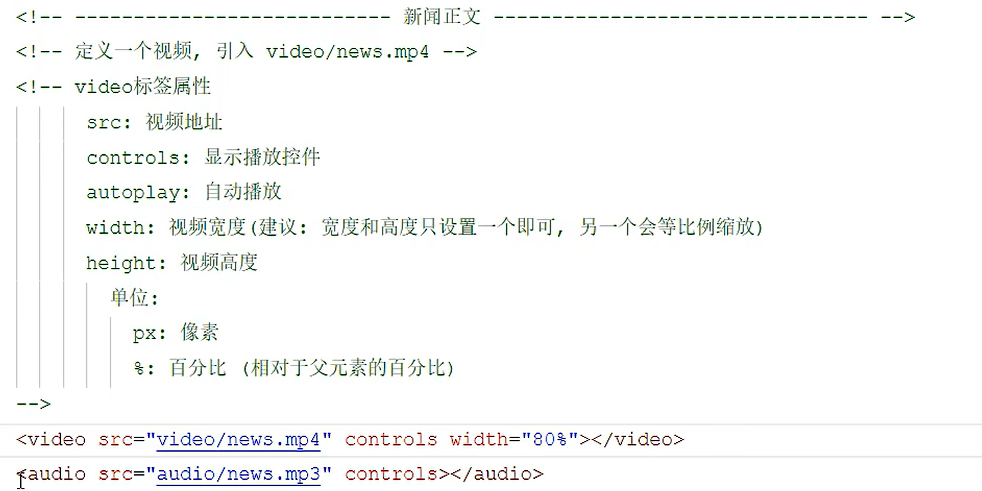
1 | <p> |
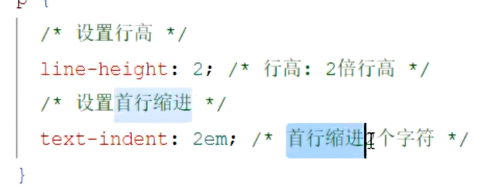
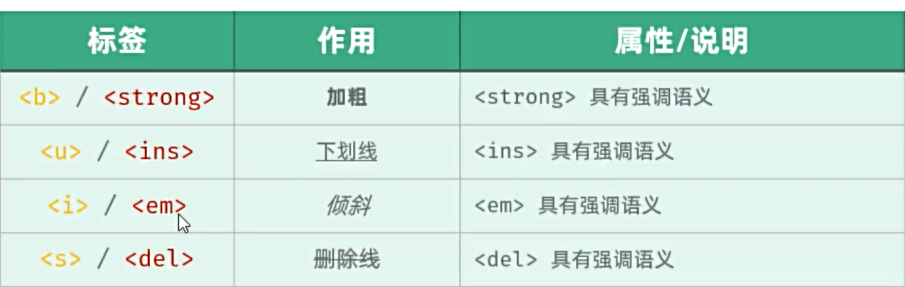
6. 加粗 缩进
加粗 strong和b

缩进
  : 空格
< : 小于
&rt : 大于
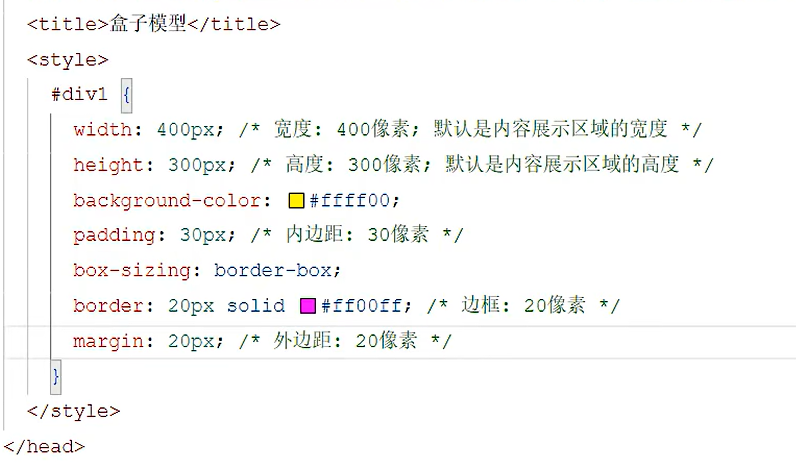
7. 盒子模型
JavaScript
基础代码
- 引入方式:
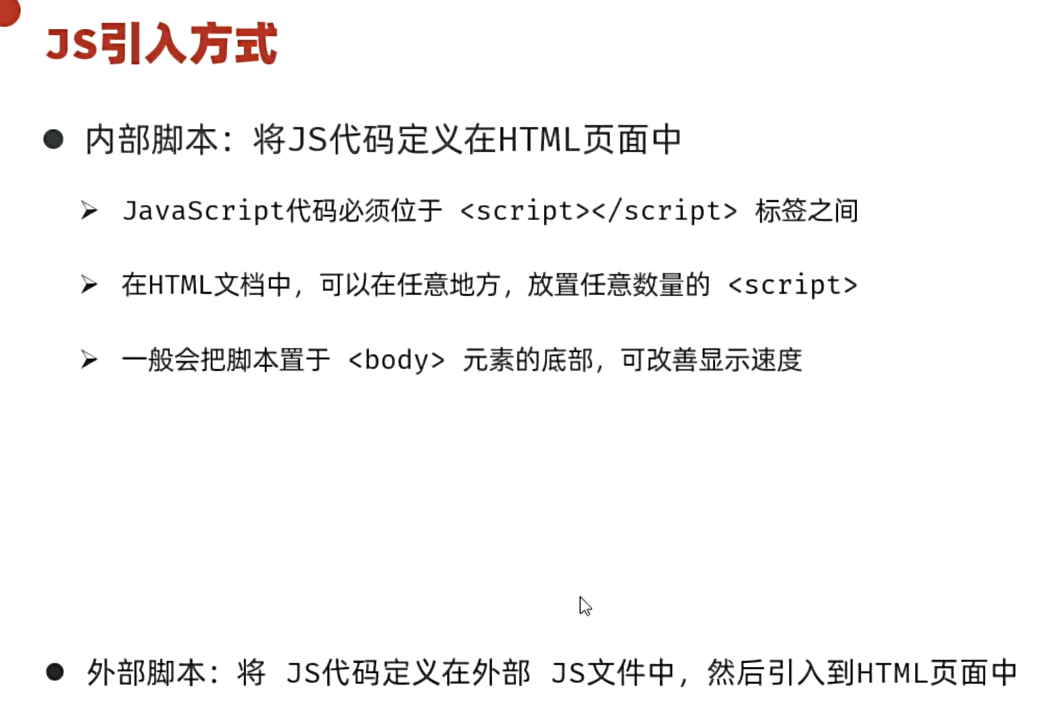
- 内部脚本:
1 | <body> |
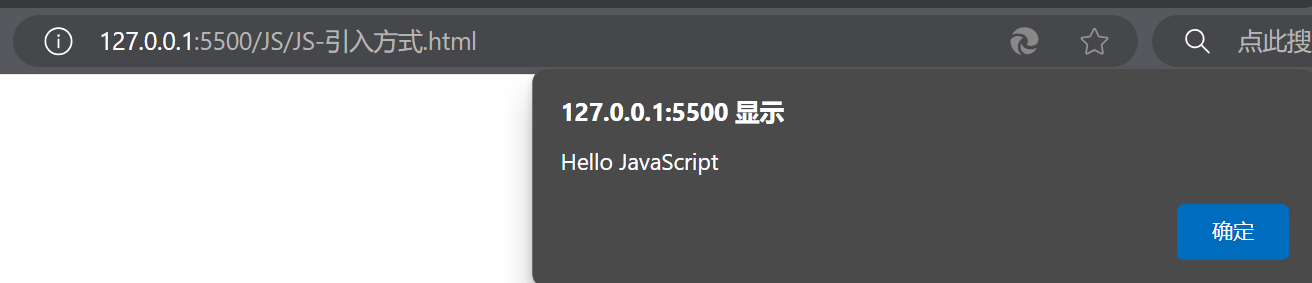
alert效果 :
外部脚本:
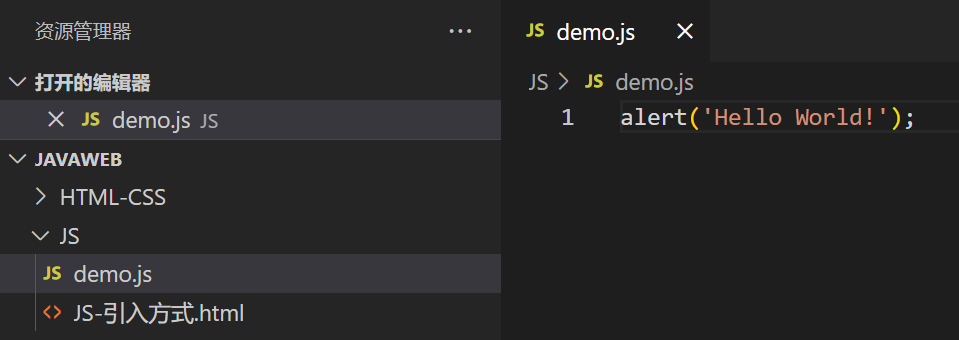
创建js脚本,再加上
1
<script src="demo.js"></script>
基础语法
变量与常量


1 | <script> |
把值写进body
1 | document.write("PI"); |
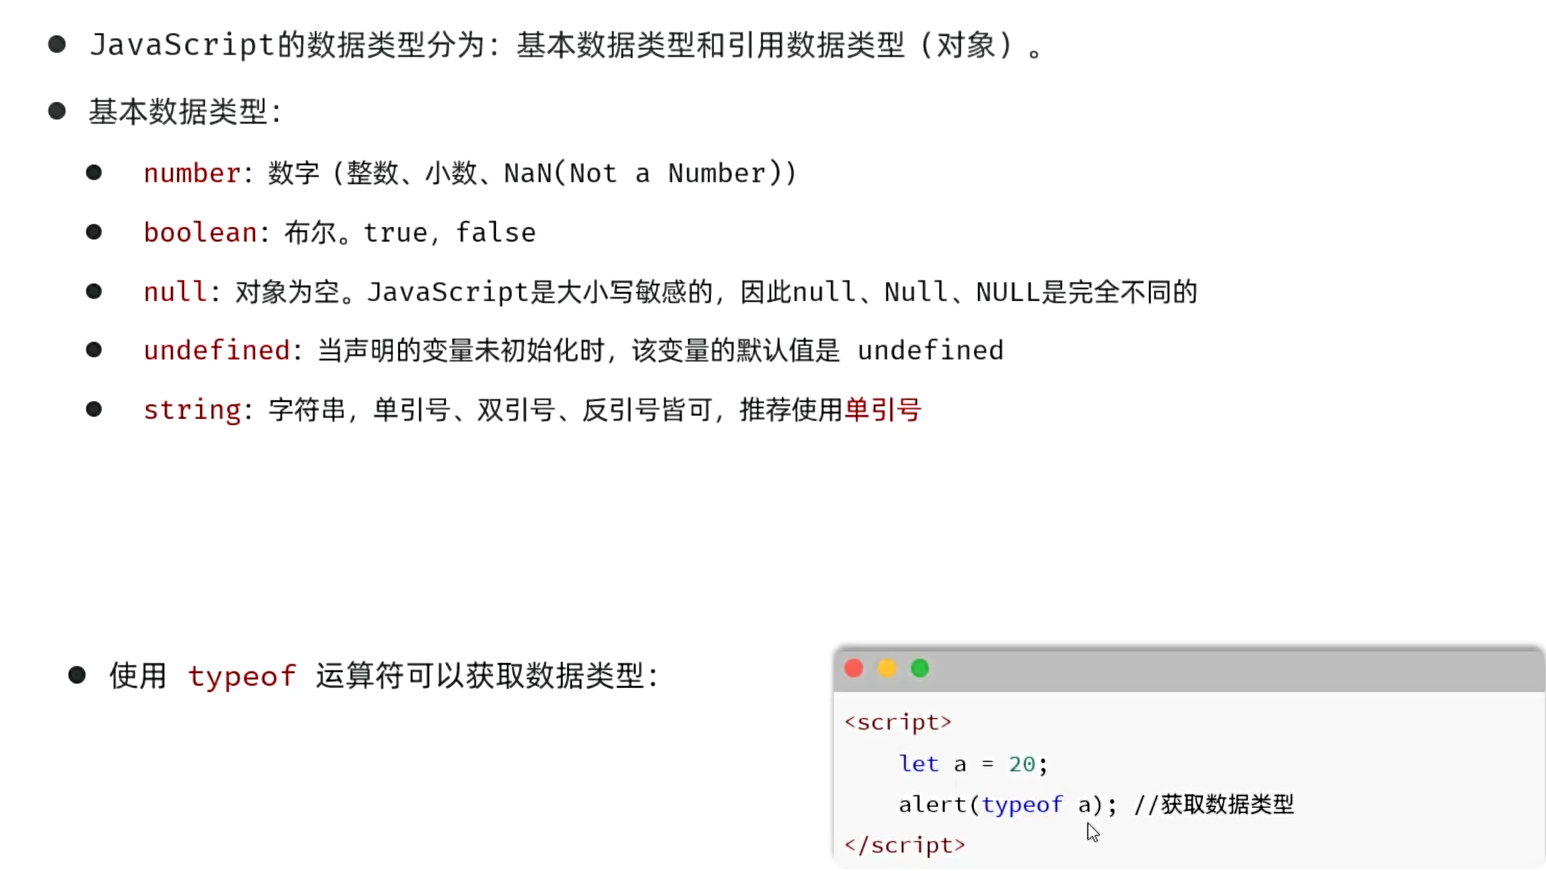
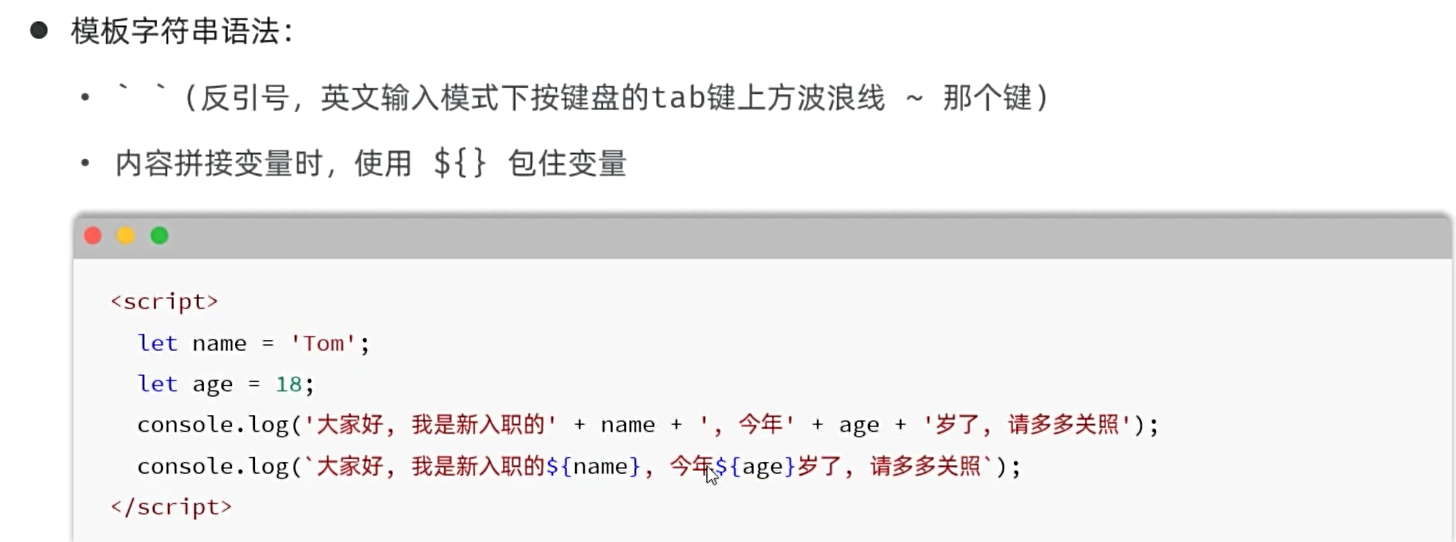
数据类型
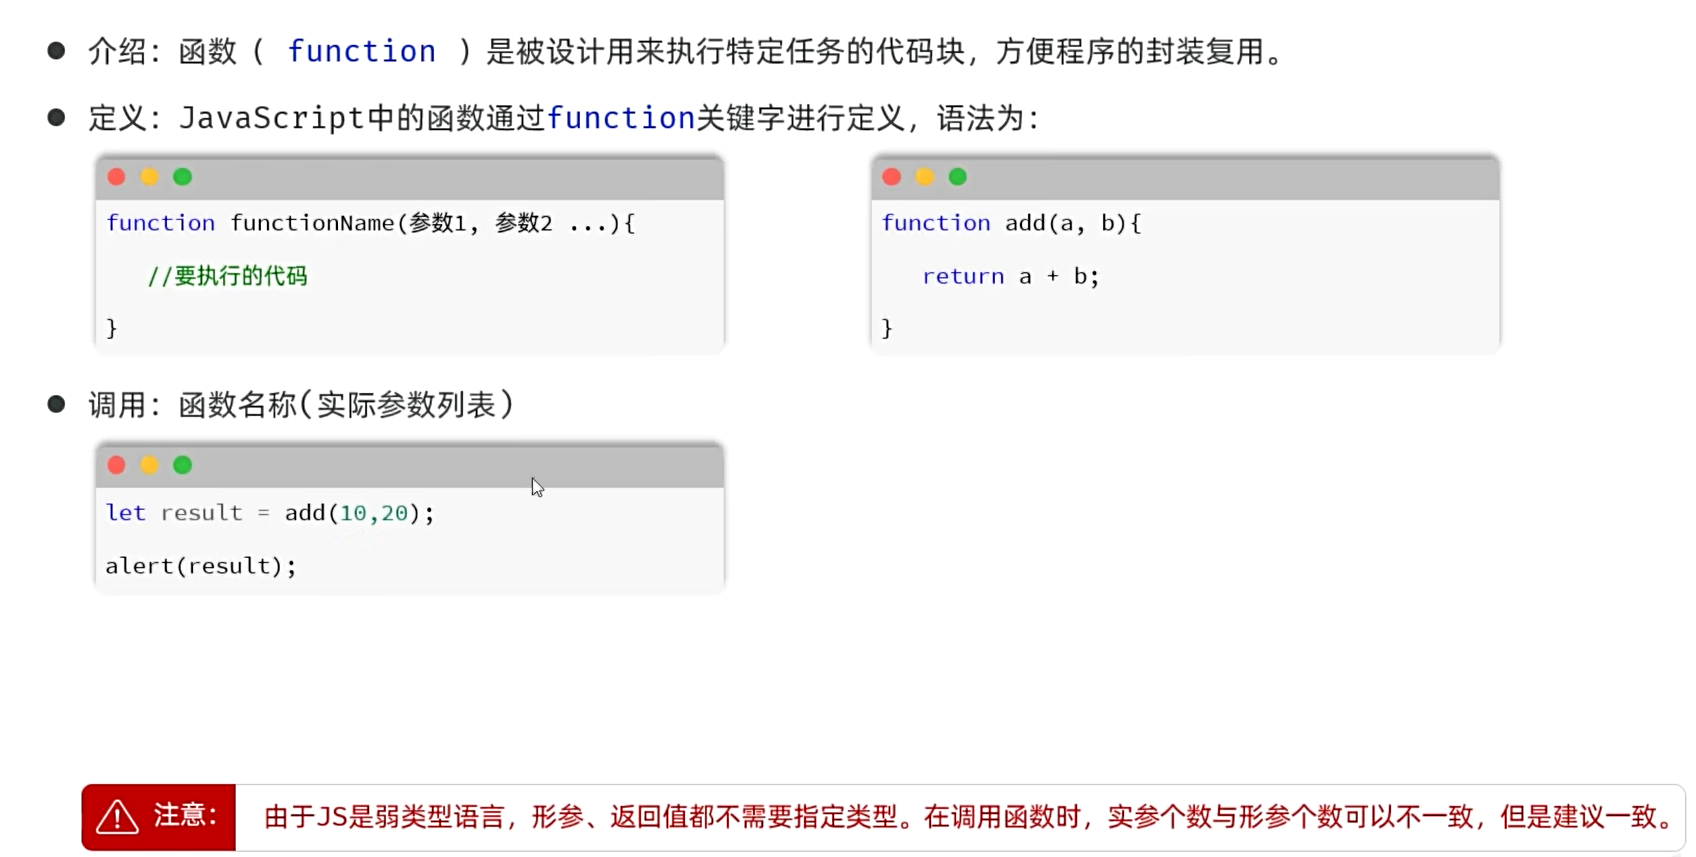
函数
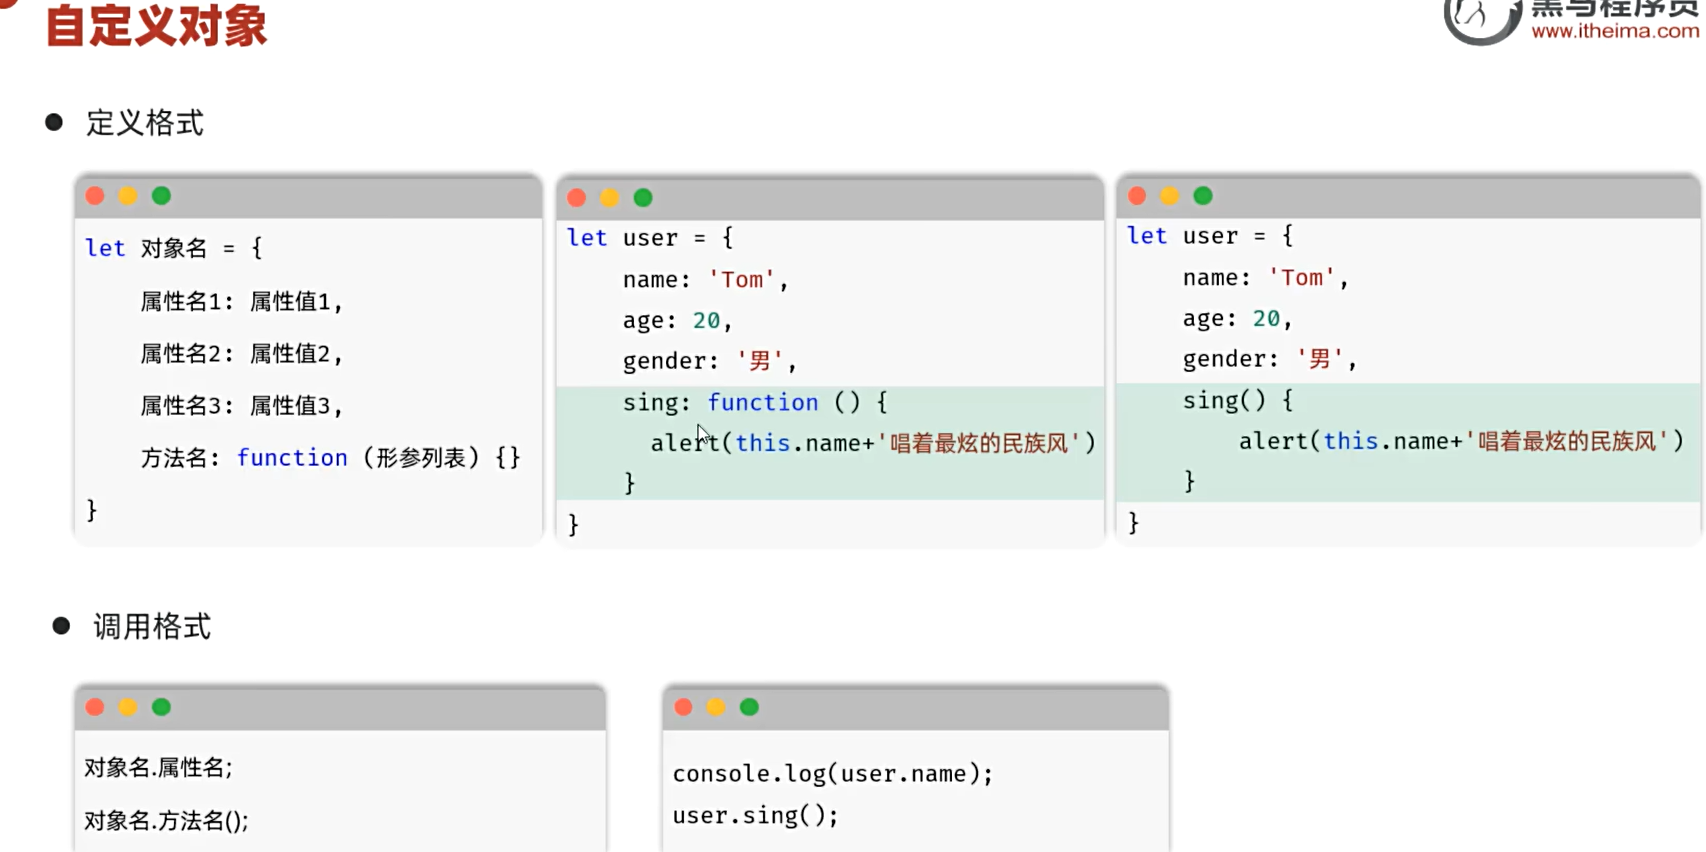
自定义对象
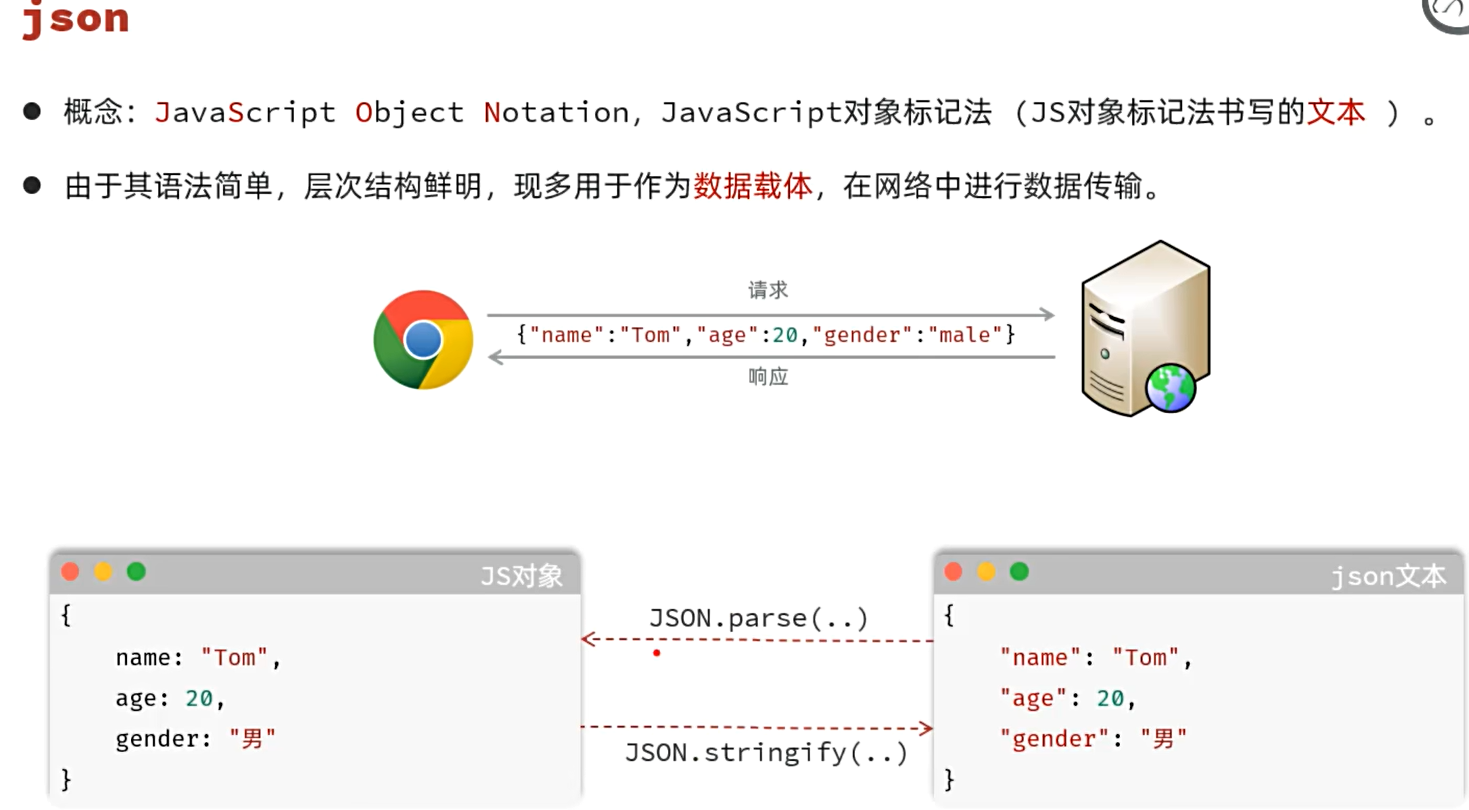
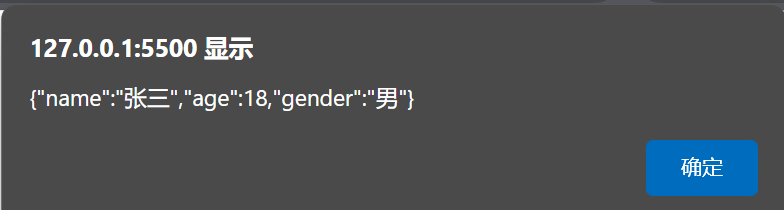
Json
1 | <script> |
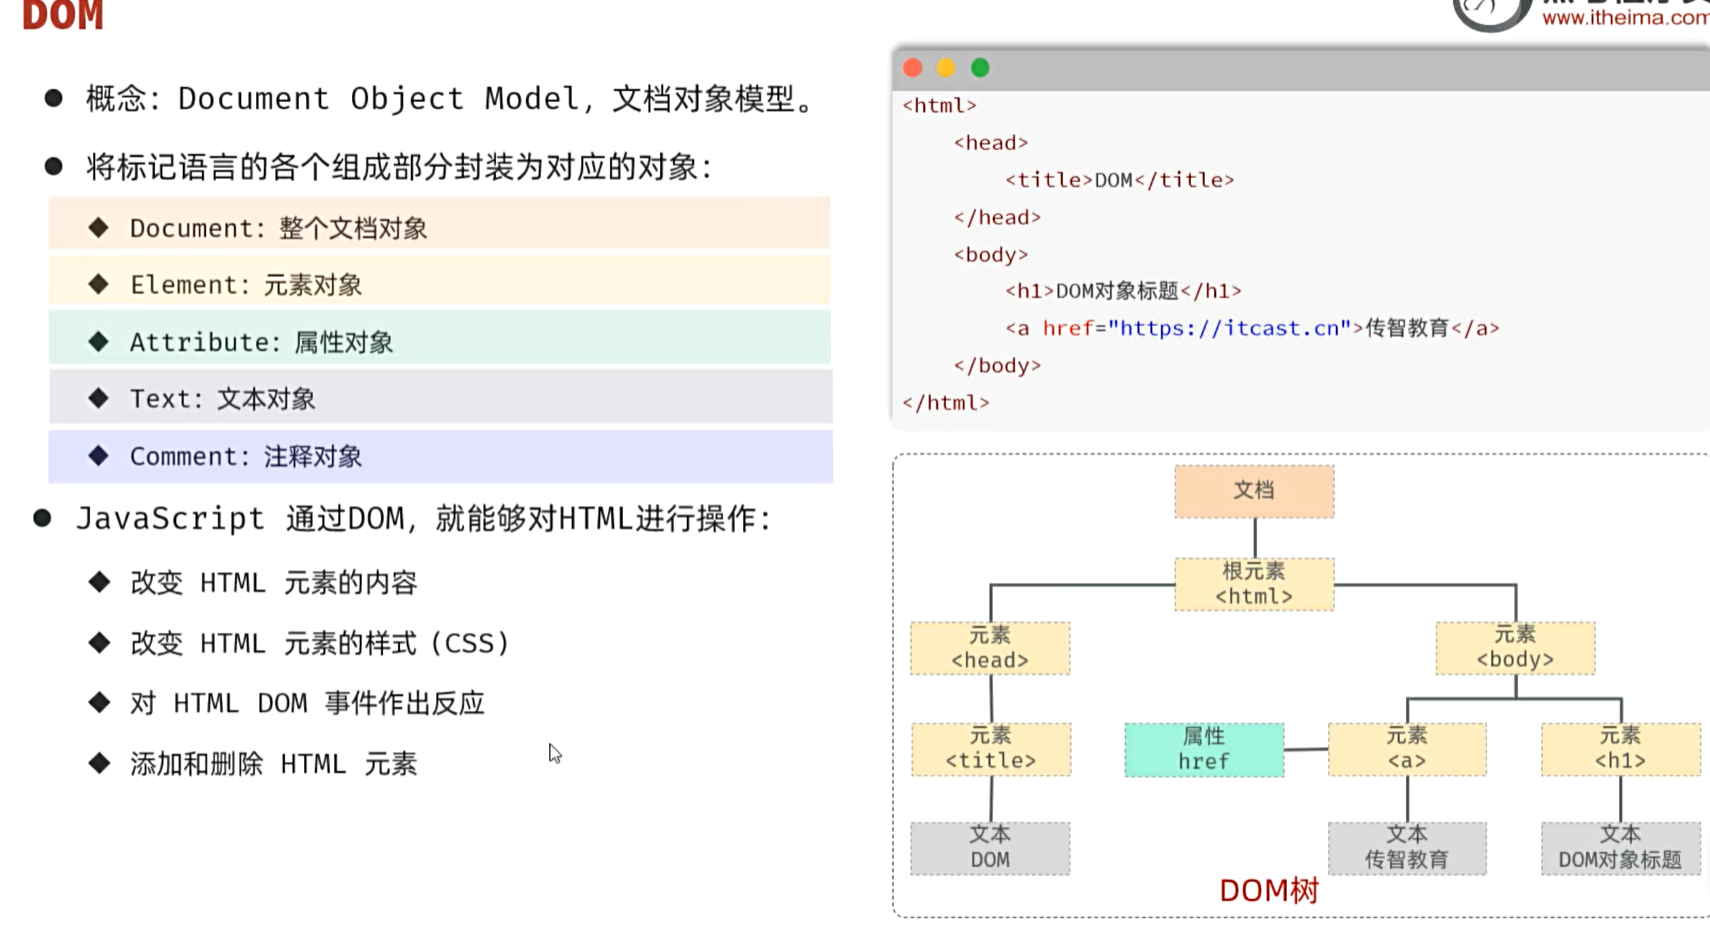
DOM
1 | <body> |
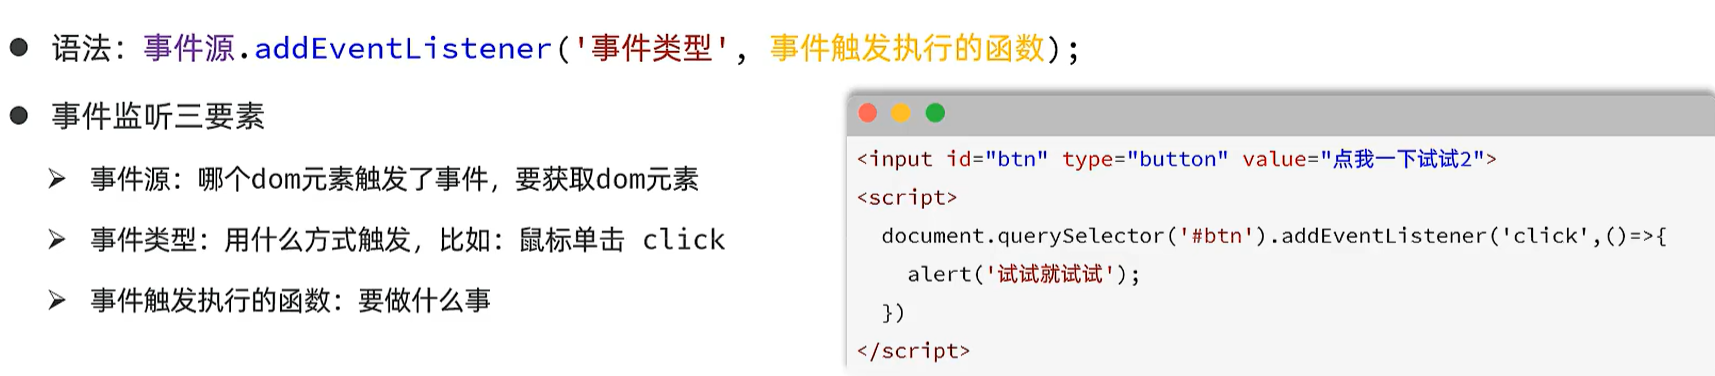
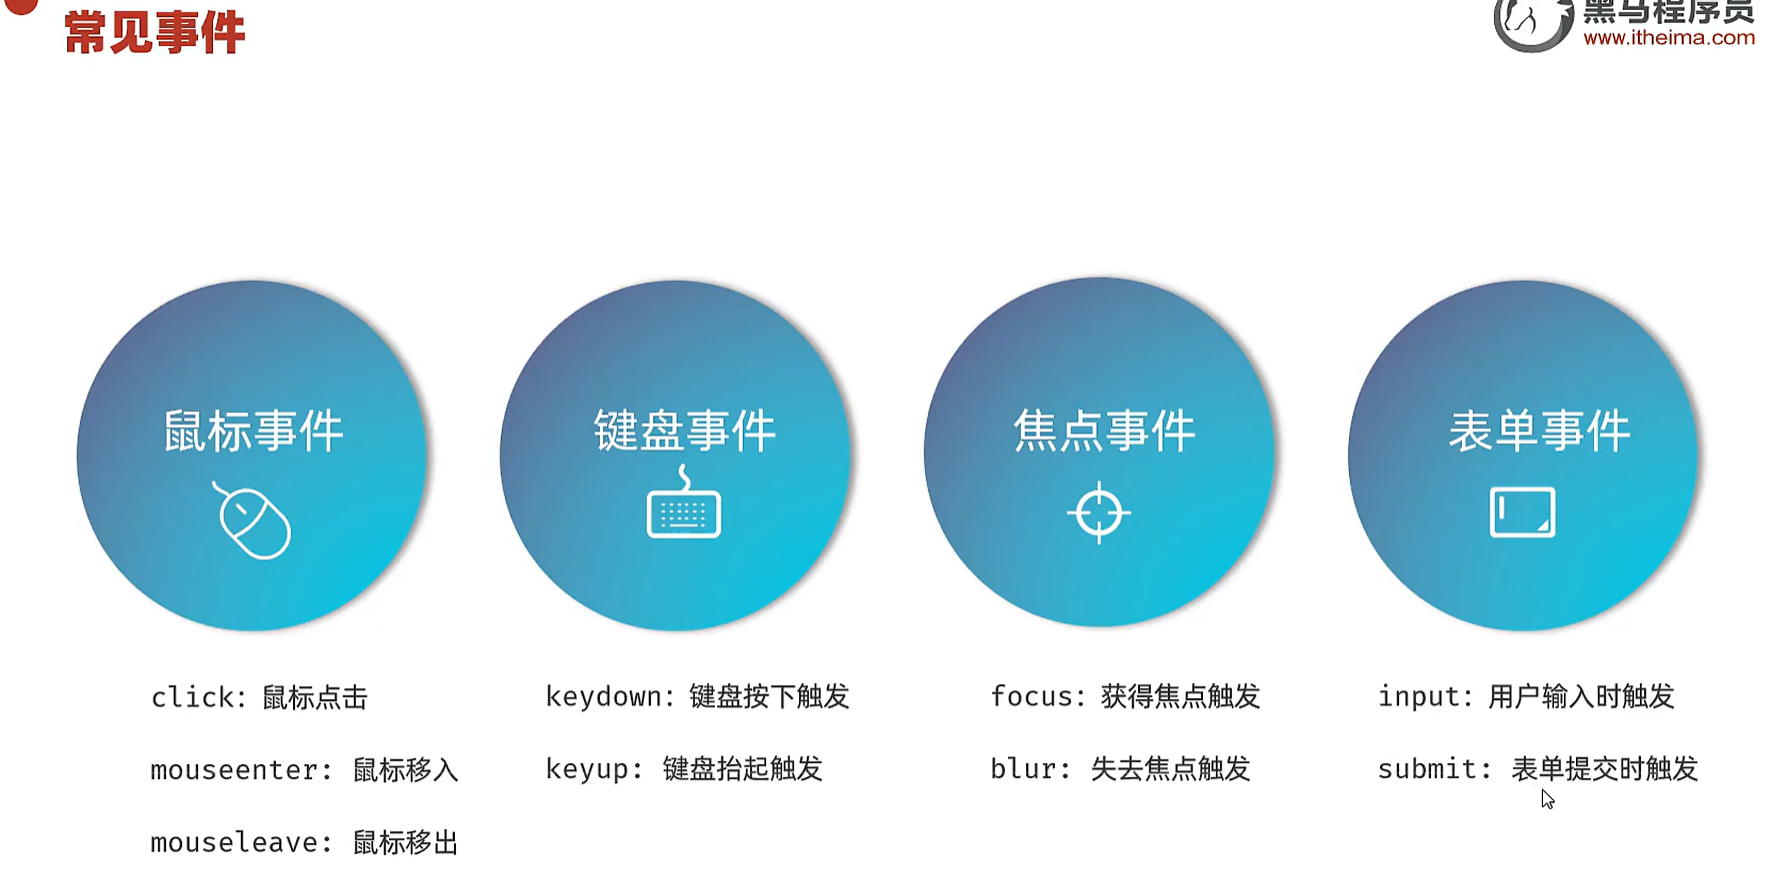
事件监听
1 | <input type="button" id="btn1"value="点我一下试试1"> |
MAVEN
创建MAVEN项目
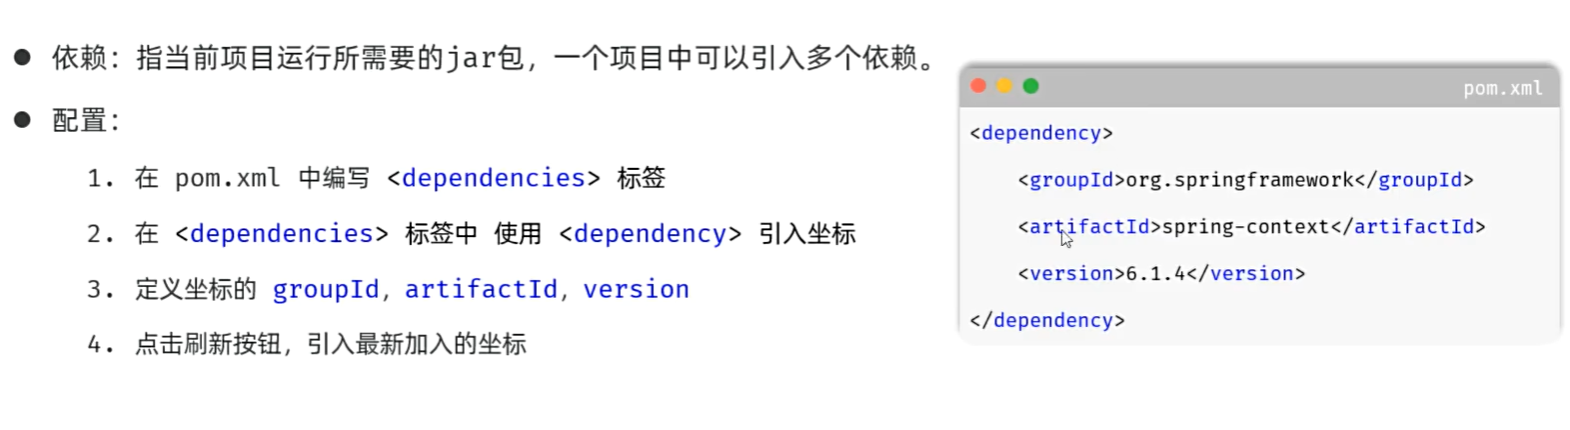
作用:
- 描述好需要的jar包,maven会自动下载并导入
- 方便配置编译
- 统一项目结构
全局配置:
在项目中点击关闭项目,点击自定义
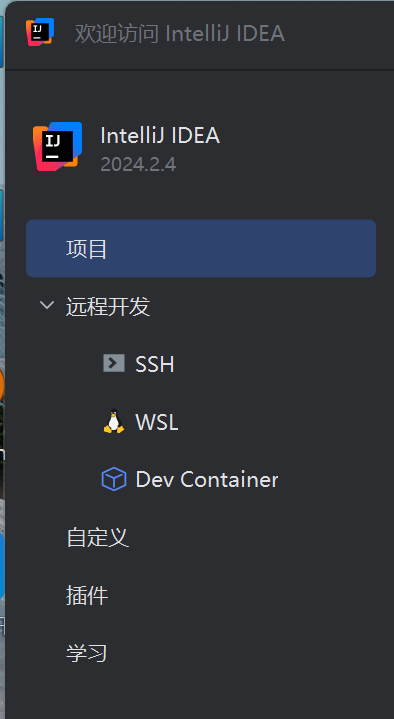
最底下所有设置
把自己的maven写入

就可以了
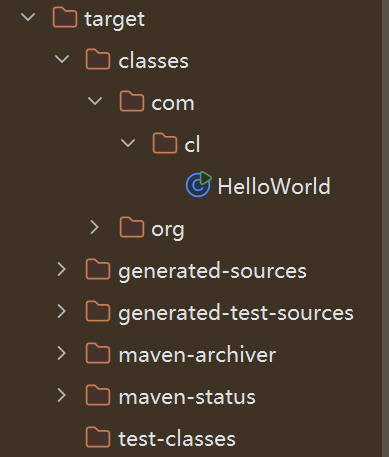
内容:
主函数和测试函数
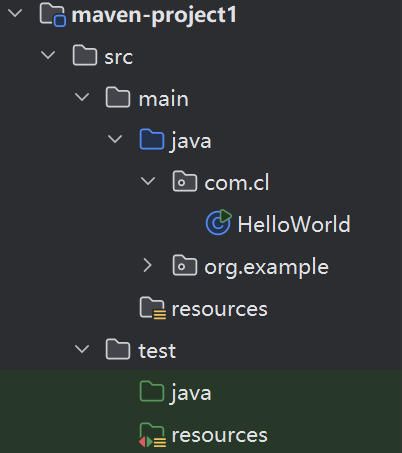
在运行后会自动生成一个target字节码文件
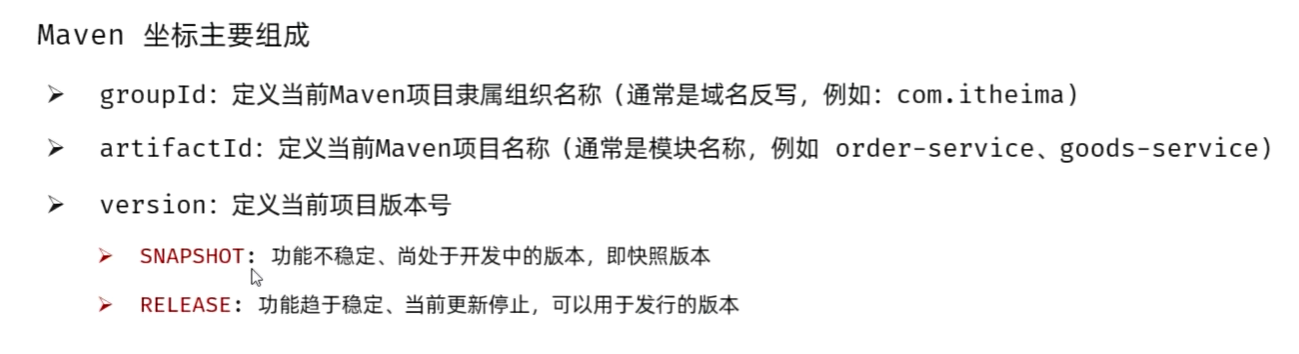
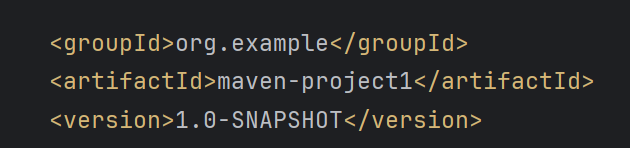
MAVEN 坐标
定义:

组成:
导入MAVEN项目
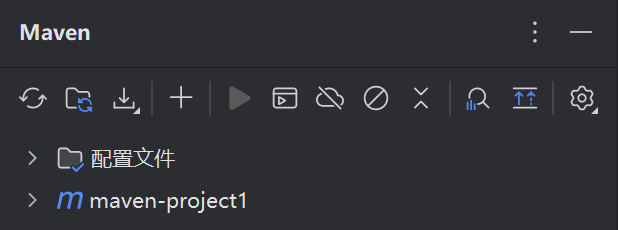
点击加号,导入pom文件即可
依赖配置

1 | <?xml version="1.0" encoding="UTF-8"?> |
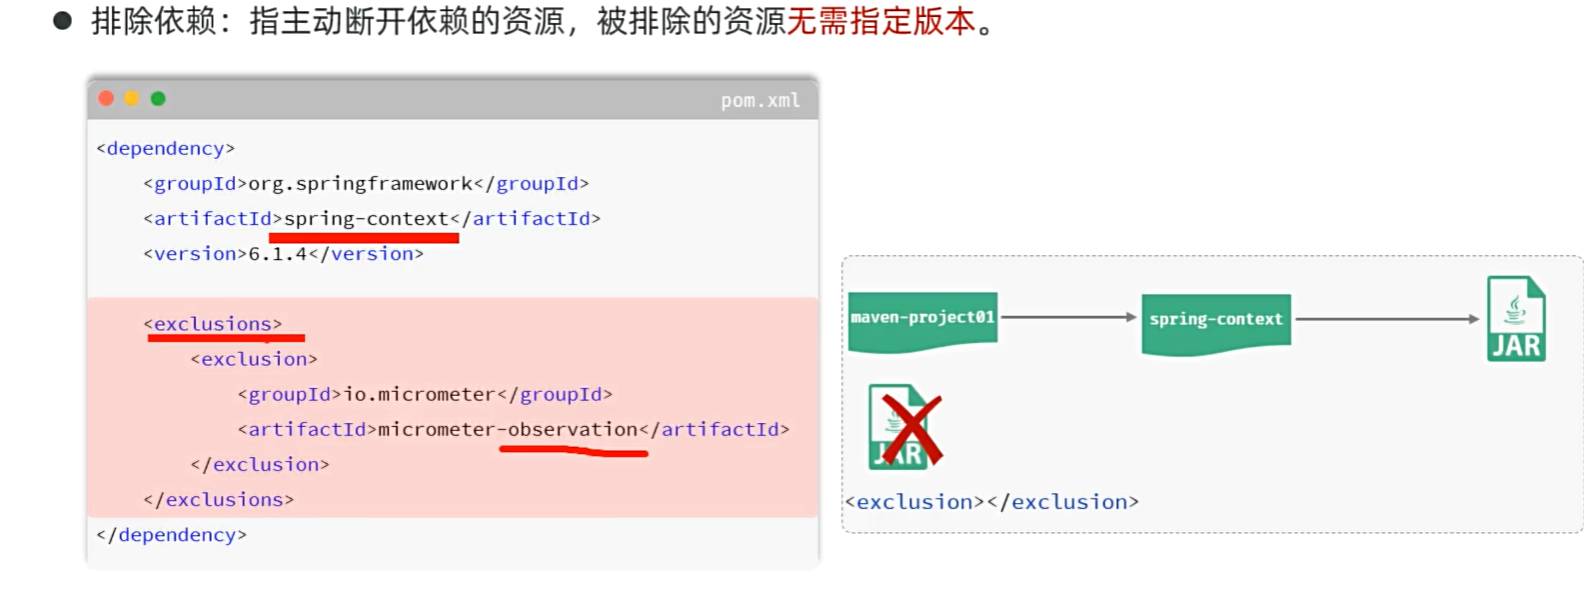
排除依赖
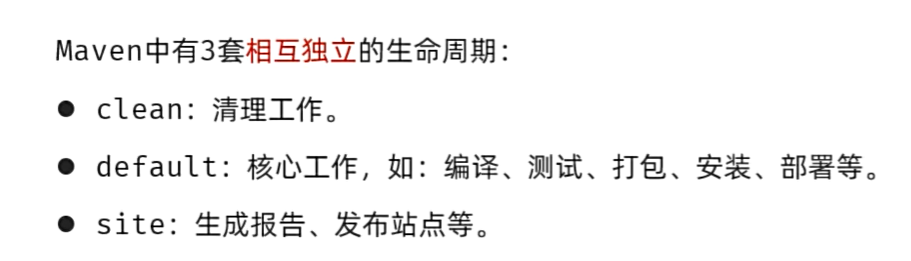
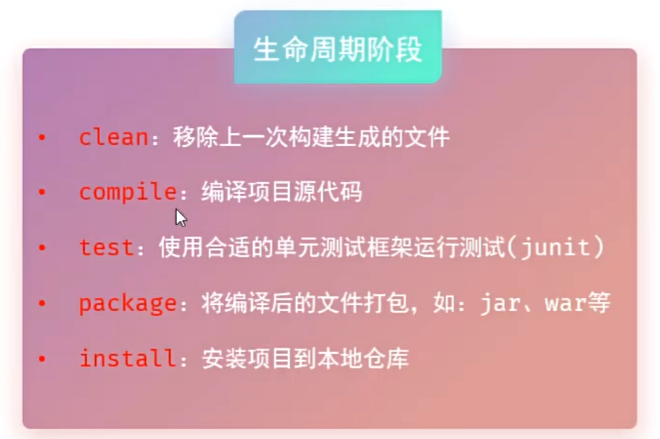
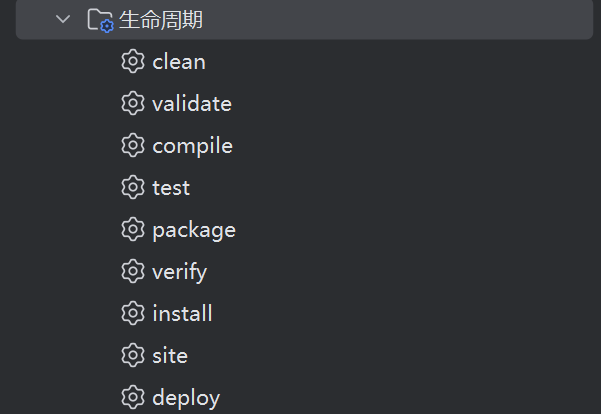
生命周期
JUnit
单元测试工具 断言的使用(测试业务方法结果有没有问题) 单元测试覆盖率

Springboot
Springboot入门程序
在IDEA创建第一个springboot项目
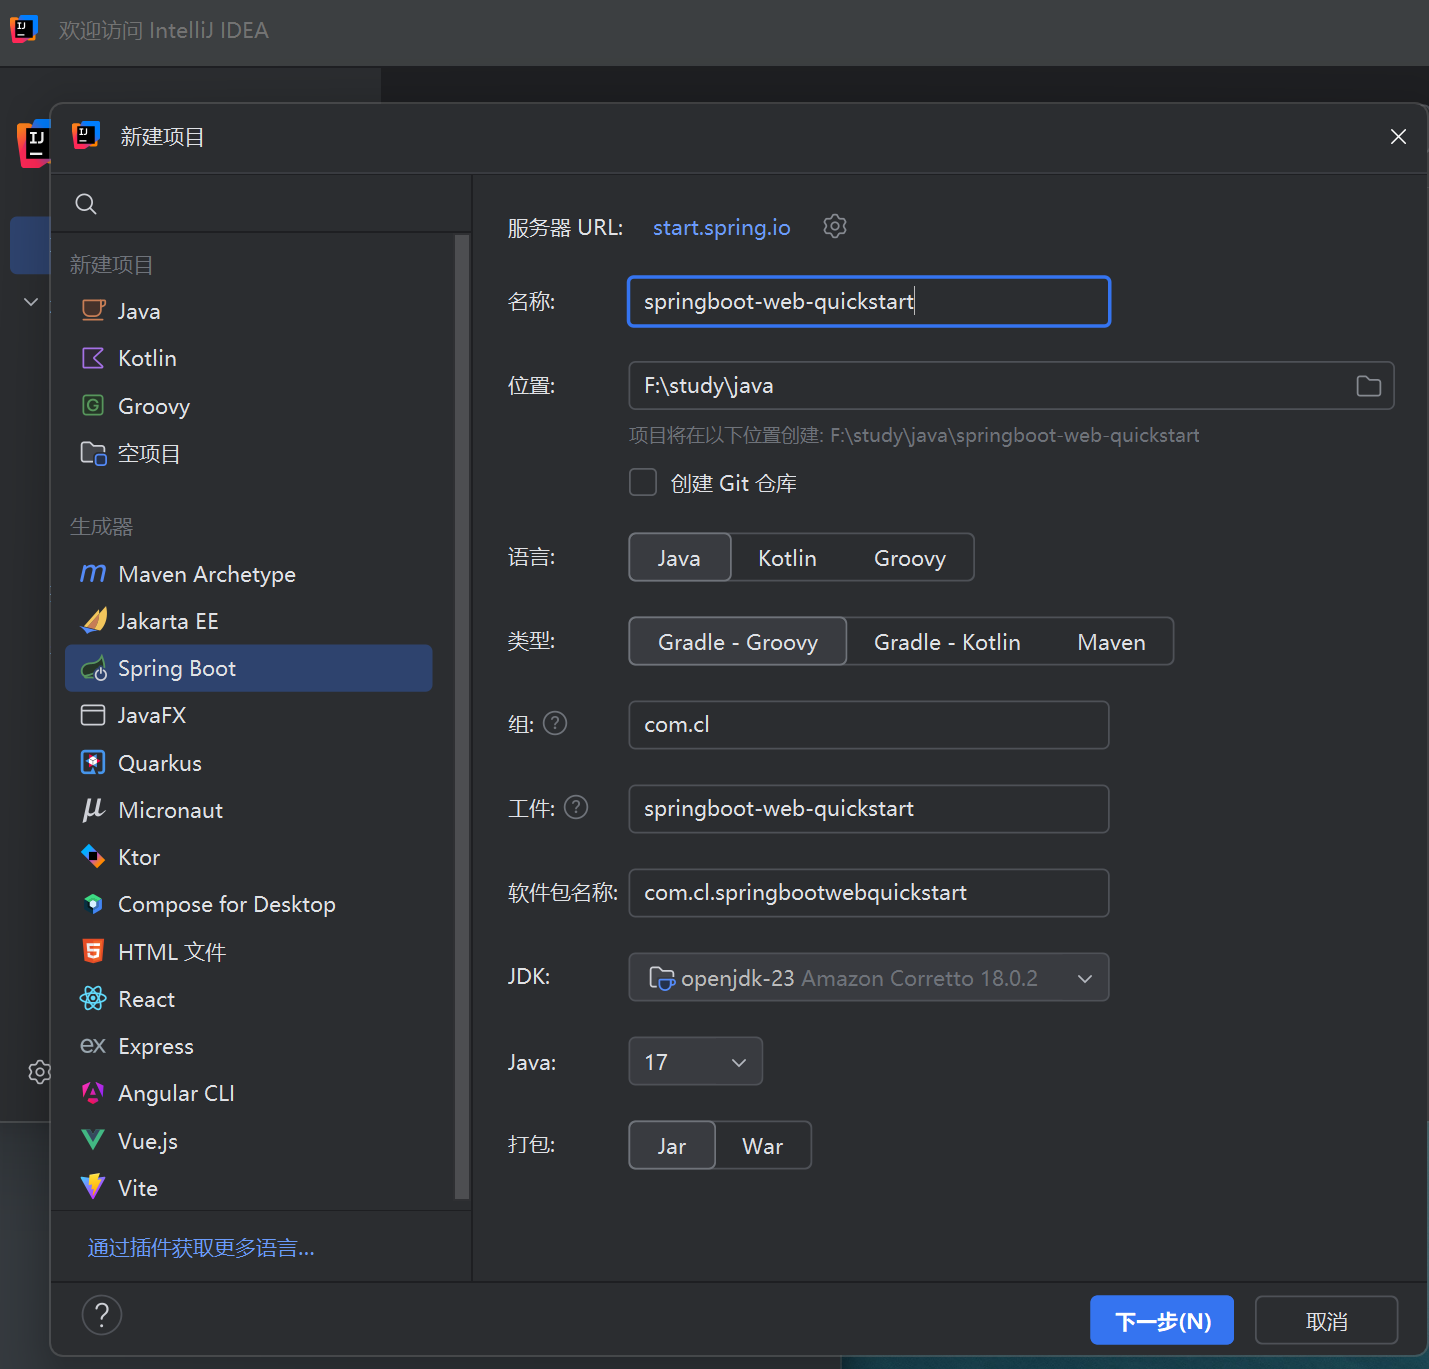
下一步勾选springweb
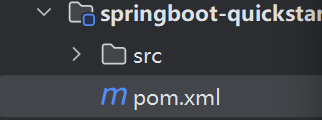
之后删除多余文件,只需要这两个
在main里: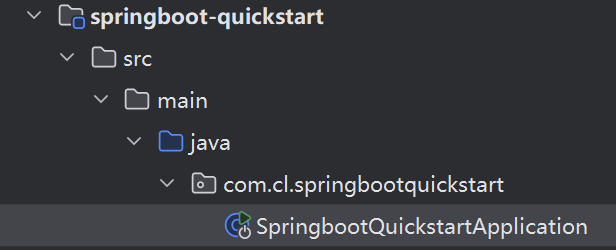
这个是启动类,要运行spring只要启动这个类就好了
resources里:
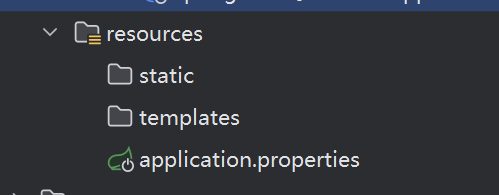
1
2
3static里存的是静态文件:如css这类的
templates存的是模板文件
第三个则是核心配置文件创建helloController
请求处理类一般叫Controller
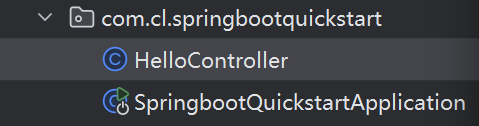
同时加上

入门程序
1
2
3
4
5
6
7
8@RestController//表示当前类是一个请求处理类
public class HelloController {
@RequestMapping("/hello")//表示网址
public String hello(String name){
System.out.println("name:"+name);
return "hello"+name+"~";
}
}
HTTP协议
请求协议
具有请求行 请求头 请求体
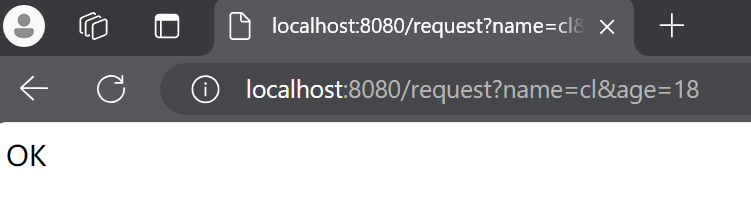
获取一下http协议的具体内容
1 | @RequestMapping("/request") |
效果:

响应协议
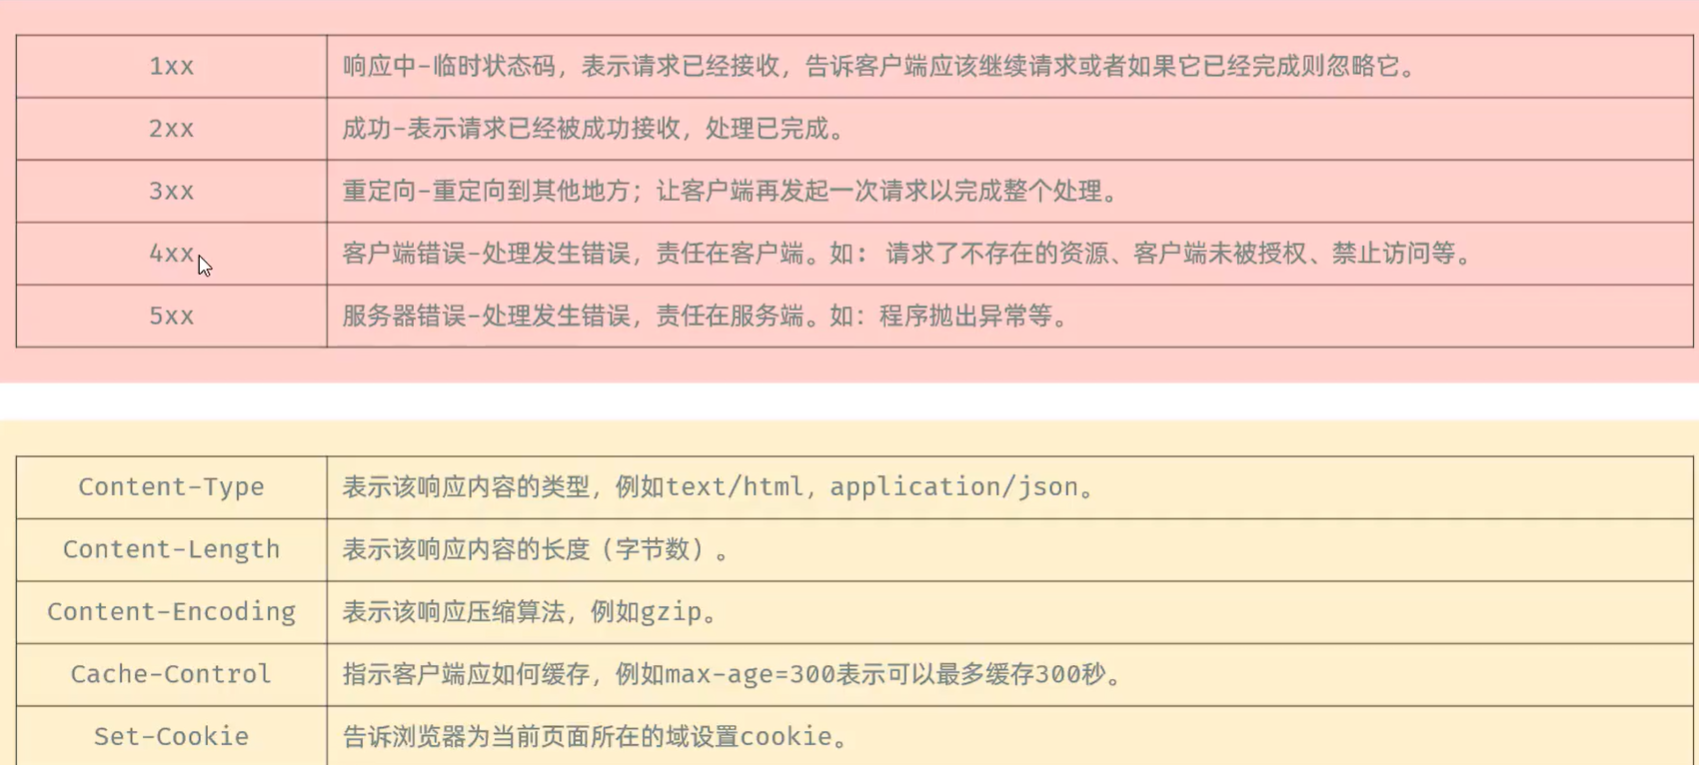
设置状态码 响应头 响应体:
1 | @RequestMapping("/response") |
或
1 | @RequestMapping("/response2") |
springboot实例
首先把写的前端代码放入resource中的static
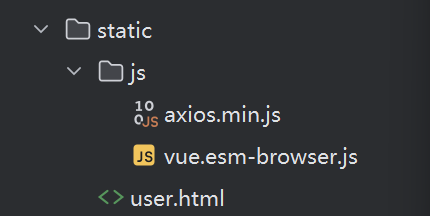
由user.txt我们要创建一个对象类,把数据在里面都有表示
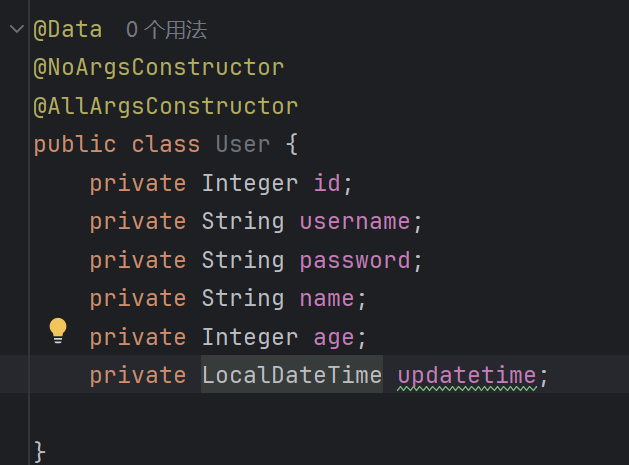
1
2
3@Data ---不需要每个进行get set
@No.... --- 无参构造
@All... --- 有参构造hutool:为了更好的解析txt里的文字
1
2
3
4
5<dependency>
<groupId>cn.hutool</groupId>
<artifactId>hutool-all</artifactId>
<version>5.8.27</version>
</dependency>
最终代码:
1 | @RestController |
报错可能是因为端口被占用
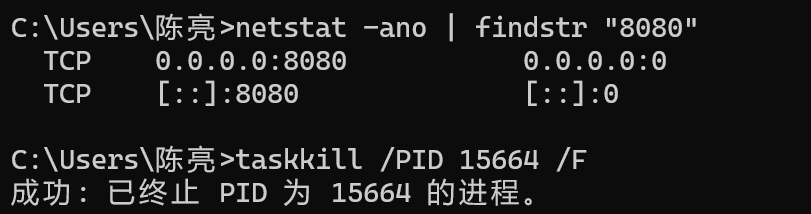
kill掉就好了
1 | netstat -ano | findstr "8080" |
1 | taskkill /PID 15664 /F |
三层架构改造实例
按照控制层,服务层,持久层规范创建
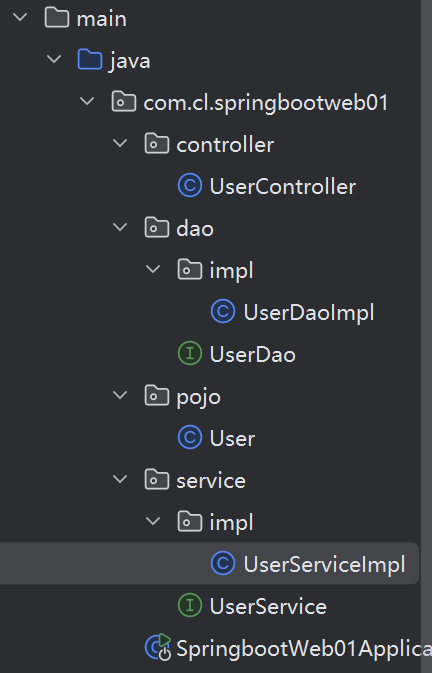
操作文件,操作数据库—->dao 持久层
业务逻辑—->服务层
接受请求,响应数据—–>控制层
举例控制层:
1 | private UserService userService=new UserServiceImpl(); //这个之后需要改 |
解耦
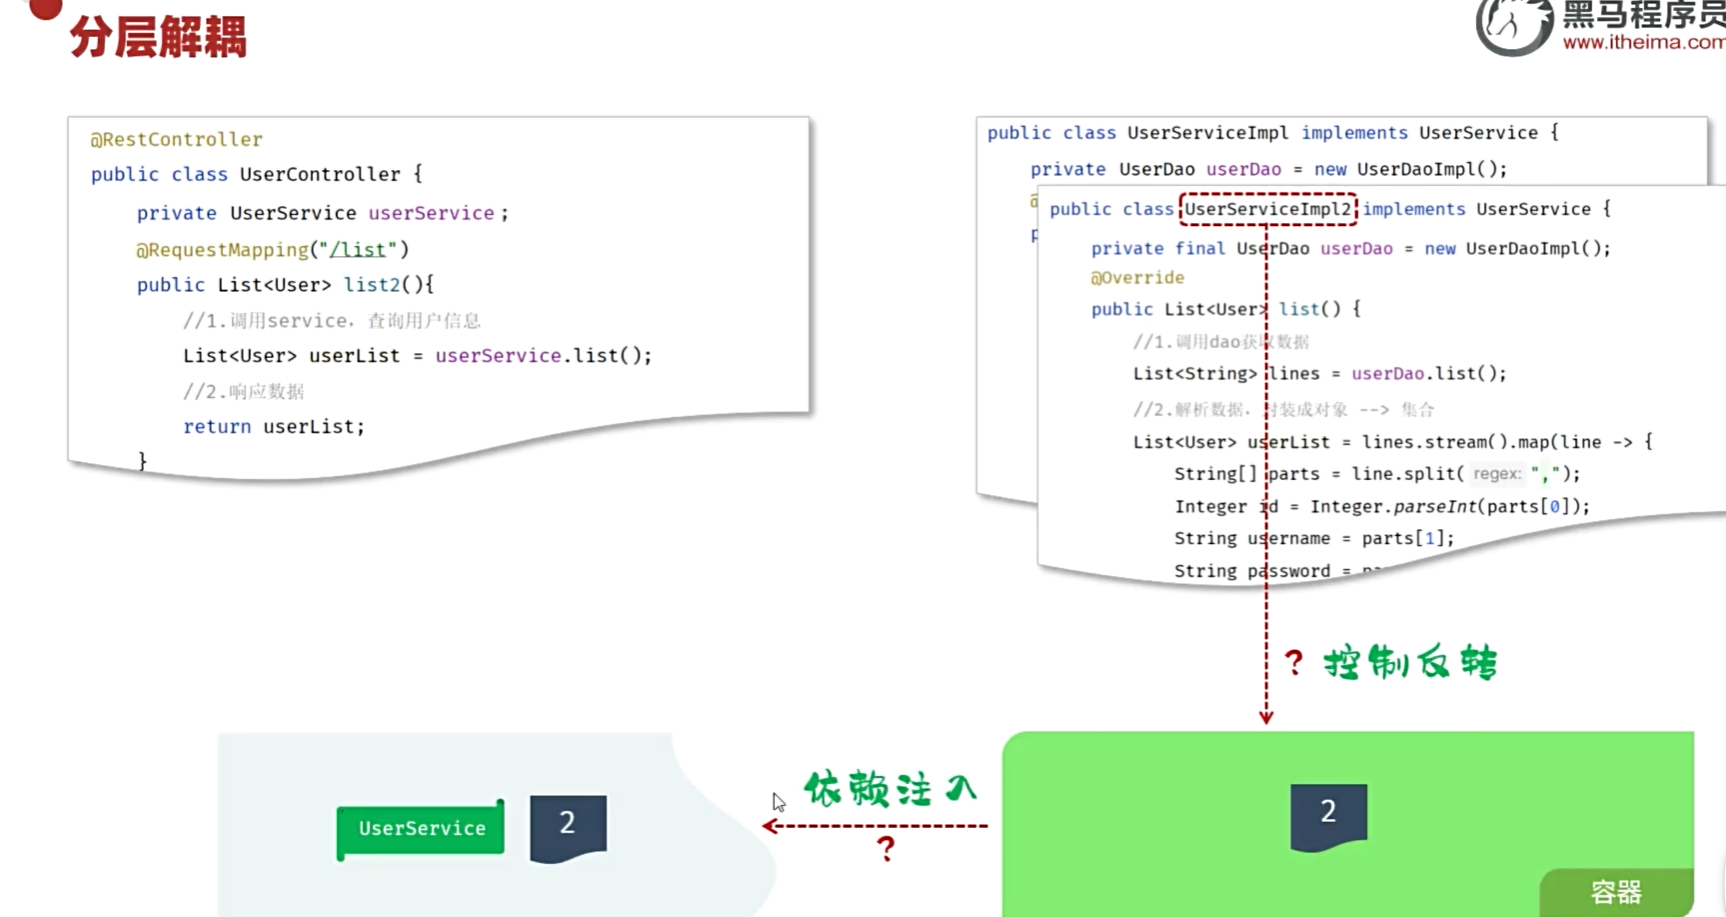
利用容器实现分层解耦

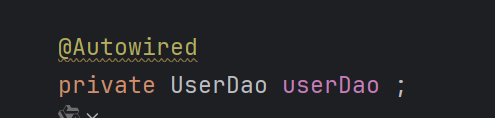
- @Component —> 交给IOC容器管理
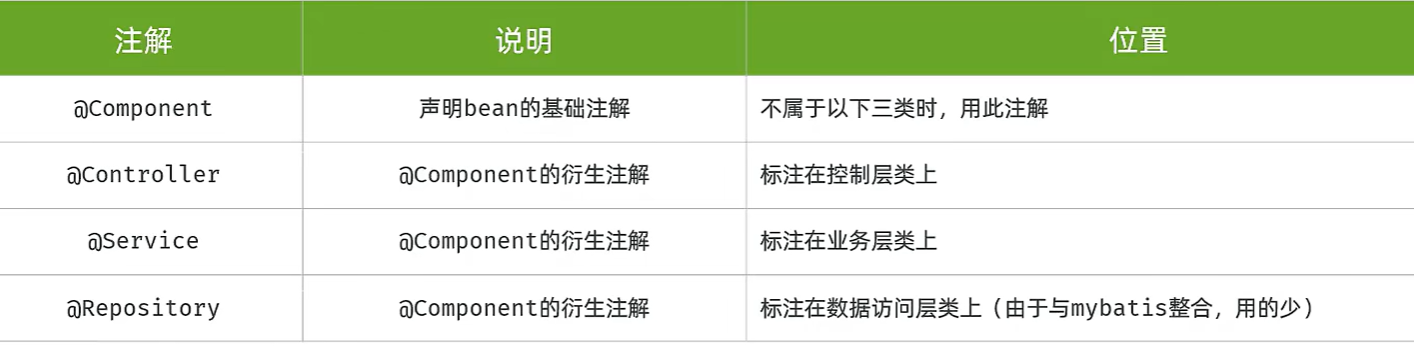
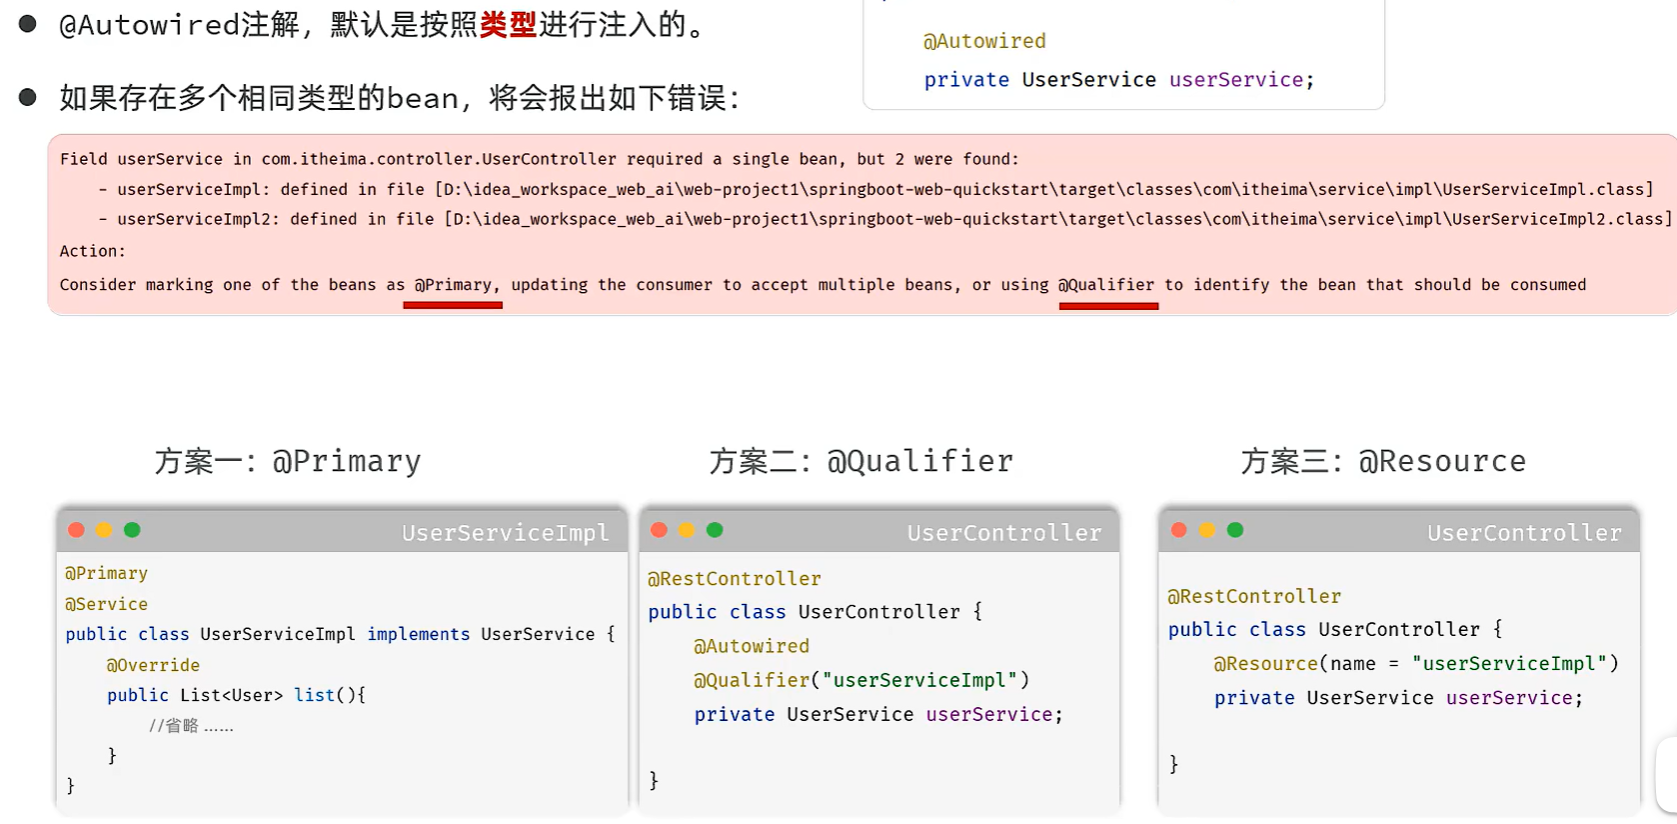
- @Autowired —> 自动从容器寻找赋值,自动查询该类型的bean对象并赋值
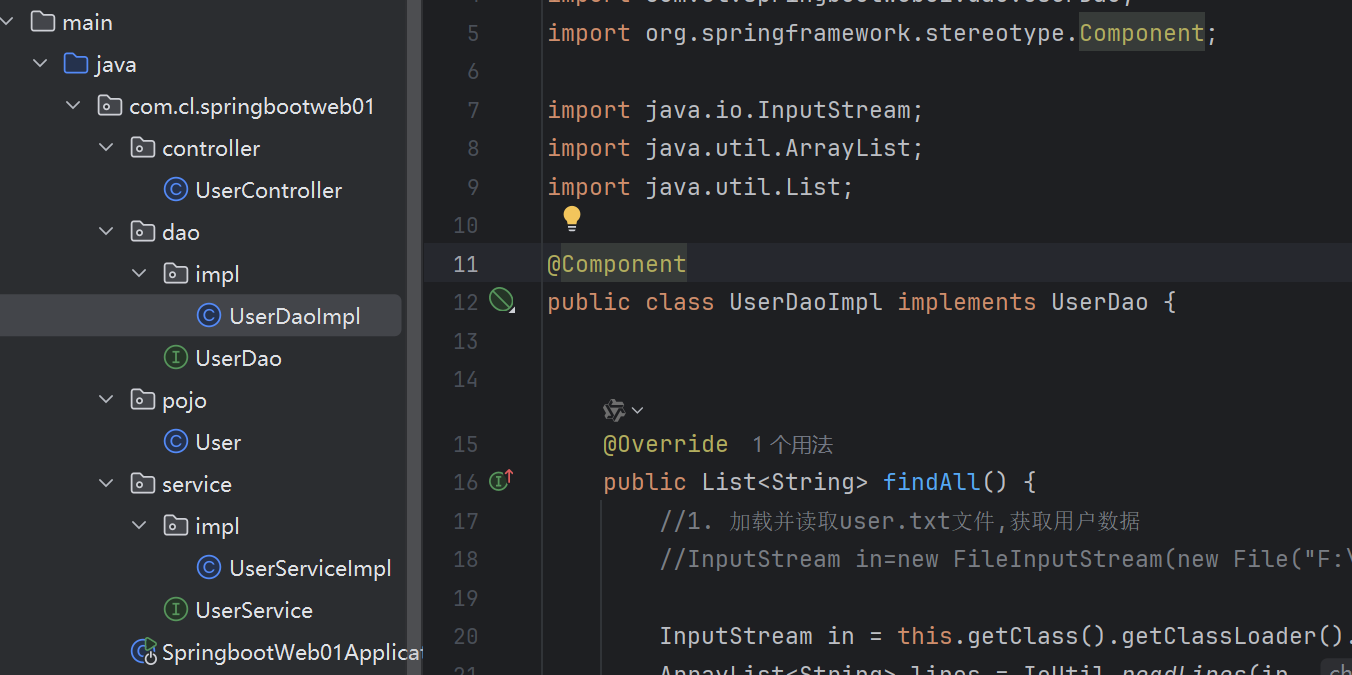
需要将dao层和service层交给IOC容器管理
再在需要的对象上加上@Autowired即可
MYSQL
以前学过,记点复习
char固定 varchar不固定
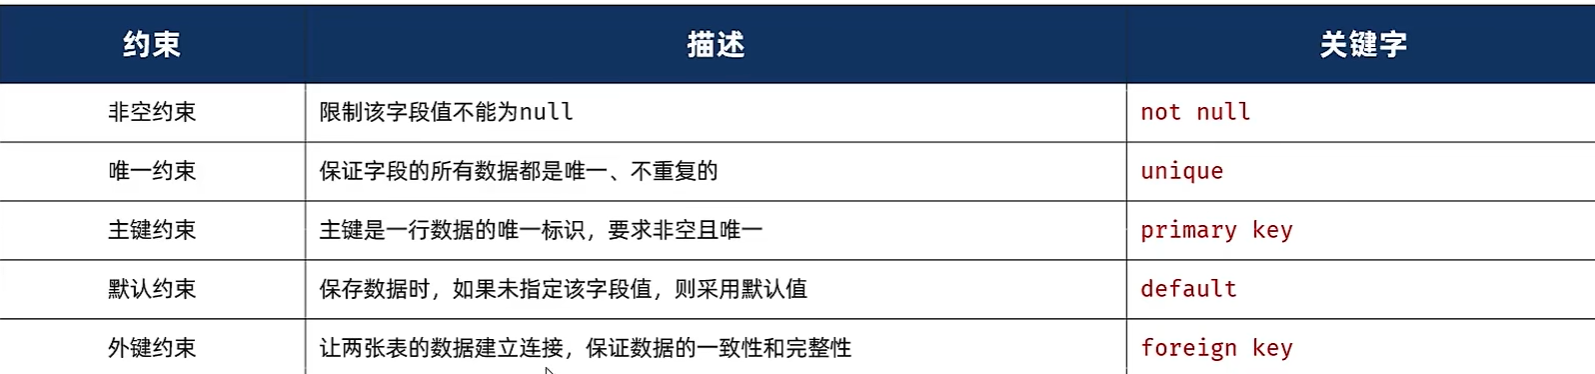
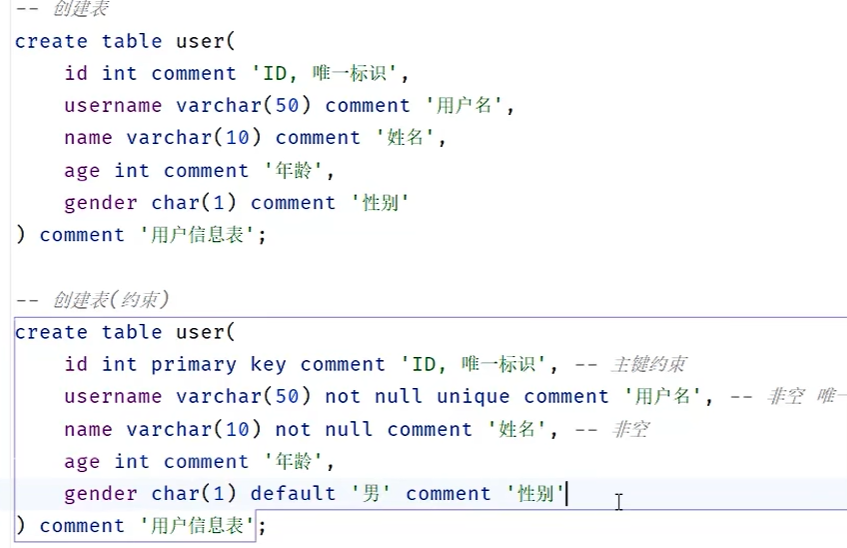
DDL
创建表
自增

1 | -- 自建一个表 |
查询修改删除表:
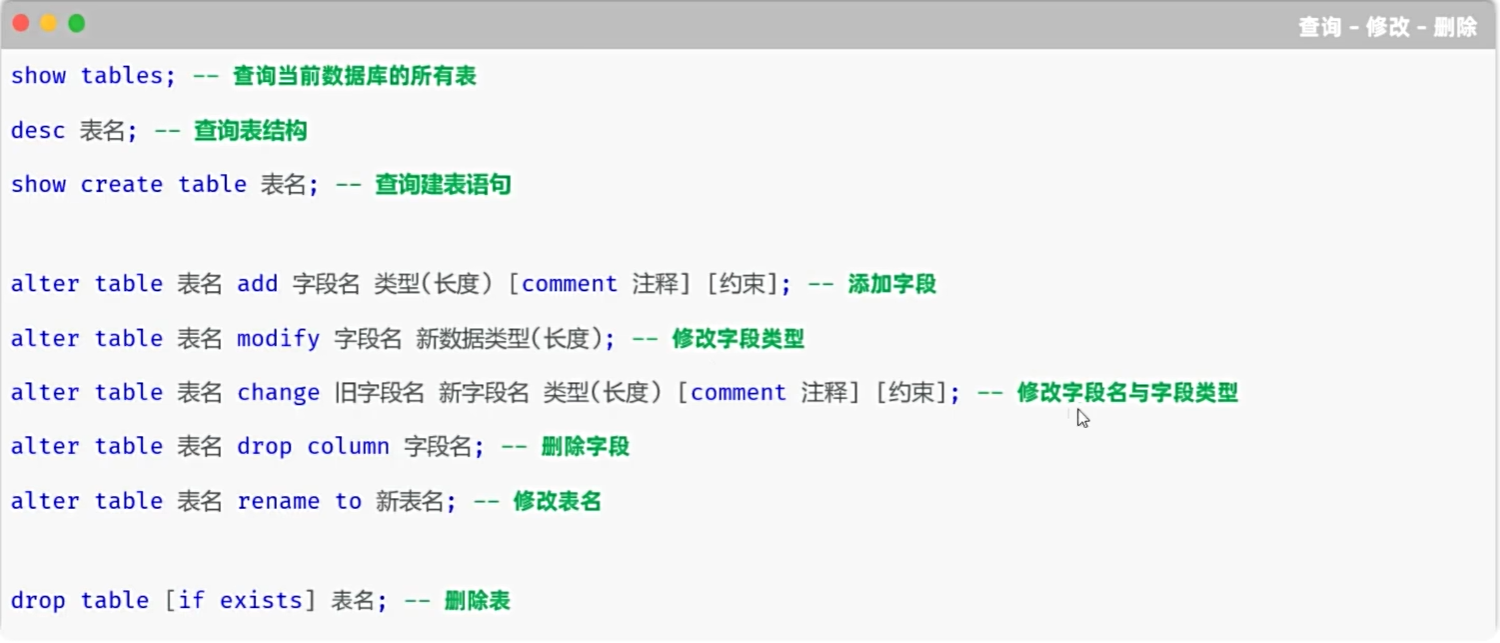
查看表
1 | -- 查询所有表 |
修改表
1 | -- 字段: 添加字段qq varchar(13) |
图形化更方便,基本用不到
DML
insert:
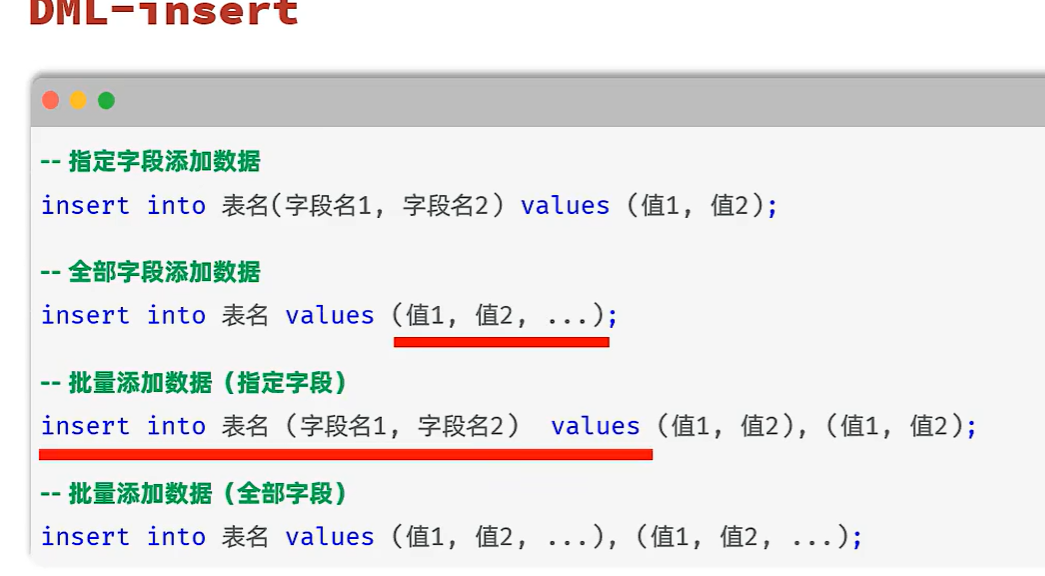
1 | -- DML : 数据操作语言 |
update

1 | -- DML : 更新数据 - update |
delete

1 | -- DML : 删除数据 - delete |
DQL
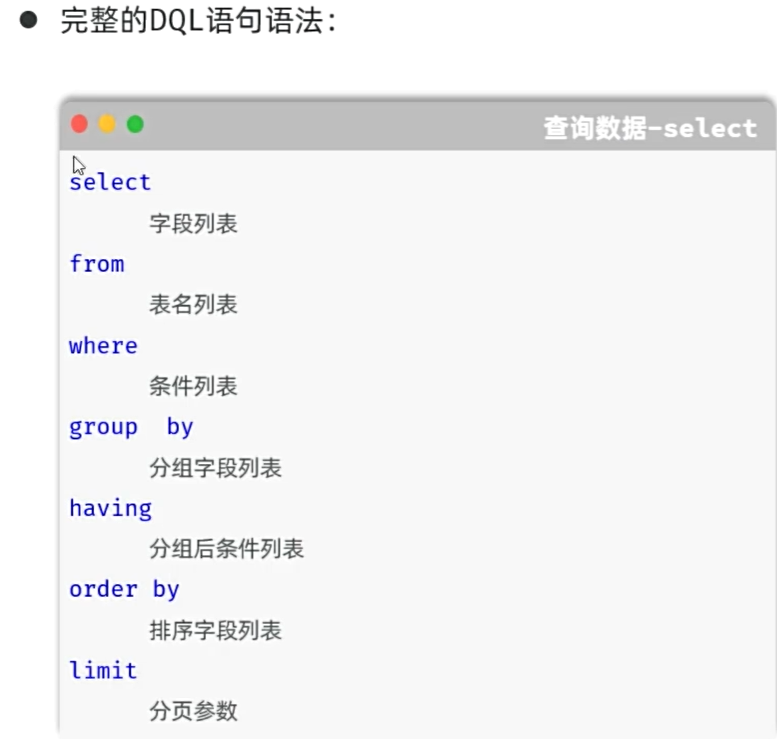
基本查询

1 | -- =================== DQL: 基本查询 ====================== |
条件查询

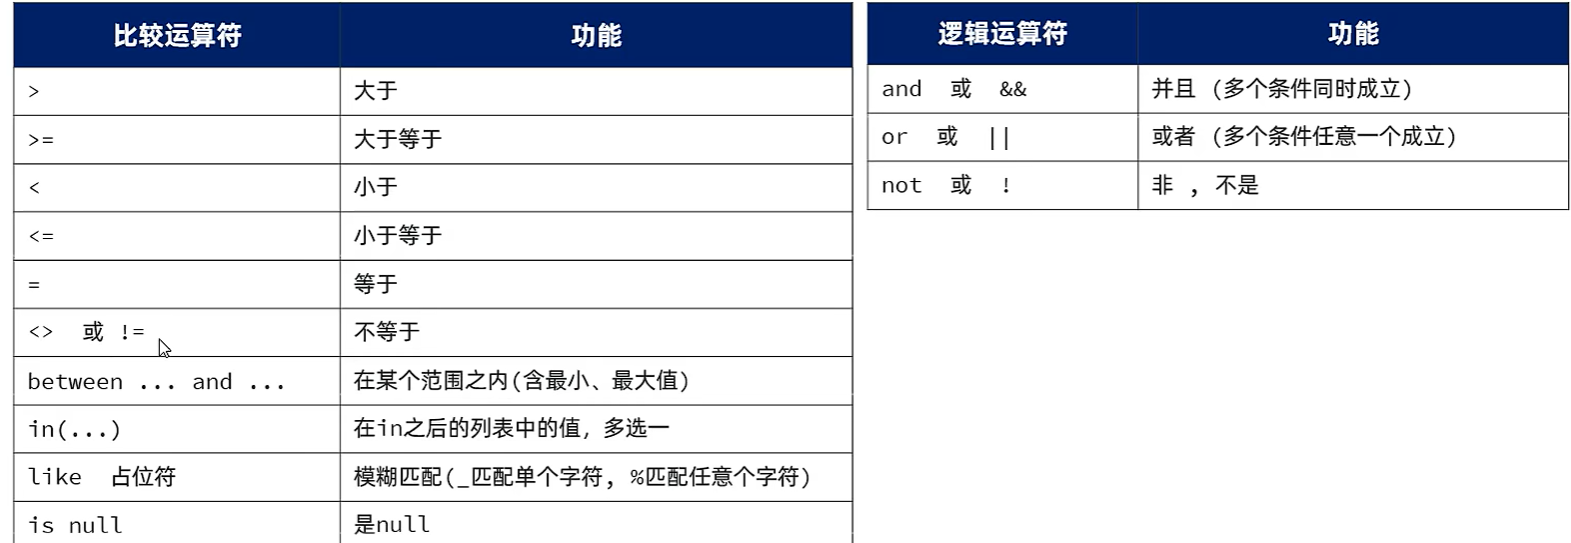
1 | -- =================== DQL: 条件查询 ====================== |
分组查询
聚合函数:

1 | -- =================== DQL: 分组查询 ====================== |
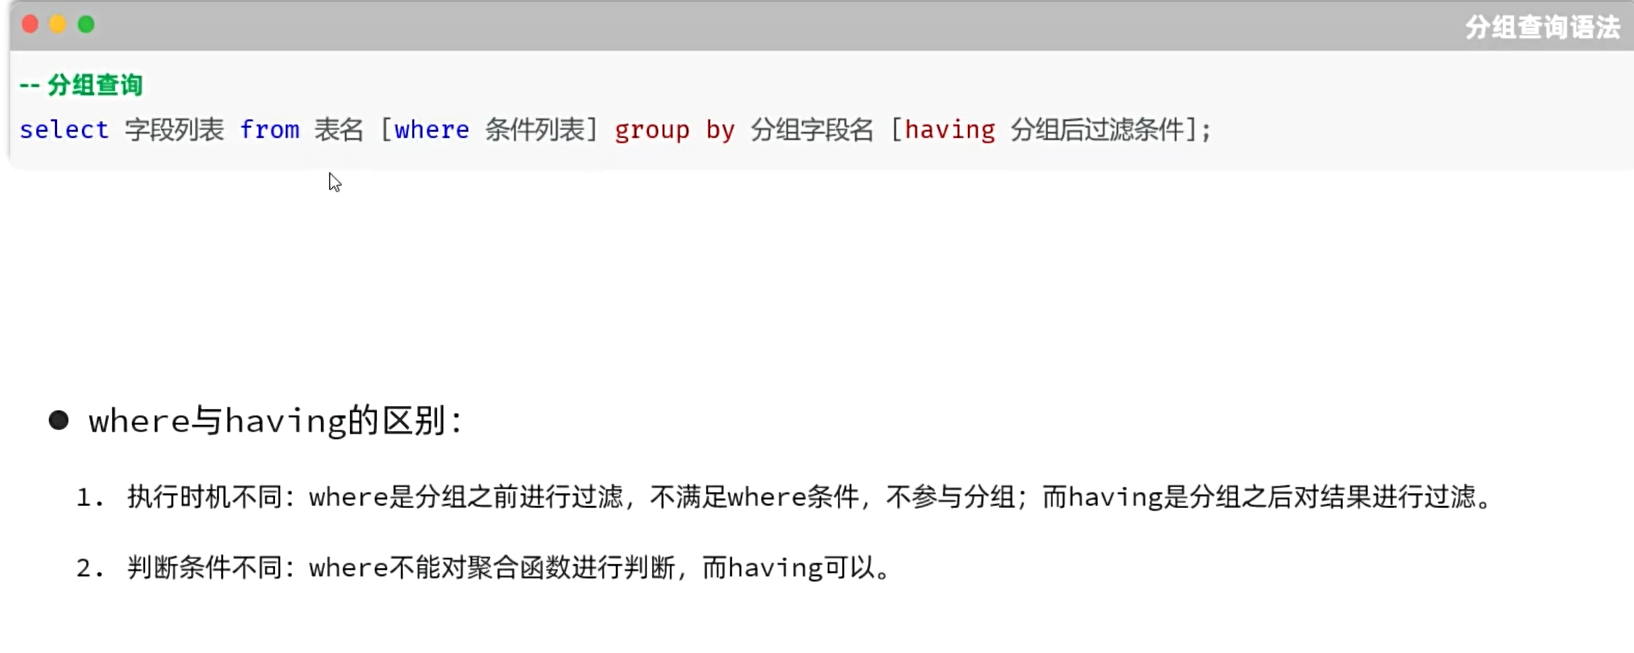
1 | -- 分组 |
排序查询 分页查询

1 | -- =================== 排序查询 ====================== |

1 | -- =================== 分页查询 ====================== |
Mybatis
入门程序

还是老样子,先创建工程,在SQL里勾选mabatis framework 以及 Mysql Driver
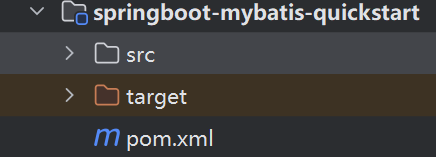
把多余的删除,留下src和pom
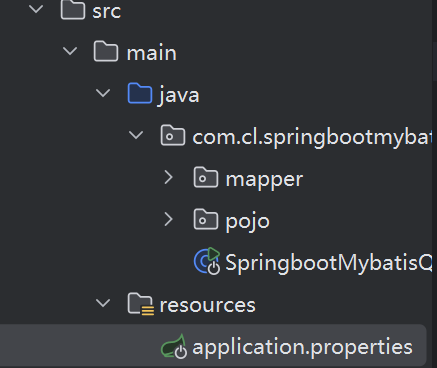
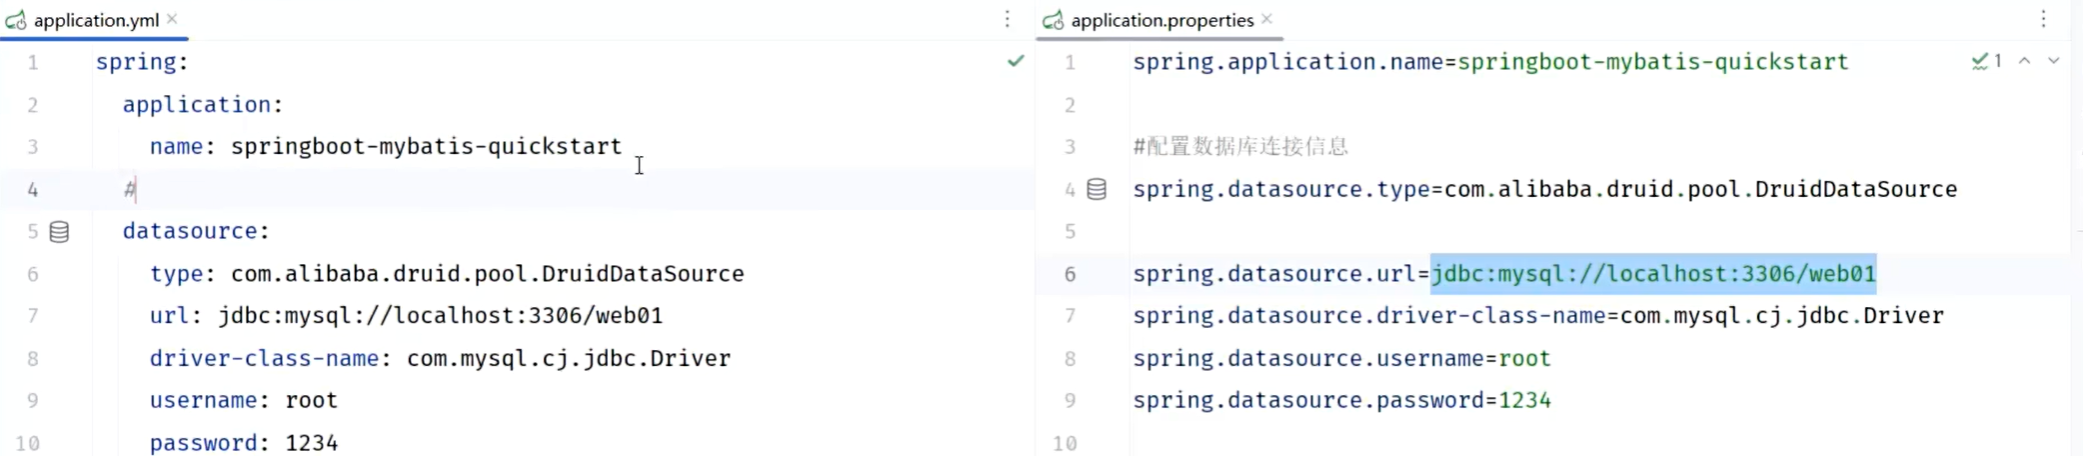
- 在application.properties里填写配置信息
1 | spring.application.name=springboot-mybatis-quickstart |
创建实体类包和Mapper包

最后在测试下编写单元测试代码
1
2
3
4
5
6
7
8
9
10
11
12@SpringBootTest // 单元测试
class SpringbootMybatisQuickstartApplicationTests {
@Autowired
private UserMapper userMapper;
@Test
public void testFindAll() {
List<User> userList = userMapper.findAll();
userList.forEach(System.out::println);
}
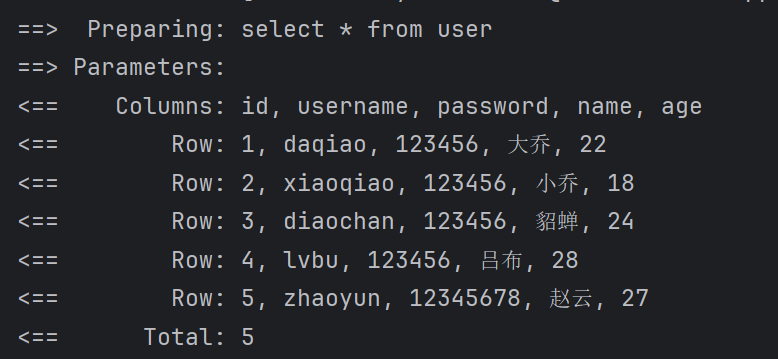
}最终测试

日志输出
1 | #配置mybatis的日志输出 |
增删改查
删除操作
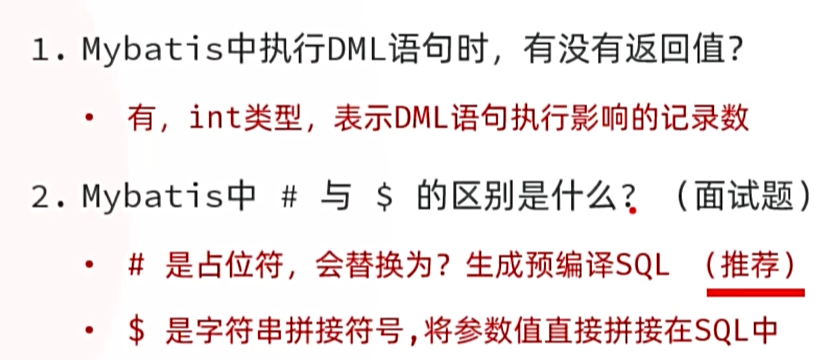
直接在mapper接口中写下, Mapper中#{} 是 参数占位符,用于安全地插入动态参数到 SQL 语句中。
1 | /** |
测试:
1 | @Test |
增加操作
要求:

mapper:
1 | /** |
test:
1 | @Test |
修改操作
要求:

mapper:
1 | /** |
test:
1 | @Test |
查询操作

注:
1 | 当有多个参数要传递时,#{}分不清谁是谁,需要@Param("username")像这样在参数前面加上注解,不加也行,sprintboot有插件 |
mapper:
1 | /** |
test:
1 | @Test |
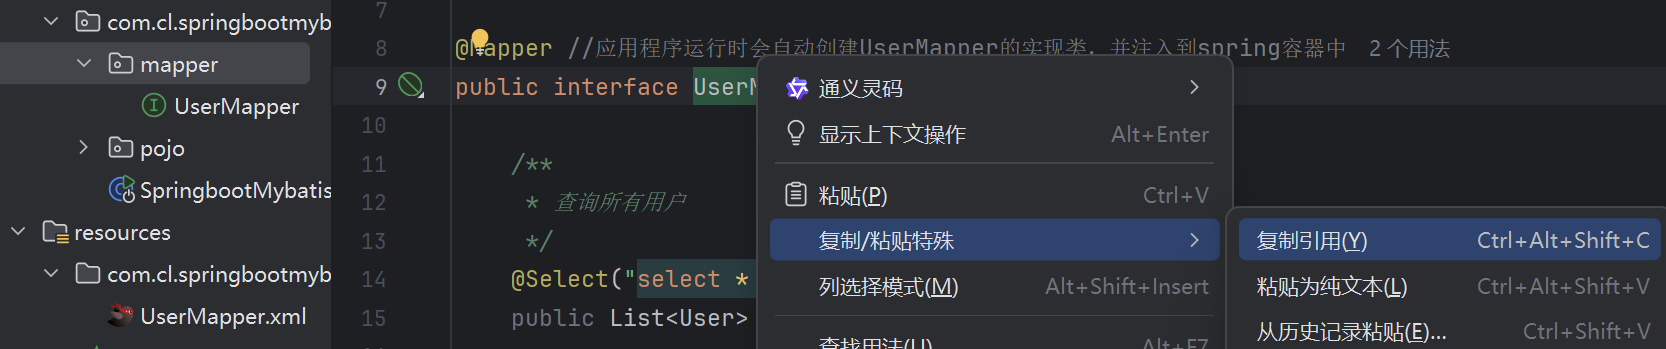
XML映射配置
规则:
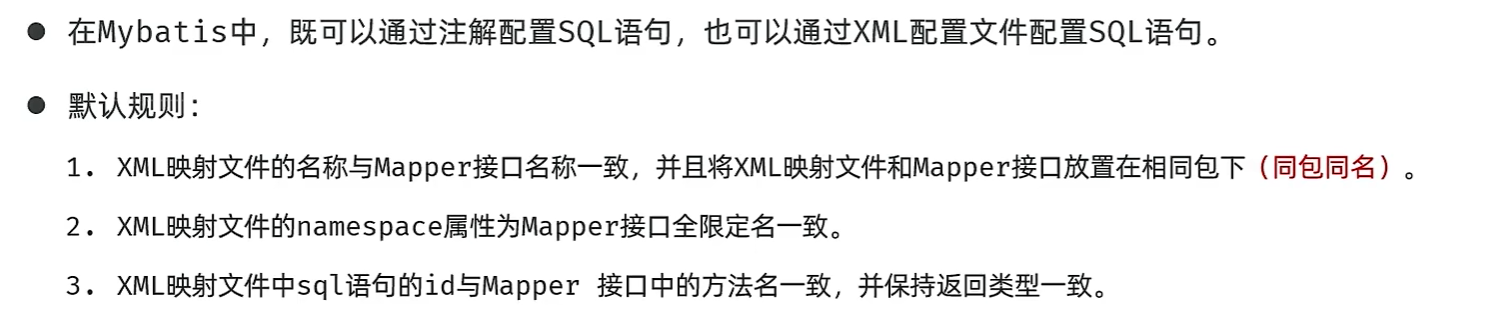
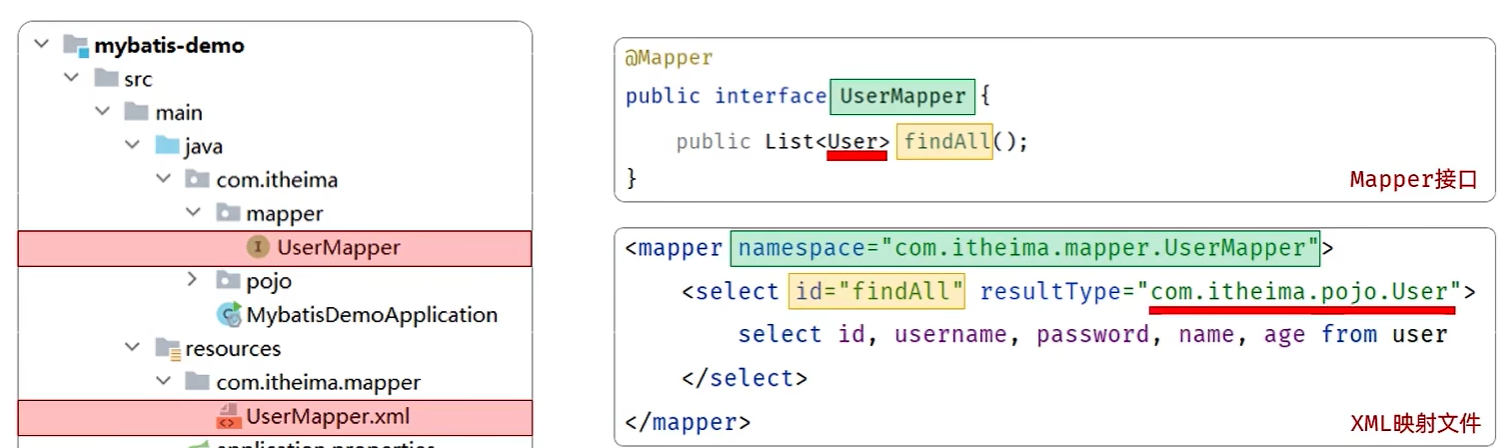
第一步:同包同名(mapper也要)
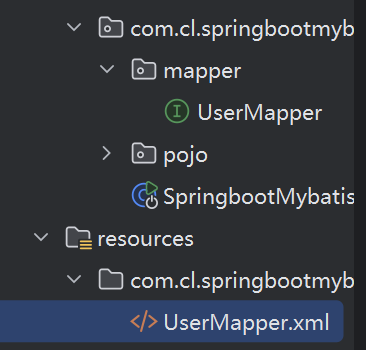
或者指定位置,利用辅助配置

第二步:初始配置
1
2
3
4
5
6
7
8<?xml version="1.0" encoding="UTF-8" ?>
<!DOCTYPE mapper PUBLIC "-//mybatis.org//DTD Mapper 3.0//EN"
"http://mybatis.org/dtd/mybatis-3-mapper.dtd" >
<mapper namespace="">
</mapper>namespace里填写:
UserMapper接口的路径
第三步:快速使用
在里面 id和方法名一致 resultType是返回的一条记录
1
2
3
4
5
6
7
8
9
10
11<?xml version="1.0" encoding="UTF-8" ?>
<!DOCTYPE mapper PUBLIC "-//mybatis.org//DTD Mapper 3.0//EN"
"http://mybatis.org/dtd/mybatis-3-mapper.dtd" >
<mapper namespace="com.cl.springbootmybatisquickstart.mapper.UserMapper">
<select id="findAll" resultType="com.cl.springbootmybatisquickstart.pojo.User">
select * from user
</select>
</mapper>
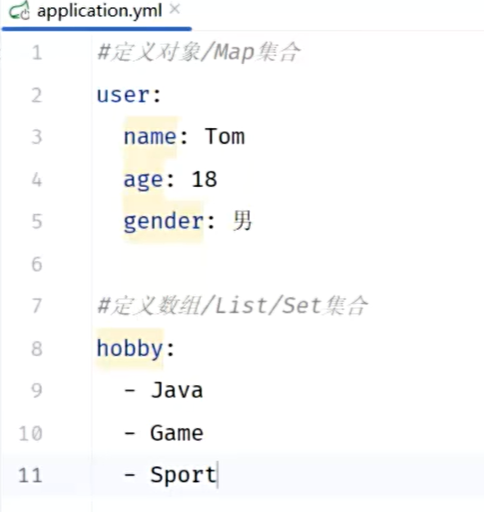
Springboot项目配置文件
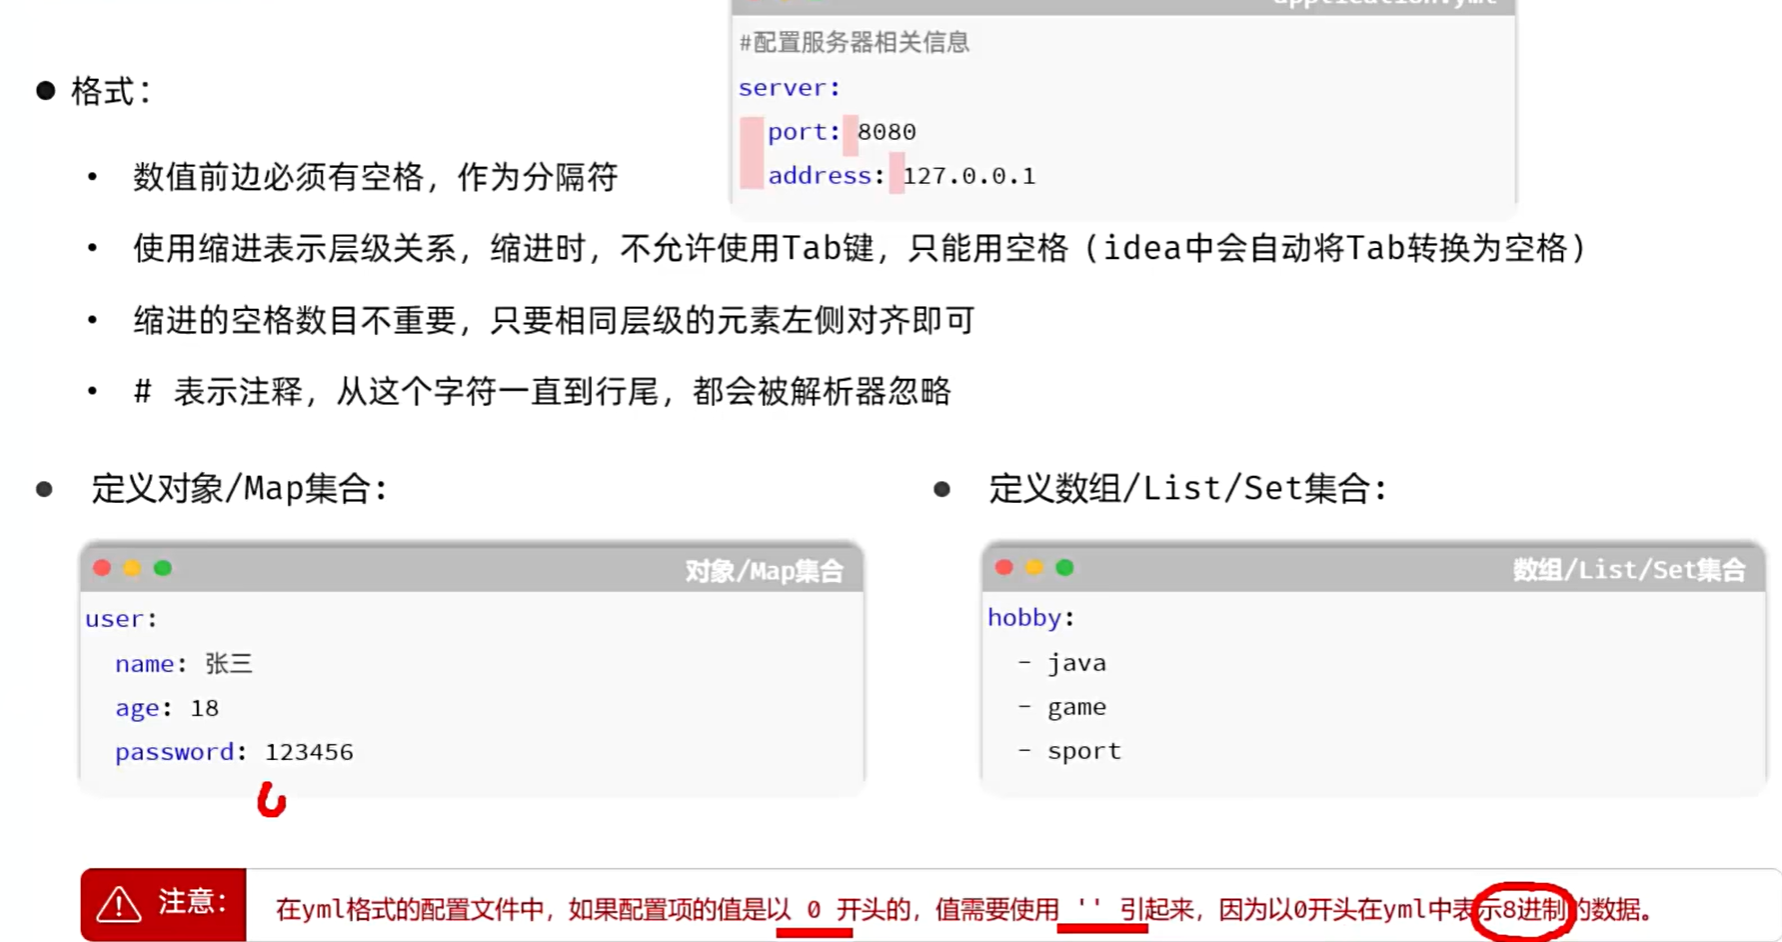
yml中定义常见类型:
用yml代替properties
案例实战
Restful
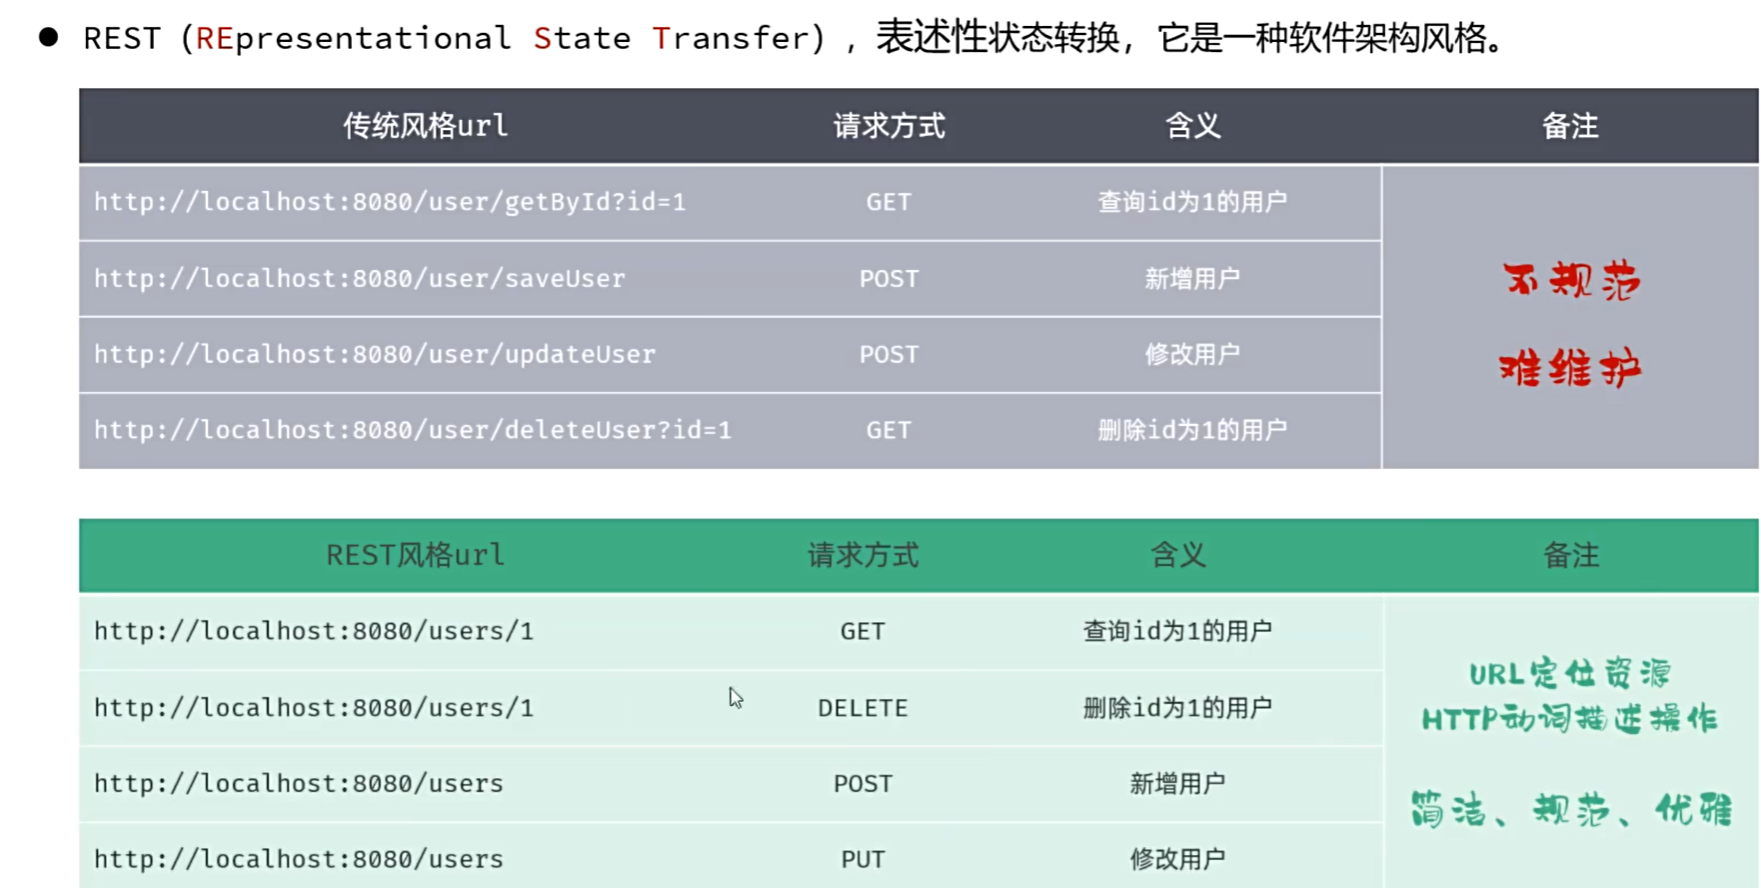
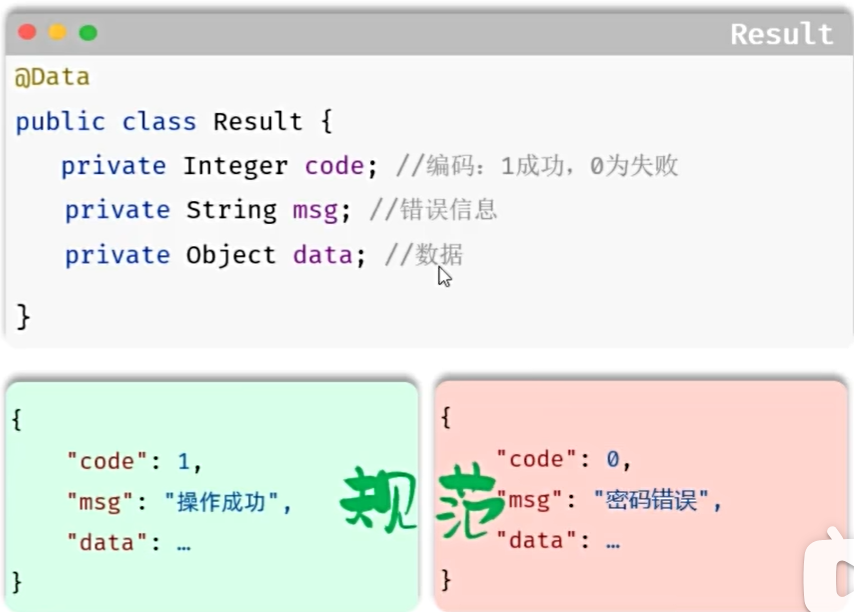
Result
配置
首先创建项目:
勾选
1
2
3
4lombok
spring web
mybatis framework
mysql driver创建数据库
1
2
3
4
5
6
7
8
9
10
11
12
13CREATE TABLE dept (
id int unsigned PRIMARY KEY AUTO_INCREMENT COMMENT 'ID, 主键',
name varchar(10) NOT NULL UNIQUE COMMENT '部门名称',
create_time datetime DEFAULT NULL COMMENT '创建时间',
update_time datetime DEFAULT NULL COMMENT '修改时间'
) COMMENT '部门表';
INSERT INTO dept VALUES (1,'学工部','2024-09-25 09:47:40','2024-09-25 09:47:40'),
(2,'教研部','2024-09-25 09:47:40','2024-09-09 15:17:04'),
(3,'咨询部','2024-09-25 09:47:40','2024-09-30 21:26:24'),
(4,'就业部','2024-09-25 09:47:40','2024-09-25 09:47:40'),
(5,'人事部','2024-09-25 09:47:40','2024-09-25 09:47:40'),
(6,'行政部','2024-11-30 20:56:37','2024-09-30 20:56:37');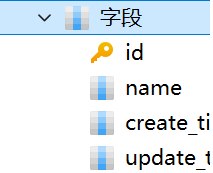
- 表当中四个字段相当于实体类中四个属性
配置idea

创建三层架构的包以及实体类的包,配置application.yml
1
2
3
4
5
6
7
8
9
10
11
12
13
14spring:
application:
name: tlias-web-management
# 数据库连接信息(注意缩进对齐到spring层级)
datasource:
url: jdbc:mysql://localhost:3306/tlias
driver-class-name: com.mysql.cj.jdbc.Driver
username: root
password: 123456
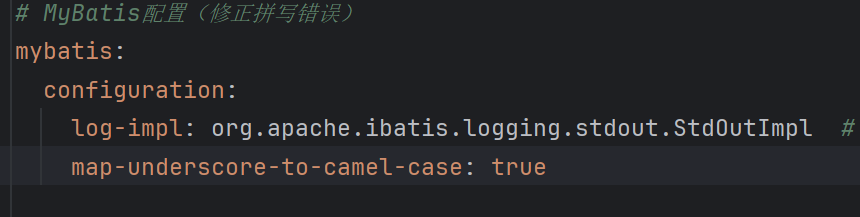
# MyBatis配置
mybatis:
configuration:
log-impl: org.apache.ibatis.logging.stdout.StdOutImpl # 注意是短横线 `Mapper层
定义一个接口,用来实现和数据库的**”交流”**
Service层:

用来实现业务逻辑,定义接口是为了避免更改,只要把impl修改即可impl中需要加上**@Service**,被标注的类,在应用启动时会被Spring扫描到,并由IOC容器自动创建其对象(即Bean),并管理它的生命周期(如依赖注入、初始化、销毁等)。通过@Autowired,容器会自动解决这些依赖关系。
Controller层:

用来实现和页面的**”交流”**
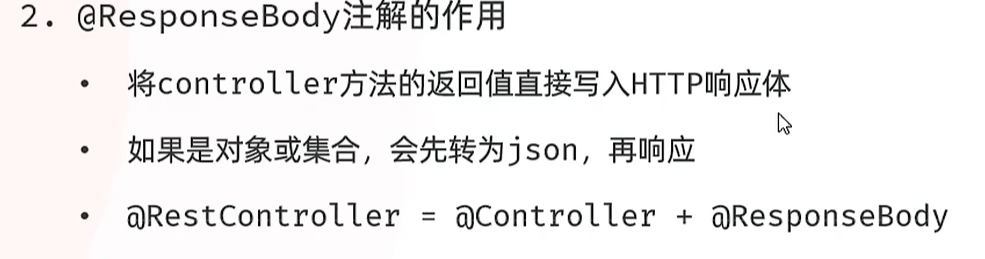
1
@RestController:自动将返回值转为json
部门管理
部门管理
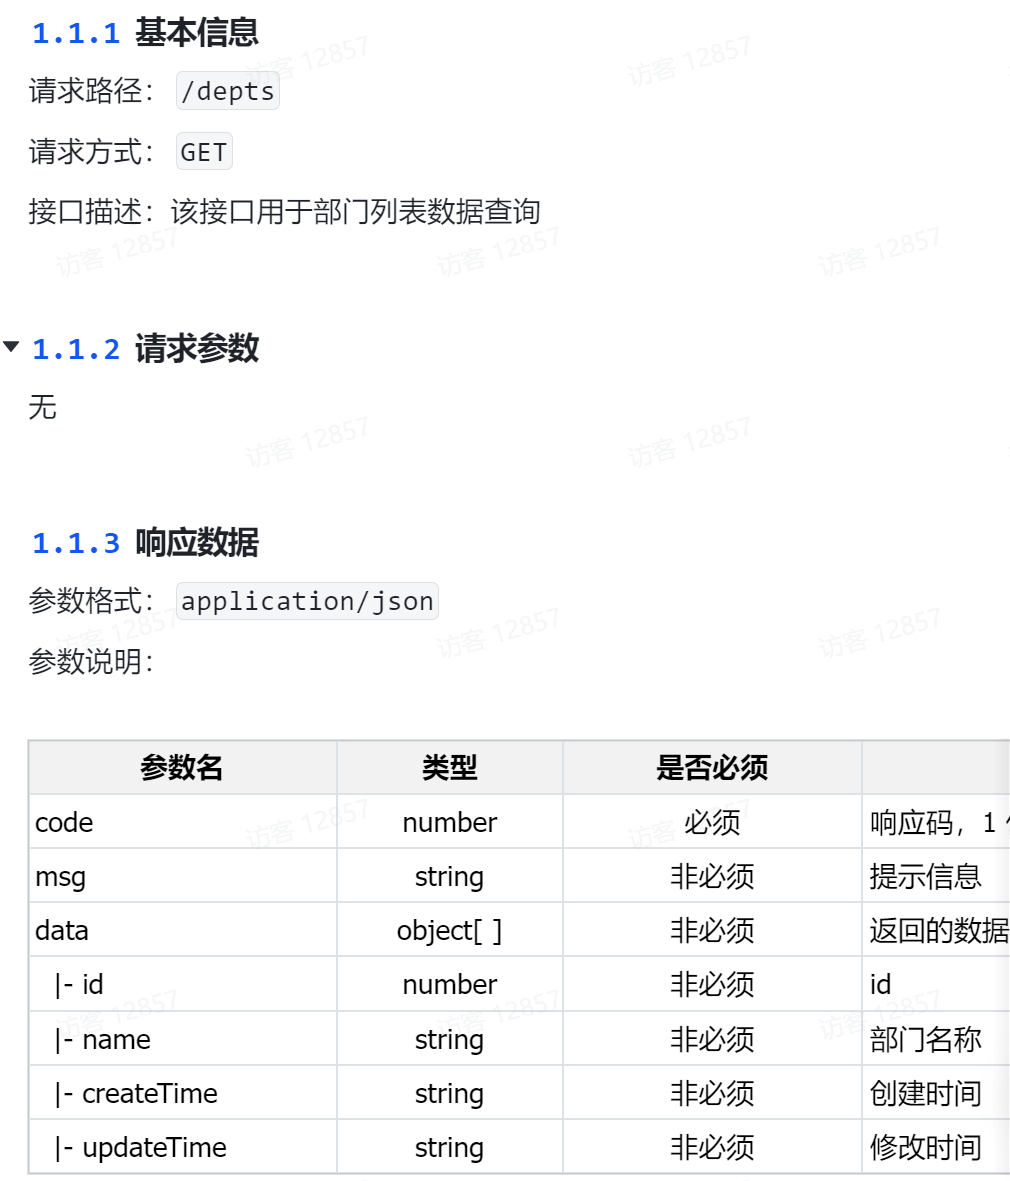
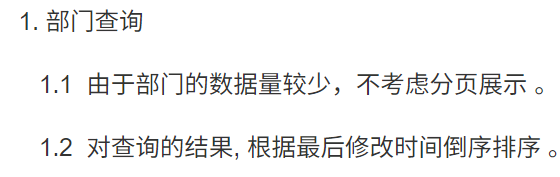
1.1 部门列表查询
看需求
先查看接口文档以及需求说明:
在数据库中先编写sql语句,按修改时间降序排列:
1 | SELECT * FROM dept ORDER BY update_time desc; |
项目中将*改成具体的内容
1 | SELECT id,name,create_time,update_time FROM dept ORDER BY update_time desc; |
之后开始进行idea的代码实现,按照上面三层架构以及解耦,需要在controller层中调用service层,在service层中调用mapper层来实现
看pojo中的result
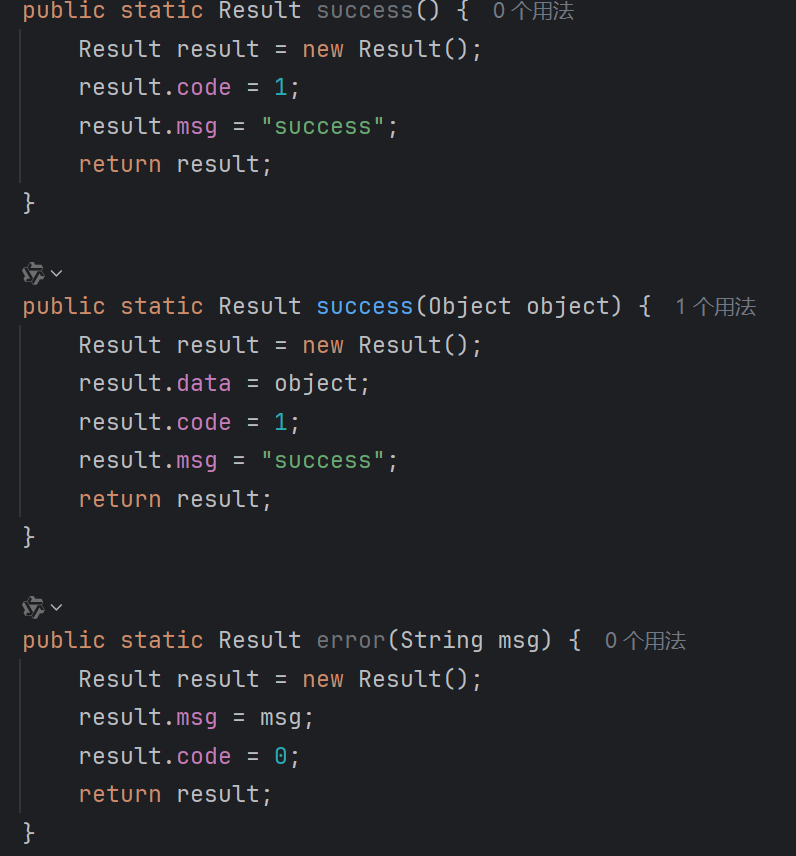
一共有三种返回类型,成功无返回,成功有返回和失败,这个查询显然要有返回,也就要带上返回值
代码
控制层代码:
1 | @RestController |
服务层代码:
1 | @Service |
持久层代码:
1 | @Mapper |
在apifox中的快捷请求中测试
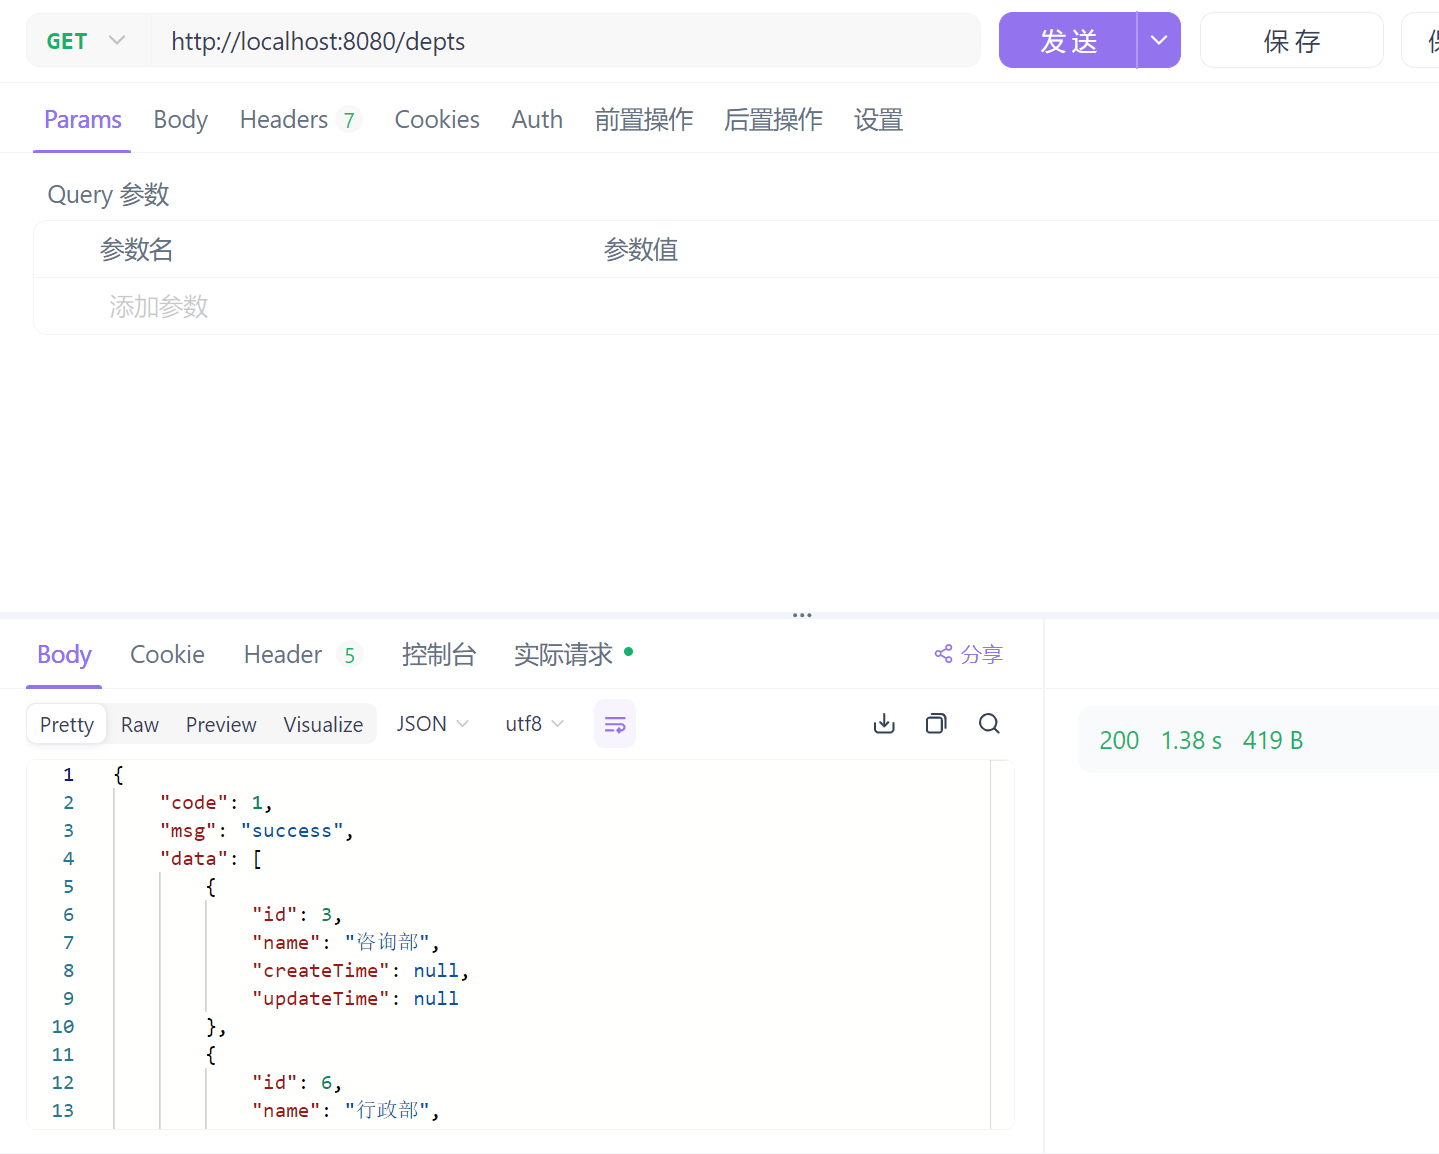
成功实现
查询优化
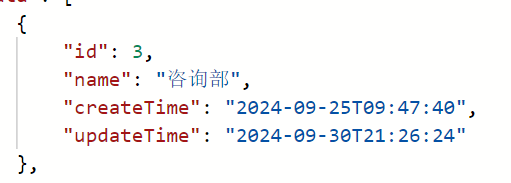
在上面我们的createTime 和 updateTime并没有成功封装,
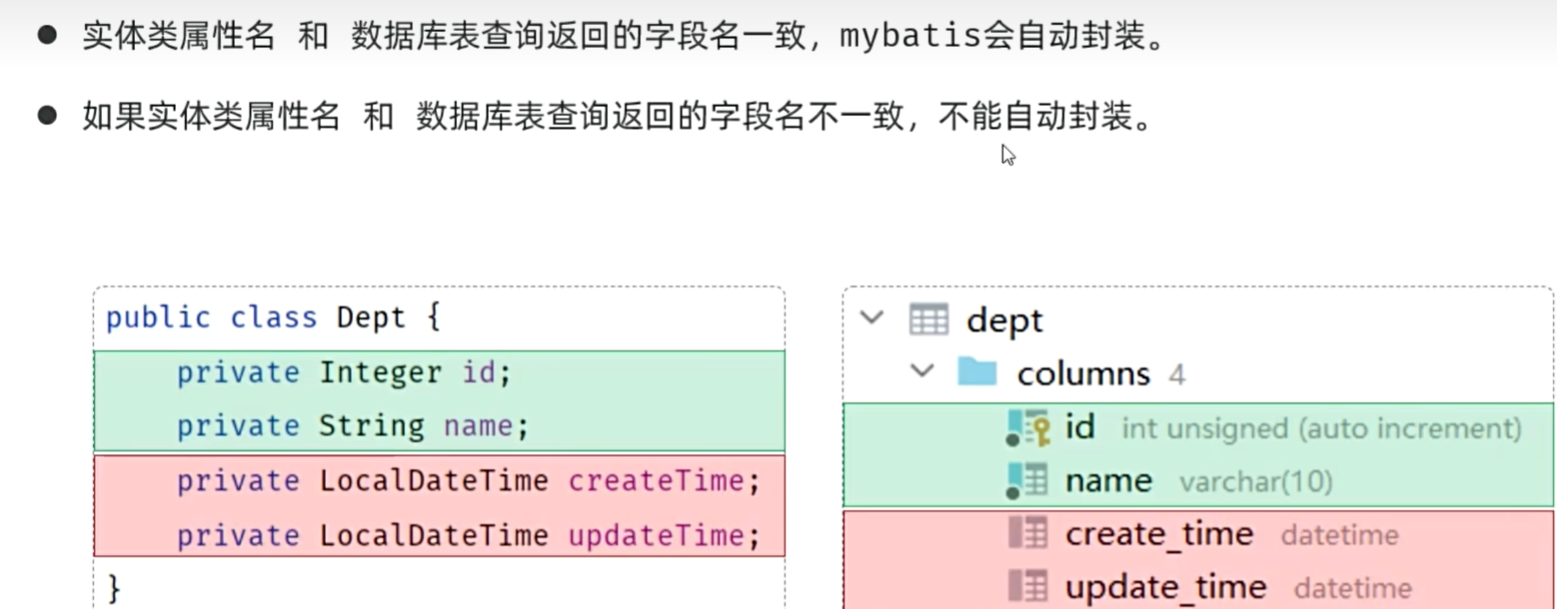
接下来优化一下
第一种方案:
手动结果映射:通过@Results及@Result进行手动结果映射
打开Mapper接口
1 | @Mapper |
成功查询
第二种方案:

第三种方案:
开启驼峰命名
1.2 部门删除
从url中获取数据
通过需求我们需要从url中获取数据:
- @PathVariable
1 | @DeleteMapping("/depts/{id}") |
这样子我们的路径就要写成:
1 | http://localhost:8080/depts/1 |
@RequestParam如果前端传来的参数名与变量名相同,可以省略@RequestParam
1
2
3
4
5@DeleteMapping("/depts")
public Result deleteById(@RequestParam("id") Integer id){
System.out.println("根据ID删除部门: "+id);
return Result.success();
}这样子的路径必须为
1
http://localhost:8080/depts?id=1
代码
控制层:
1 | @DeleteMapping("/depts") |
服务层:
1 | @Override |
持久层:
1 | @Delete("delete from dept where id = #{id}") |
1.3 新增部门
注:@RequestBody
1 | 将一个json格式的请求参数直接封装在一个对象中 |
代码:
控制层
1 | @PostMapping("/depts") |
服务层
1 | @Override |
持久层
1 | @Insert("insert into dept(name,create_time,update_time) values(#{name},#{createTime},#{updateTime}) ") |
1.4 修改部门
查询回显
为了能点击修改时显示当前名字便于更改
控制层
1 | @GetMapping("/depts/{id}") |
服务层
1 | @Override |
持久层
1 | @Select("SELECT id,name,create_time,update_time FROM dept where id=#{id}") |
修改数据
还是先写sql语句:
1 | update dept set name='',update_time='' where id=#{id} |
注意!:
1 | @RequestBody 只能用于单个参数,不能拆分到多个参数 |
因此我们就不能收两个参数name和id,需要封装成一个DTO,这里属性较少就不封装了,直接用dept传输
代码:
1 | @PutMapping("/depts") |
1 | @Override |
1 | @Update("update dept set name=#{name},update_time=#{updateTime} where id=#{id}") |
RequestMapping
可以在类开头加上
1 | @RequestMapping("/depts") |
后面的get put post等就有了公共的路径,只要加上自己需要的就行了
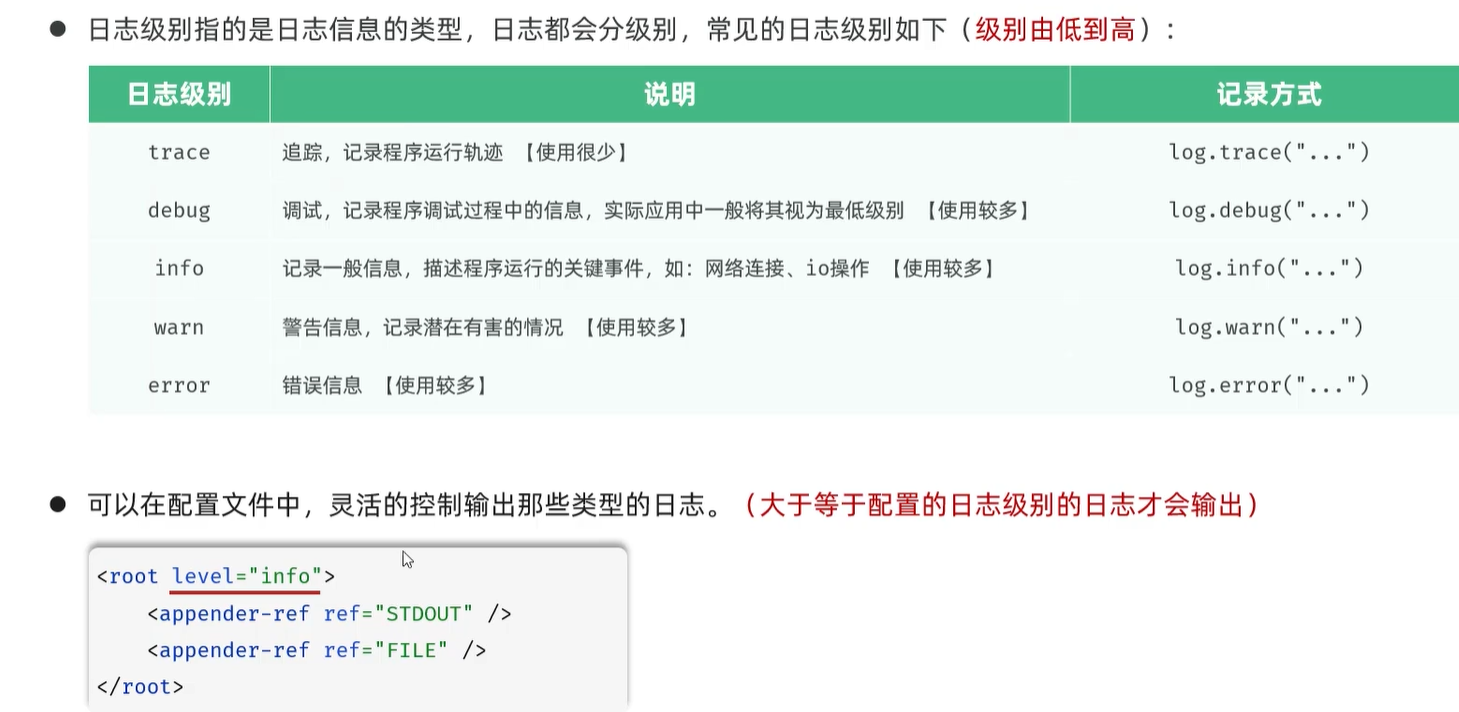
日志技术
System.out.println:

logback快速入门

logback.xml:固定格式,直接复制
1 | <?xml version="1.0" encoding="UTF-8"?> |
定义日志记录对象
1 | private static final Logger log = LoggerFactory.getLogger(类名.class); |
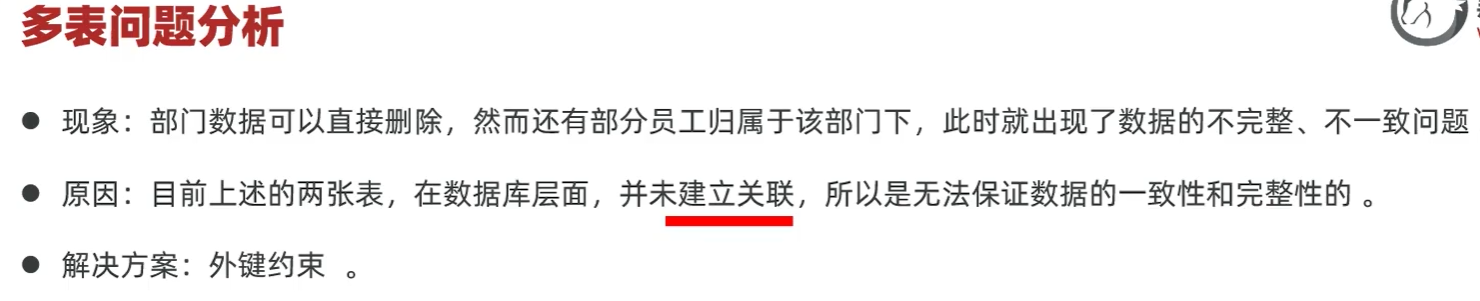
多表关系
多对一
在数据库中,例如部门和员工的关系,一个部门可以有多个员工,一个员工只在一个部门,我们可以通过在多的一方,也就是员工的数据库,加上一个dept_id,对应上部门的id,这样就可以用这个id来判断在哪个部门

问题:
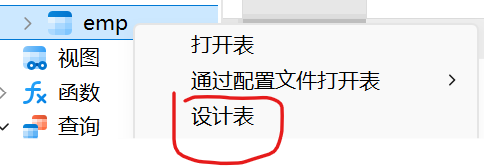
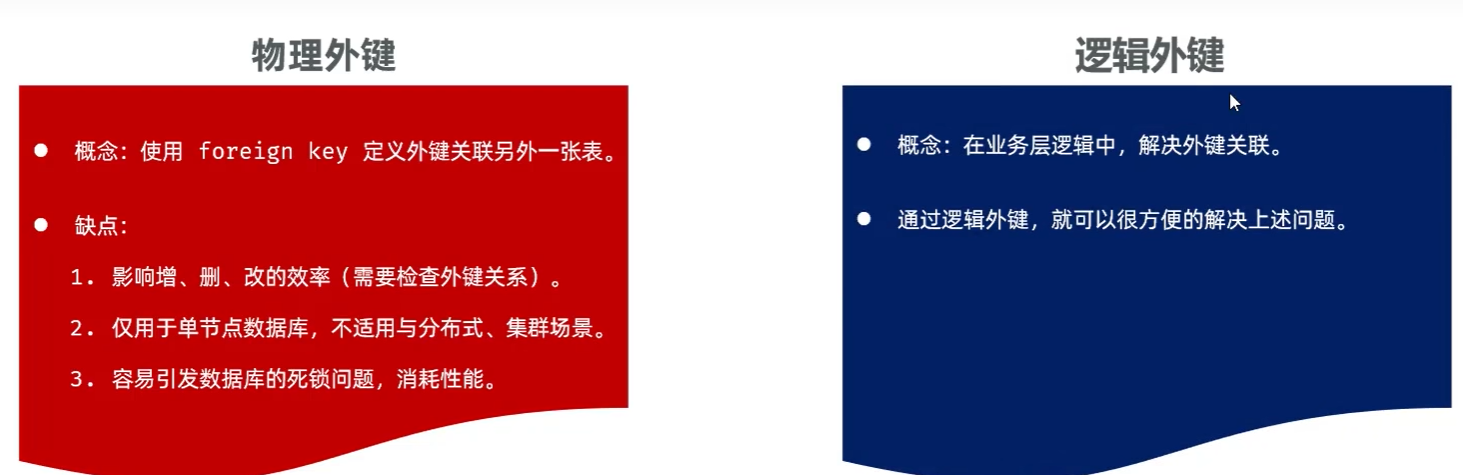
创建表时添加外键约束
1
2
3
4
5create table 表名(
字段名 数据类型,
...
[constraint] [外键名称] foreign key (外键字段名) references 主表 (字段名)
)创建表后添加外键约束
1
alter table 表名 add constraint 外键名称 foreign key (外键字段名) references 主表 (字段名);
eg:
先创建表
1
2
3
4
5
6
7
8
9
10
11
12
13
14
15
16
17
18
19
20
21
22
23
24
25
26
27
28
29
30
31
32
33CREATE TABLE dept (
id int unsigned PRIMARY KEY AUTO_INCREMENT COMMENT 'ID, 主键',
name varchar(10) NOT NULL UNIQUE COMMENT '部门名称',
create_time datetime DEFAULT NULL COMMENT '创建时间',
update_time datetime DEFAULT NULL COMMENT '修改时间'
) COMMENT '部门表';
INSERT INTO dept VALUES (1,'学工部','2023-09-25 09:47:40','2023-09-25 09:47:40'),
(2,'教研部','2023-09-25 09:47:40','2023-10-09 15:17:04'),
(3,'咨询部','2023-09-25 09:47:40','2023-11-30 21:26:24'),
(4,'就业部','2023-09-25 09:47:40','2023-09-25 09:47:40'),
(5,'人事部','2023-09-25 09:47:40','2023-09-25 09:47:40'),
(15,'行政部','2023-11-30 20:56:37','2023-11-30 20:56:37');
create table emp(
id int unsigned primary key auto_increment comment 'ID,主键',
username varchar(20) not null unique comment '用户名',
password varchar(32) default '123456' comment '密码',
name varchar(10) not null comment '姓名',
gender tinyint unsigned not null comment '性别, 1:男, 2:女',
phone char(11) not null unique comment '手机号',
job tinyint unsigned comment '职位, 1 班主任, 2 讲师 , 3 学工主管, 4 教研主管, 5 咨询师',
salary int unsigned comment '薪资',
image varchar(255) comment '头像',
entry_date date comment '入职日期',
dept_id int unsigned comment '部门ID',
create_time datetime comment '创建时间',
update_time datetime comment '修改时间'
) comment '员工表';添加外键约束
1
2-- 添加外键约束(emp的 dept_id ---> dept的主键id)
alter table emp add constraint fk_emp_dept_id foreign key (dept_id) REFERENCES dept(id);更方便的图形化添加…

以上基本不用了
一对一
特殊的多对一,需要在定义字段时加上unique
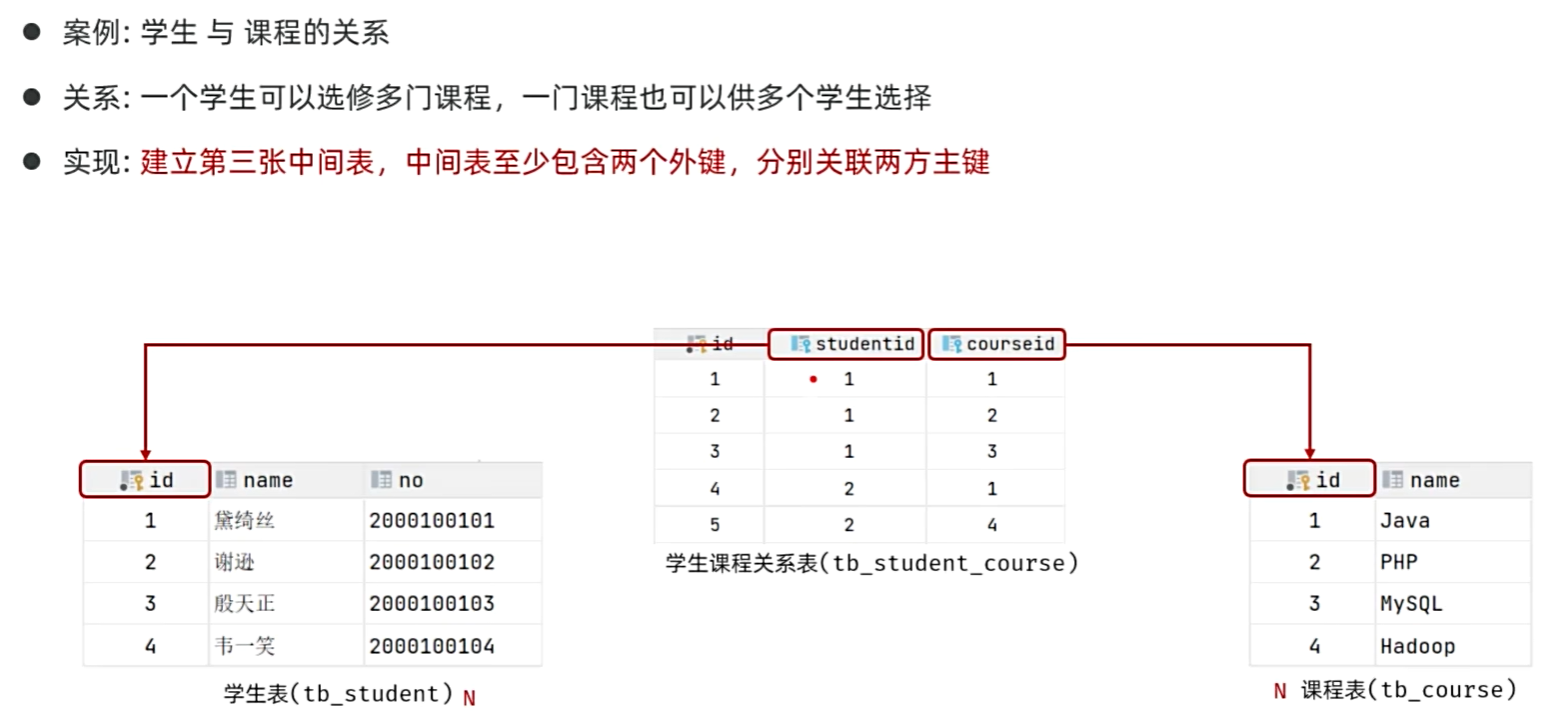
多对多
多表查询
1 | select * from emp,dept; |
这样子会输出两个表的笛卡尔积,当我们要输入emp及其对应的dept时需要:
1 | select * from emp,dept where emp.dept_id=dept.id; |
内连接
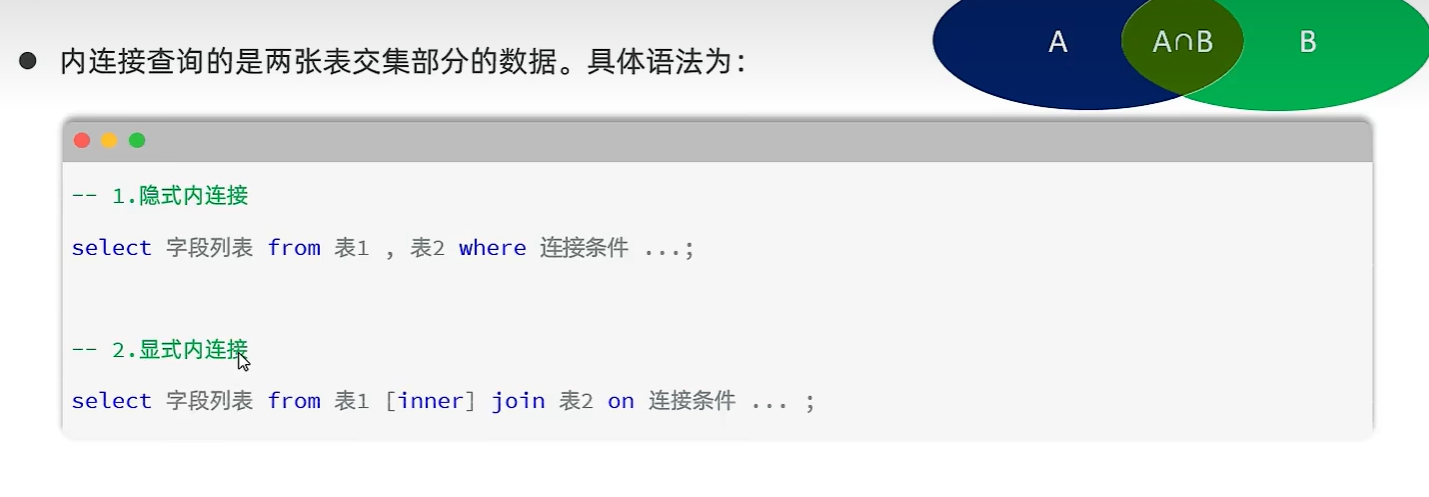
eg: 查询 性别为男 工资>8000 的员工 的ID 姓名 及所属的部门名称
隐式:
1 | select emp.id,emp.name,dept.name from emp,dept where emp.dept_id=dept.id and emp.gender=1 and emp.salary>8000; |
显式:
1 | select emp.id,emp.name,dept.name from emp join dept on emp.dept_id=dept.id where emp.gender=1 and emp.salary>8000; |
tip:给表起别名

外连接
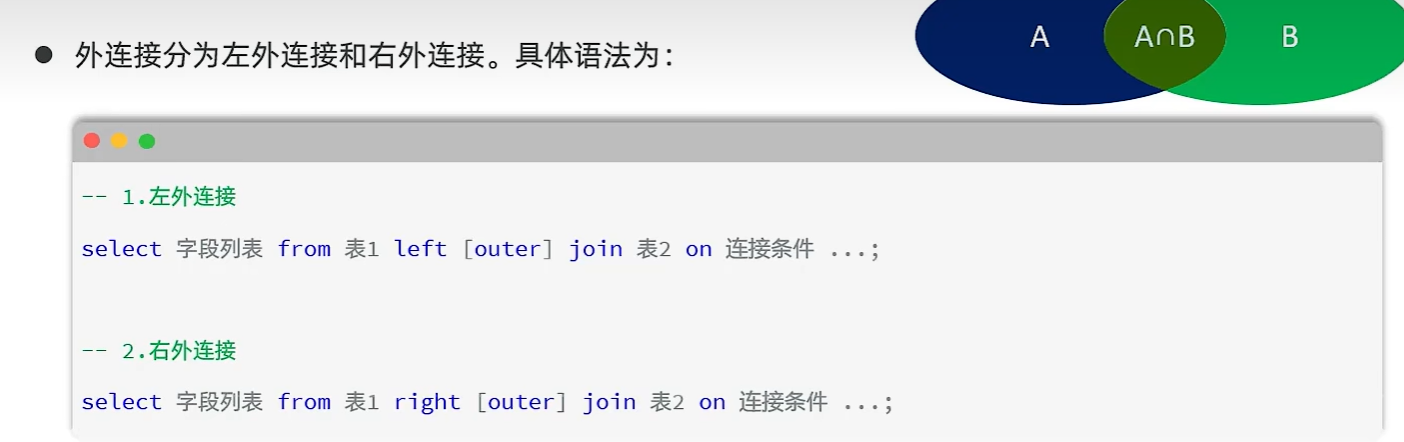
eg1: 查询员工表 所有员工的姓名 和 对应的部门名称(左外连接)
1 | select e.name,d.name from emp e left outer join dept d on e.dept_id=d.id; |
eg2: 查询部门表 所有 部门的名称,和对应的员工名称(右外连接)
1 | select e.name,d.name from emp e right outer join dept d on e.dept_id=d.id; |
eg3:查询工资高于8000 的所有员工的姓名 和对应的部门名称(左外连接)
1 | select e.name,d.name from emp e left outer join dept d on e.dept_id=d.id where e.salary>8000; |
子查询
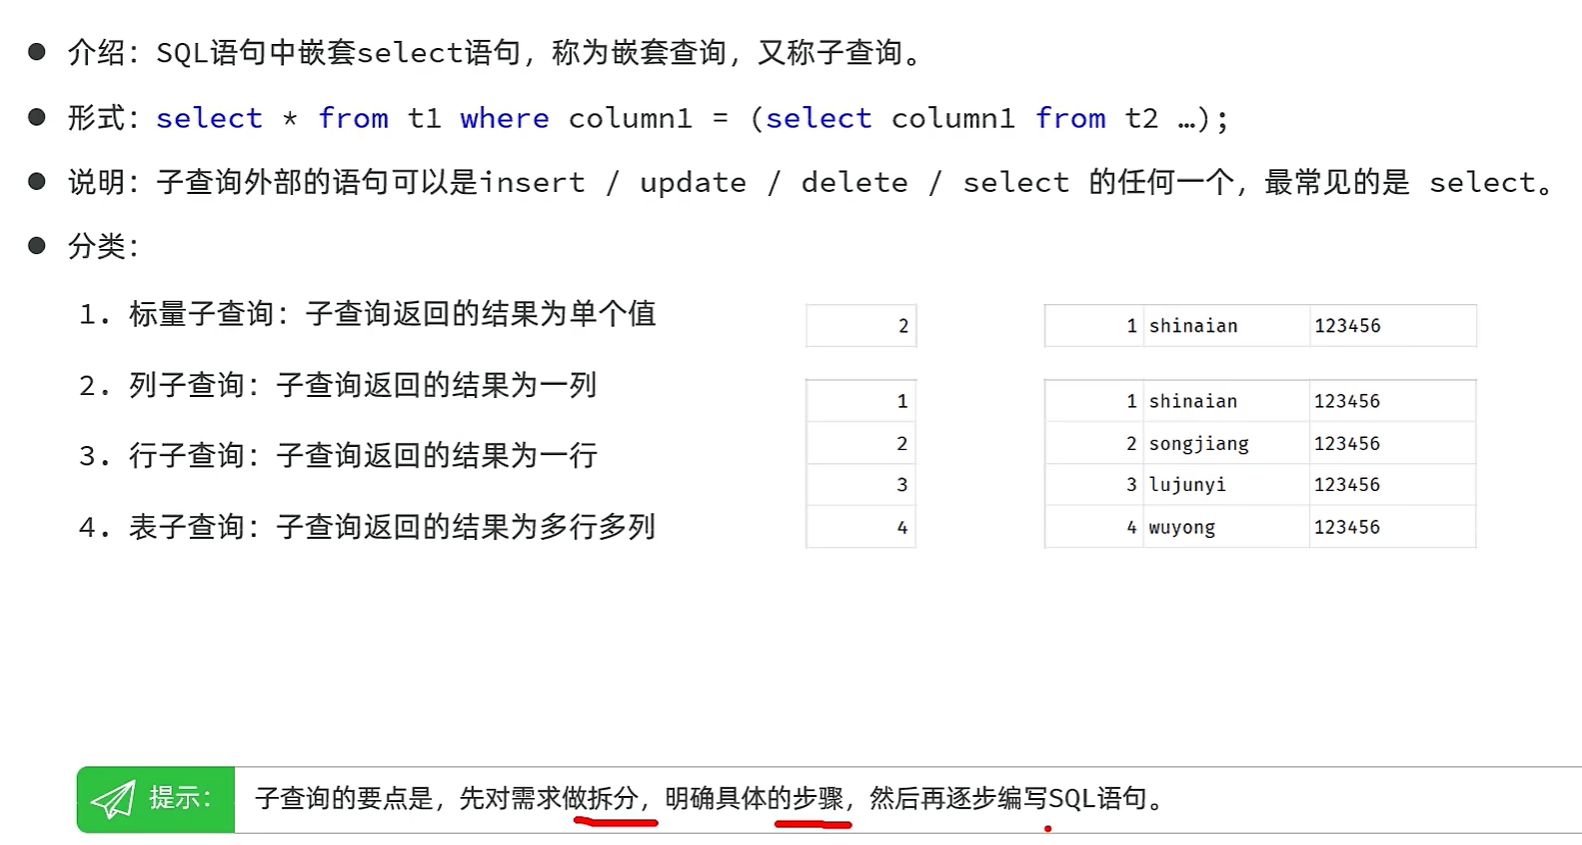
eg:
查询最早入职时间:
1
select min(entry_date) from emp;
查询 最早入职 的员工信息:
1
select * from emp where entry_date=(select min(entry_date) from emp);
查询在”阮小五”入职之后入职的员工信息
1
select * from emp where entry_date > (select entry_date from emp where name ="阮小五");
查询**”教研部”和”咨询部”** 的所有员工信息
1
select * from emp where dept_id in (select id from dept where name="教研部" or name ="咨询部");
查询与 “李忠” 的薪资 及 职位 都相同的员工信息
1
select * from emp where salary=(select salary from emp where name="李忠") and job=(select job from emp where name="李忠");
优化:
1
select * from emp where (salary,job)=(select salary,job from emp where name="李忠");
获取每个部门中薪资最高的员工信息
1
select * from emp where (dept_id,salary) in (select dept_id,max(salary) from emp group by dept_id);
员工管理
准备工作:

创建表
1
2
3
4
5
6
7
8
9
10
11
12
13
14
15
16
17
18
19
20
21
22
23
24
25
26
27
28
29
30
31
32
33
34
35
36
37
38
39
40
41
42
43
44
45
46
47
48
49
50
51
52
53
54
55
56
57
58
59
60-- 员工表
create table emp(
id int unsigned primary key auto_increment comment 'ID,主键',
username varchar(20) not null unique comment '用户名',
password varchar(32) default '123456' comment '密码',
name varchar(10) not null comment '姓名',
gender tinyint unsigned not null comment '性别, 1:男, 2:女',
phone char(11) not null unique comment '手机号',
job tinyint unsigned comment '职位, 1 班主任, 2 讲师 , 3 学工主管, 4 教研主管, 5 咨询师',
salary int unsigned comment '薪资',
image varchar(255) comment '头像',
entry_date date comment '入职日期',
dept_id int unsigned comment '部门ID',
create_time datetime comment '创建时间',
update_time datetime comment '修改时间'
) comment '员工表';
INSERT INTO emp VALUES
(1,'shinaian','123456','施耐庵',1,'13309090001',4,15000,'https://web-framework.oss-cn-hangzhou.aliyuncs.com/2023/1.jpg','2000-01-01',2,'2023-10-20 16:35:33','2023-11-16 16:11:26'),
(2,'songjiang','123456','宋江',1,'13309090002',2,8600,'https://web-framework.oss-cn-hangzhou.aliyuncs.com/2023/1.jpg','2015-01-01',2,'2023-10-20 16:35:33','2023-10-20 16:35:37'),
(3,'lujunyi','123456','卢俊义',1,'13309090003',2,8900,'https://web-framework.oss-cn-hangzhou.aliyuncs.com/2023/1.jpg','2008-05-01',2,'2023-10-20 16:35:33','2023-10-20 16:35:39'),
(4,'wuyong','123456','吴用',1,'13309090004',2,9200,'https://web-framework.oss-cn-hangzhou.aliyuncs.com/2023/1.jpg','2007-01-01',2,'2023-10-20 16:35:33','2023-10-20 16:35:41'),
(5,'gongsunsheng','123456','公孙胜',1,'13309090005',2,9500,'https://web-framework.oss-cn-hangzhou.aliyuncs.com/2023/1.jpg','2012-12-05',2,'2023-10-20 16:35:33','2023-10-20 16:35:43'),
(6,'huosanniang','123456','扈三娘',2,'13309090006',3,6500,'https://web-framework.oss-cn-hangzhou.aliyuncs.com/2023/1.jpg','2013-09-05',1,'2023-10-20 16:35:33','2023-10-20 16:35:45'),
(7,'chaijin','123456','柴进',1,'13309090007',1,4700,'https://web-framework.oss-cn-hangzhou.aliyuncs.com/2023/1.jpg','2005-08-01',1,'2023-10-20 16:35:33','2023-10-20 16:35:47'),
(8,'likui','123456','李逵',1,'13309090008',1,4800,'https://web-framework.oss-cn-hangzhou.aliyuncs.com/2023/1.jpg','2014-11-09',1,'2023-10-20 16:35:33','2023-10-20 16:35:49'),
(9,'wusong','123456','武松',1,'13309090009',1,4900,'https://web-framework.oss-cn-hangzhou.aliyuncs.com/2023/1.jpg','2011-03-11',1,'2023-10-20 16:35:33','2023-10-20 16:35:51'),
(10,'linchong','123456','林冲',1,'13309090010',1,5000,'https://web-framework.oss-cn-hangzhou.aliyuncs.com/2023/1.jpg','2013-09-05',1,'2023-10-20 16:35:33','2023-10-20 16:35:53'),
(11,'huyanzhuo','123456','呼延灼',1,'13309090011',2,9700,'https://web-framework.oss-cn-hangzhou.aliyuncs.com/2023/1.jpg','2007-02-01',2,'2023-10-20 16:35:33','2023-10-20 16:35:55'),
(12,'xiaoliguang','123456','小李广',1,'13309090012',2,10000,'https://web-framework.oss-cn-hangzhou.aliyuncs.com/2023/1.jpg','2008-08-18',2,'2023-10-20 16:35:33','2023-10-20 16:35:57'),
(13,'yangzhi','123456','杨志',1,'13309090013',1,5300,'https://web-framework.oss-cn-hangzhou.aliyuncs.com/2023/1.jpg','2012-11-01',1,'2023-10-20 16:35:33','2023-10-20 16:35:59'),
(14,'shijin','123456','史进',1,'13309090014',2,10600,'https://web-framework.oss-cn-hangzhou.aliyuncs.com/2023/1.jpg','2002-08-01',2,'2023-10-20 16:35:33','2023-10-20 16:36:01'),
(15,'sunerniang','123456','孙二娘',2,'13309090015',2,10900,'https://web-framework.oss-cn-hangzhou.aliyuncs.com/2023/1.jpg','2011-05-01',2,'2023-10-20 16:35:33','2023-10-20 16:36:03'),
(16,'luzhishen','123456','鲁智深',1,'13309090016',2,9600,'https://web-framework.oss-cn-hangzhou.aliyuncs.com/2023/1.jpg','2010-01-01',2,'2023-10-20 16:35:33','2023-10-20 16:36:05'),
(17,'liying','12345678','李应',1,'13309090017',1,5800,'https://web-framework.oss-cn-hangzhou.aliyuncs.com/2023/1.jpg','2015-03-21',1,'2023-10-20 16:35:33','2023-10-20 16:36:07'),
(18,'shiqian','123456','时迁',1,'13309090018',2,10200,'https://web-framework.oss-cn-hangzhou.aliyuncs.com/2023/1.jpg','2015-01-01',2,'2023-10-20 16:35:33','2023-10-20 16:36:09'),
(19,'gudasao','123456','顾大嫂',2,'13309090019',2,10500,'https://web-framework.oss-cn-hangzhou.aliyuncs.com/2023/1.jpg','2008-01-01',2,'2023-10-20 16:35:33','2023-10-20 16:36:11'),
(20,'ruanxiaoer','123456','阮小二',1,'13309090020',2,10800,'https://web-framework.oss-cn-hangzhou.aliyuncs.com/2023/1.jpg','2018-01-01',2,'2023-10-20 16:35:33','2023-10-20 16:36:13'),
(21,'ruanxiaowu','123456','阮小五',1,'13309090021',5,5200,'https://web-framework.oss-cn-hangzhou.aliyuncs.com/2023/1.jpg','2015-01-01',3,'2023-10-20 16:35:33','2023-10-20 16:36:15'),
(22,'ruanxiaoqi','123456','阮小七',1,'13309090022',5,5500,'https://web-framework.oss-cn-hangzhou.aliyuncs.com/2023/1.jpg','2016-01-01',3,'2023-10-20 16:35:33','2023-10-20 16:36:17'),
(23,'ruanji','123456','阮籍',1,'13309090023',5,5800,'https://web-framework.oss-cn-hangzhou.aliyuncs.com/2023/1.jpg','2012-01-01',3,'2023-10-20 16:35:33','2023-10-20 16:36:19'),
(24,'tongwei','123456','童威',1,'13309090024',5,5000,'https://web-framework.oss-cn-hangzhou.aliyuncs.com/2023/1.jpg','2006-01-01',3,'2023-10-20 16:35:33','2023-10-20 16:36:21'),
(25,'tongmeng','123456','童猛',1,'13309090025',5,4800,'https://web-framework.oss-cn-hangzhou.aliyuncs.com/2023/1.jpg','2002-01-01',3,'2023-10-20 16:35:33','2023-10-20 16:36:23'),
(26,'yanshun','123456','燕顺',1,'13309090026',5,5400,'https://web-framework.oss-cn-hangzhou.aliyuncs.com/2023/1.jpg','2011-01-01',3,'2023-10-20 16:35:33','2023-11-08 22:12:46'),
(27,'lijun','123456','李俊',1,'13309090027',2,6600,'https://web-framework.oss-cn-hangzhou.aliyuncs.com/2023/1.jpg','2004-01-01',2,'2023-10-20 16:35:33','2023-11-16 17:56:59'),
(28,'lizhong','123456','李忠',1,'13309090028',5,5000,'https://web-framework.oss-cn-hangzhou.aliyuncs.com/2023/1.jpg','2007-01-01',3,'2023-10-20 16:35:33','2023-11-17 16:34:22'),
(30,'liyun','123456','李云',1,'13309090030',NULL,NULL,'https://web-framework.oss-cn-hangzhou.aliyuncs.com/2023/1.jpg','2020-03-01',NULL,'2023-10-20 16:35:33','2023-10-20 16:36:31'),
(36,'linghuchong','123456','令狐冲',1,'18809091212',2,6800,'https://web-framework.oss-cn-hangzhou.aliyuncs.com/2023/1.jpg','2023-10-19',2,'2023-10-20 20:44:54','2023-11-09 09:41:04');
-- 员工工作经历信息
create table emp_expr(
id int unsigned primary key auto_increment comment 'ID, 主键',
emp_id int unsigned comment '员工ID',
begin date comment '开始时间',
end date comment '结束时间',
company varchar(50) comment '公司名称',
job varchar(50) comment '职位'
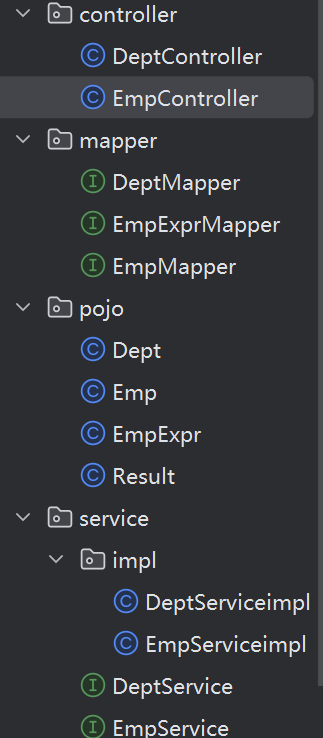
)comment '工作经历';创建实体类:一张表对应一个实体类
三层架构
编写sql
1
2-- 查询所有的员工信息 以及所属部门名称
select e.*,d.name from emp e left join dept d on e.dept_id=d.id;
1.1 分页查询
前端的展示是这样的,其中每页展示数靠的是前端,而后半部分靠的是后端
1 | -- 查询总记录数 |

原始方法
1 | -- 分页查询 |
由上可得,我们从前端传递过来页码1,2,3……,而我们的数据库需要的是0,5,10……,我们需要通过计算把前端传递过来的数据换算成数据库所需要的数据:
1 | 起始索引=(页码-1)*每页展示记录数 |

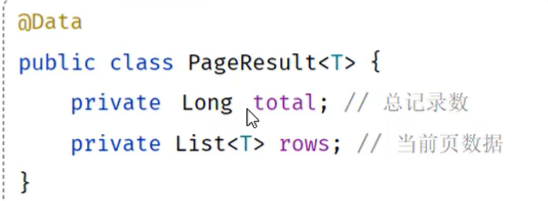
后端返回的数据一般封装成一个实体类
代码实现
思路:
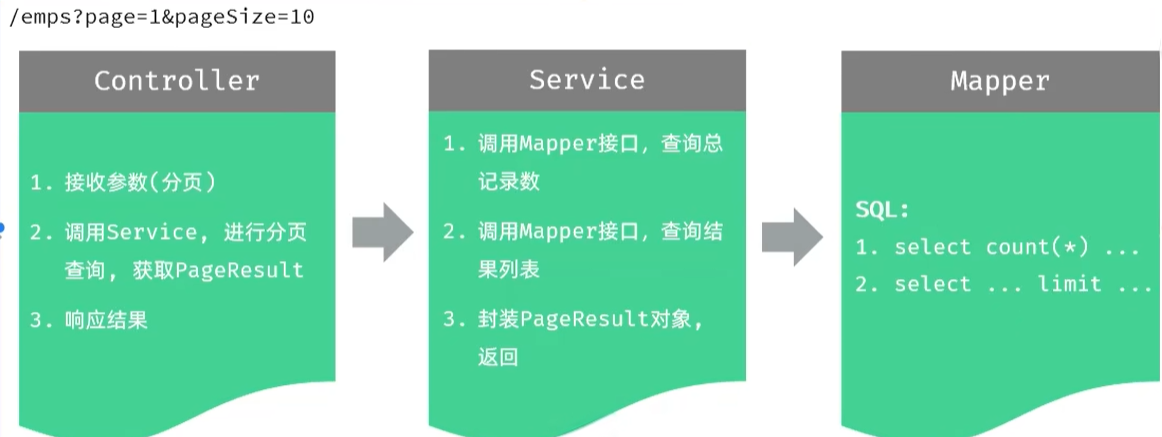
控制层:
注: 在@RequestParam中使用defaultValue = “1”可以设置默认值
1 | /** |
服务层:
1 | @Override |
持久层
当我们的实体类中没有某个属性的时候,需要去看接口文档来创建所需的属性名称,同时在sql语句中设置别名d.name deptName来匹配所创建的属性
1 | @Select("select count(*) from emp e left join dept d on e.dept_id=d.id") |
PageHelper
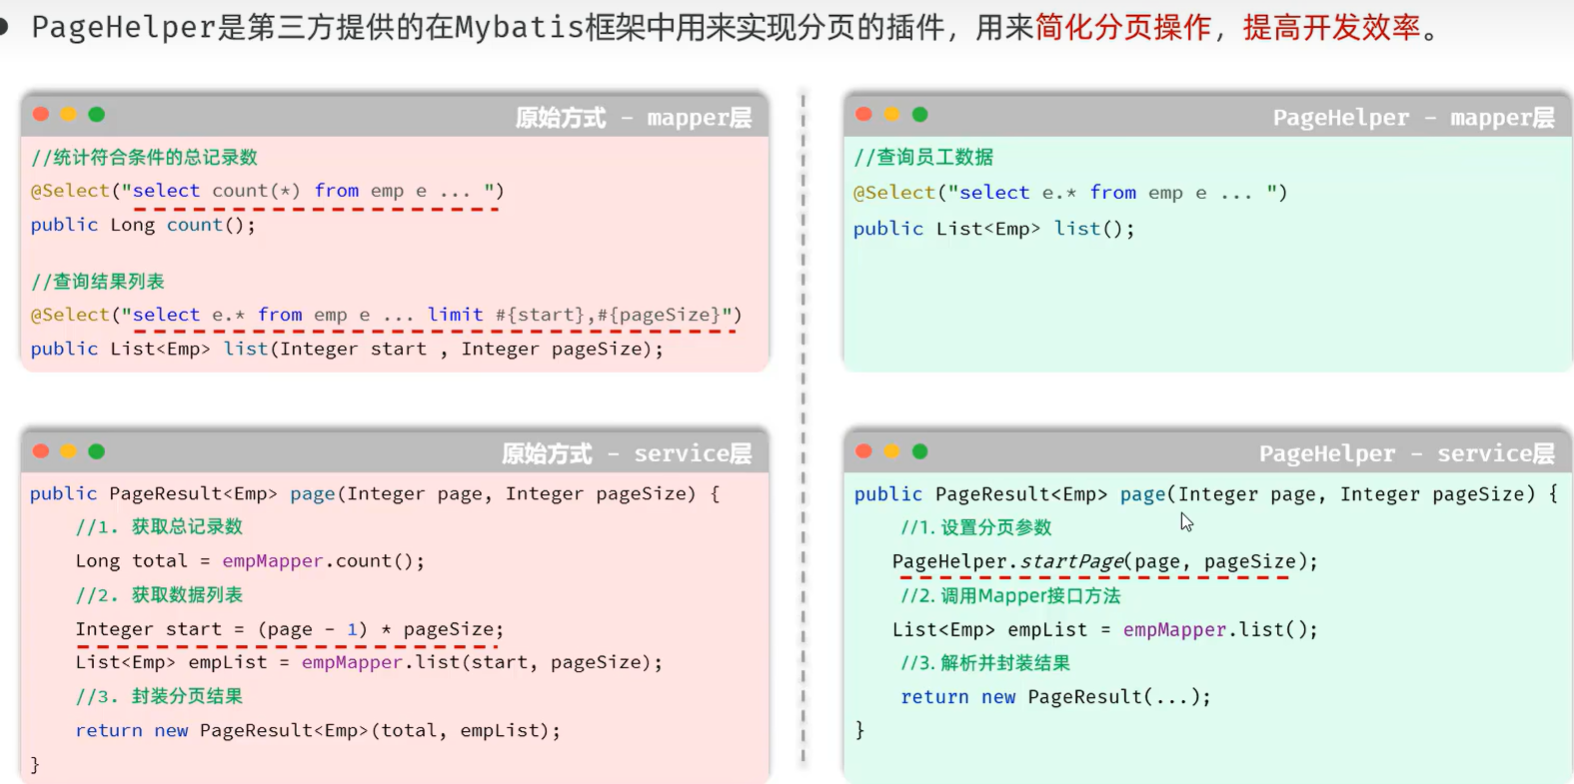
使用:
引入依赖:放在pom的dependences里
1
2
3
4
5
6<!--分页插件PageHelper-->
<dependency>
<groupId>com.github.pagehelper</groupId>
<artifactId>pagehelper-spring-boot-starter</artifactId>
<version>1.4.7</version>
</dependency>定义一个普通的查询语句,不需要limit,同时也不需要传递参数进来
1
2
3@Select("select e.*,d.name deptName from emp e left join dept d on e.dept_id=d.id " +
"order by e.update_time desc ")
public List<Emp> pageQuery();回到服务层,把list封装到Page中,page中有自带获取各种属性的方法
1
2
3
4
5
6
7
8
9// 1. 设置分页参数
PageHelper.startPage(page,pageSize);
// 2. 执行查询
List<Emp> empList=empMapper.pageQuery();
// 3. 解析查询结果并封装
Page<Emp> p = (Page<Emp>) empList;
return new PageResult<Emp>(p.getTotal(),p.getResult());

1.2 条件分页查询
需要根据姓名,性别,入职时间进行条件查询:
1 | select e.*,d.name deptName from emp e left join dept d on e.dept_id=d.id |
代码:
控制层:
对于接收,看需求文档,把姓名,性别,入职时间接受进来,其中时间每个项目的格式不同,需要自己去定义格式
1 | @DateTimeFormat(pattern = "yyyy-MM-dd") |
1 | @GetMapping |
服务层:
没有什么变化,需要多传入参数就是了
1 | public PageResult<Emp> pageQuery(Integer page, Integer pageSize, String name, Integer gender, LocalDate begin, LocalDate end) { |
持久层:
由于sql语句很复杂,我们可以使用mapper的xml来编写,同时要注意!,**’%#{name}%’**引号内不能使用#{}
需要使用concat函数来拼接字符串
1 | <?xml version="1.0" encoding="UTF-8" ?> |
优化:
请求参数接收优化:
由于 接受过多 要改的会很麻烦,就可以把接收参数封装到一个实体类中,之后只要改 实体类 就好了
实体类:
1 | @Data |
控制层:
1 | @GetMapping |
服务层
1 | @Override |
持久层,xml不用变
1 | public List<Emp> pageQuery(EmpQueryParam empQueryParam); |
由于传入参数可以不选择,但是我们写的sql语句是写死的,假如不写他不会传递参数,也就查询不出东西
这就需要使用mybatis中的动态sql

1
2<if>: 判断条件是否成立,如果条件为true,则拼接SQL
<where>: 根据查询条件,来生成where关键字,并且会自动去除and 或 or修改后xml:
1
2
3
4
5
6
7
8
9
10
11
12
13
14
15
16
17<select id="pageQuery" resultType="com.cl.pojo.Emp">
select e.*,d.name deptName from emp e left join dept d on e.dept_id=d.id
<where>
<if test="name != null and name !=''">
e.name like concat('%',#{name},'%')
</if>
<if test="gender != null">
and e.gender=#{gender}
</if>
<if test="begin != null and end != null">
and e.entry_date BETWEEN #{begin} and #{end}
</if>
</where>
ORDER BY e.update_time desc
</select>
1.3 新增员工
还是先写sql语句,我们要新增员工到emp表,新增员工的工作经历到emp_expr表
– 保存员工基本信息
1
2
3
4
5
6
7
8-- 保存员工基本信息
INSERT INTO emp (
username, name, gender, phone, job, salary, image,
entry_date, dept_id, create_time, update_time
) VALUES (
'linpingzhi', '林平之', 1, '13333333333', 1, 6000, '1.jpg',
'2020-01-01 00:00:00', 1, '2024-10-01 00:00:00', '2024-10-01 00:00:00'
);– 批量保存员工工作经历信息
1
2
3
4
5
6
7
8-- 批量保存员工工作经历信息
insert into emp_expr(
emp_id,begin,end,company,job
) values (
37,'2020-01-01','2021-01-01','百度','java开发'
),(
37,'2020-01-01','2021-01-01','字节','java开发'
)
保存员工基本信息
先理思路:
增加不需要返回什么数组,只要Result.success()就可以了
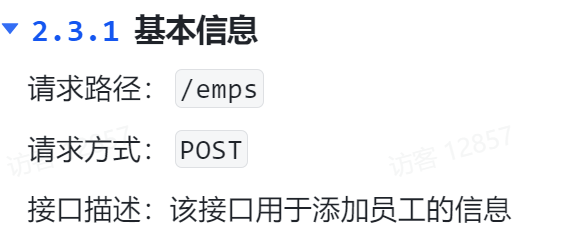
1 | @RequestMapping("/emps") |
前端传来json格式,我们用@RequestBody接收
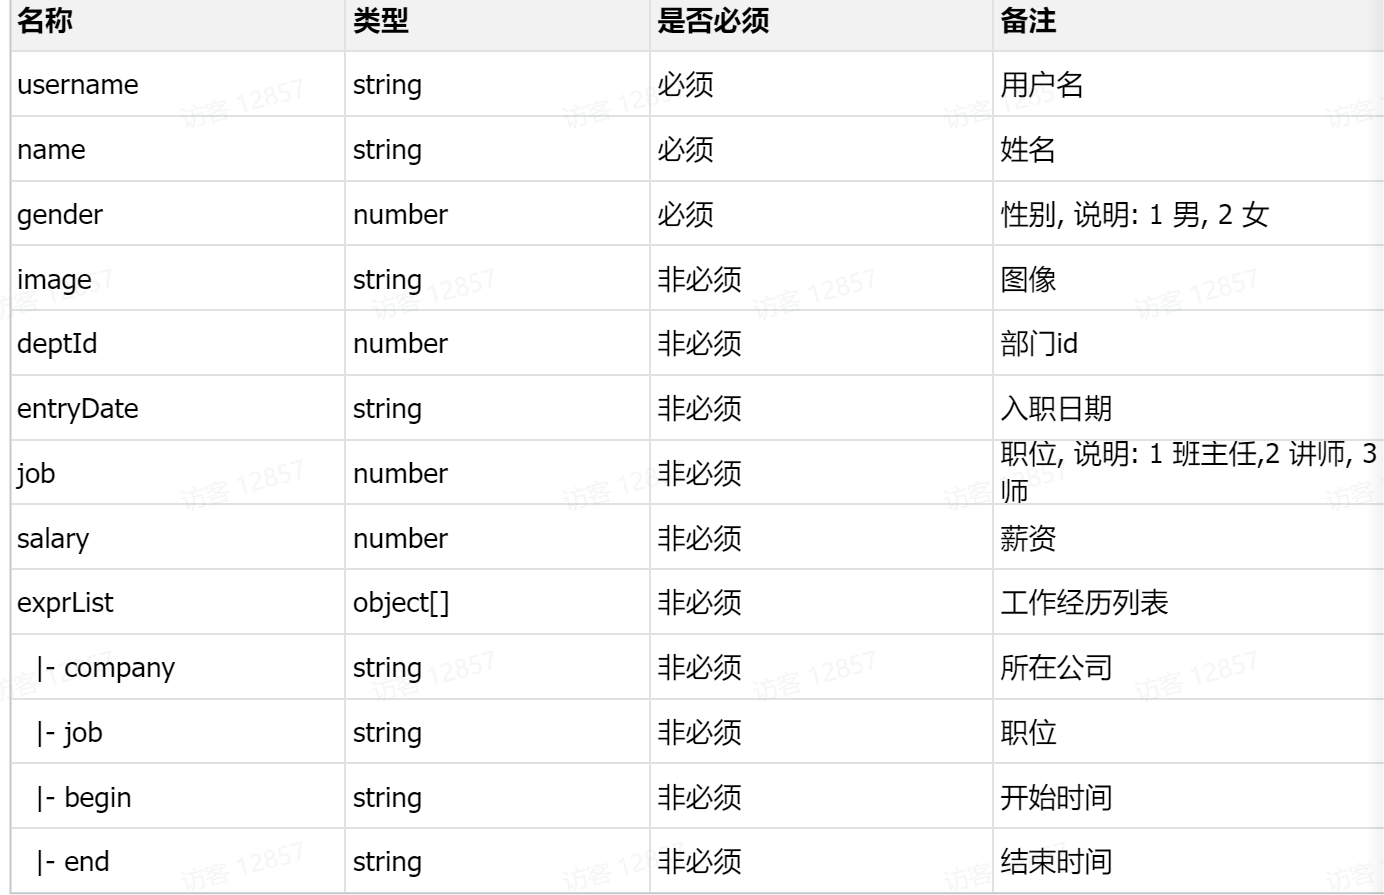
在我们的对象中并没有exprList属性,需要我们新增一个属性
1 | // 封装工作经历信息 |
之后就是具体代码实现
1 | /** |
1 | @Override |
1 | /** |
保存员工工作经历信息
先传来exprList
1 | List<EmpExpr> exprList = emp.getExprList(); |
需要判断是否存在工作经历,
1 | if(!CollectionUtils.isEmpty(exprList)){ |
要传来的工作经历已经封装到了exprList中,我们需要使用动态sql去遍历即可
foreach
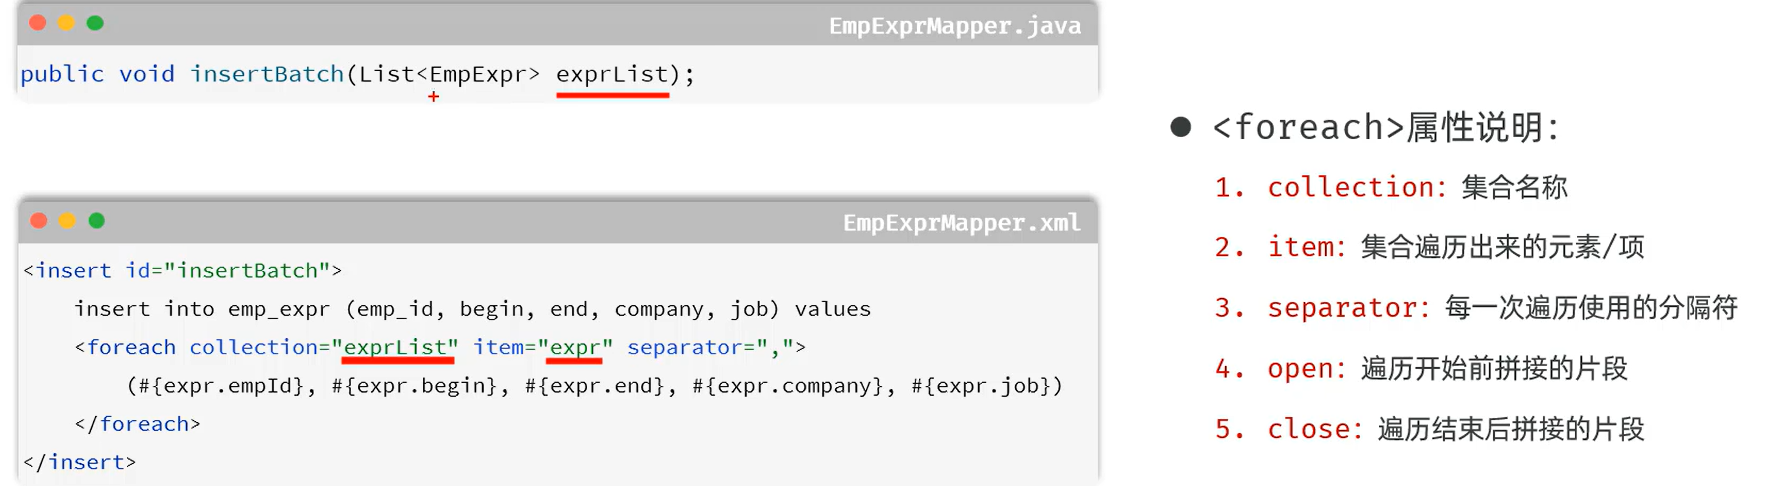
1 | <!--批量保存员工工作经历信息--> |
同时他前端传来的工作经历并没有员工的id,需要我们自己获取主键
@Options:
1 | @Options(useGeneratedKeys = true,keyProperty = "id") |
最后在服务层把id遍历进exprlist的empid即可
1 | @Override |
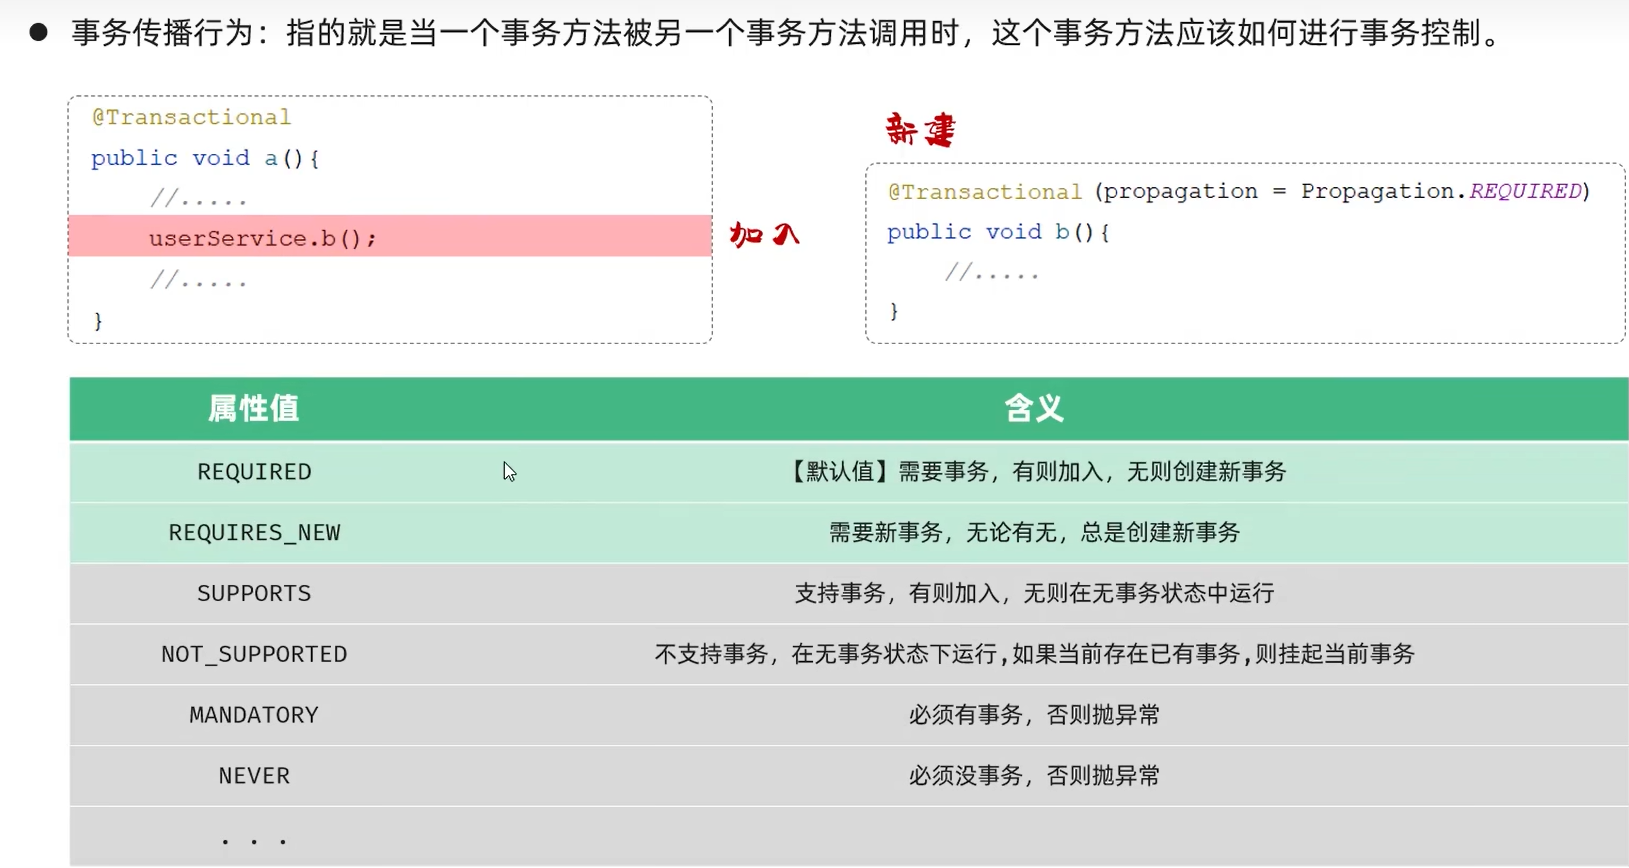
事务管理

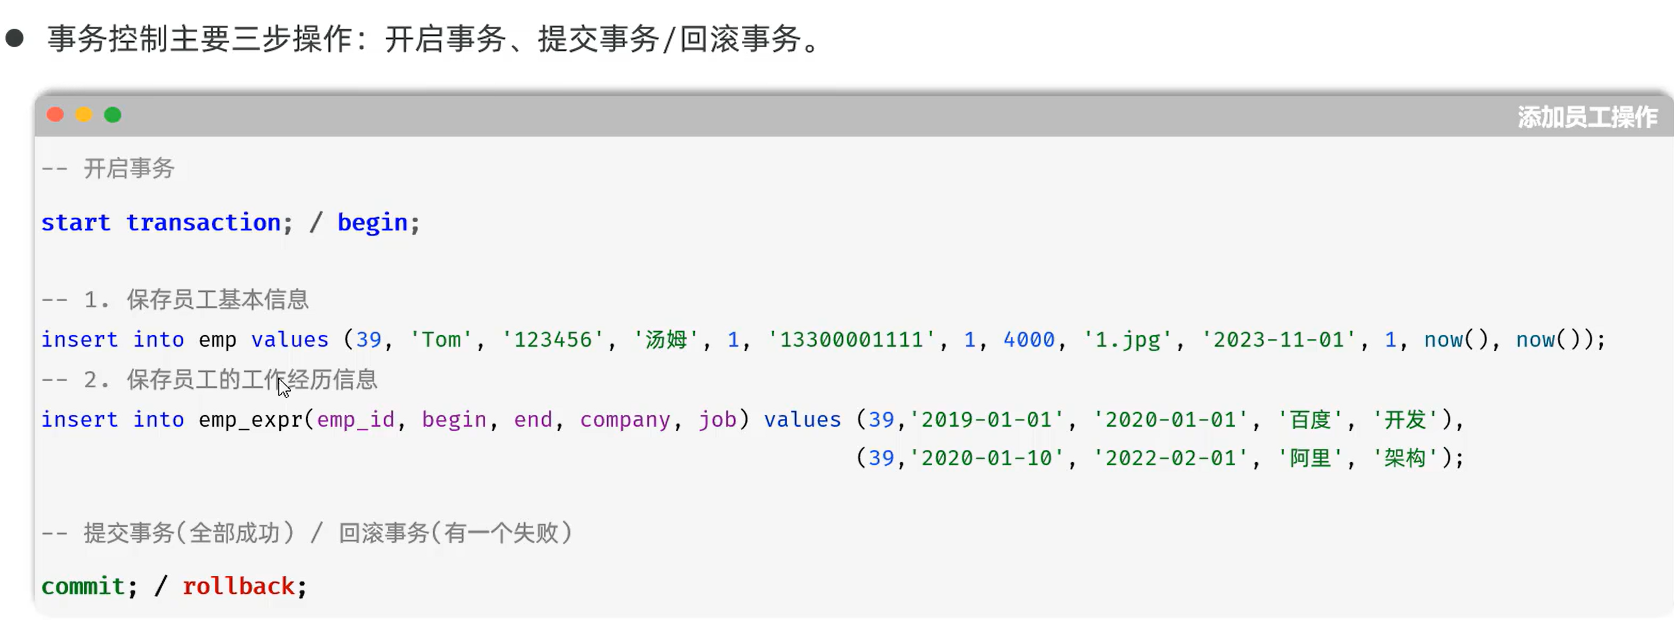
1 | -- 开启事务: |
spring事务管理

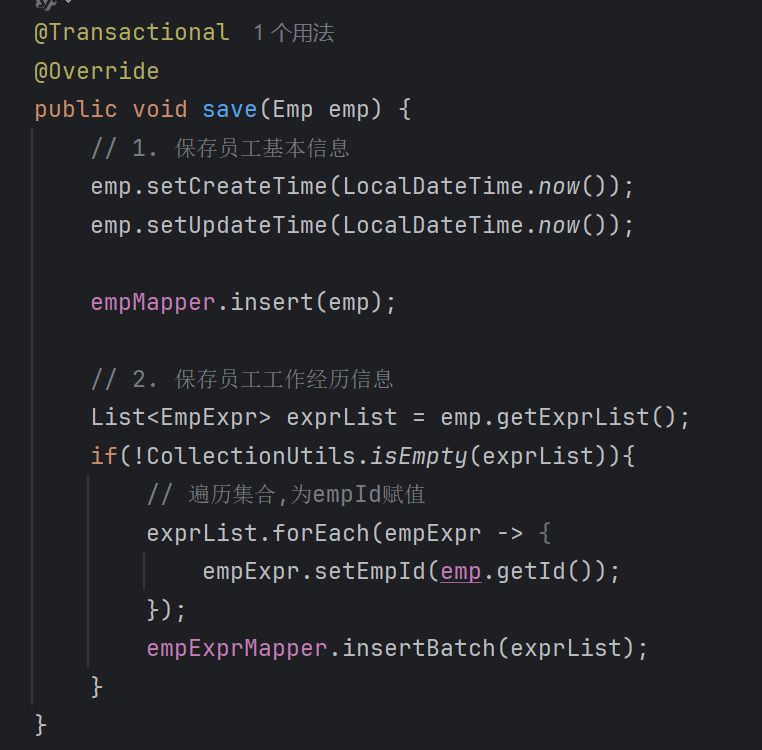
在方法前加上即可,这样就可以避免部分错误但是还是运行了
rollbackFor:


因此要设置rollbackFor
propagation

文件上传
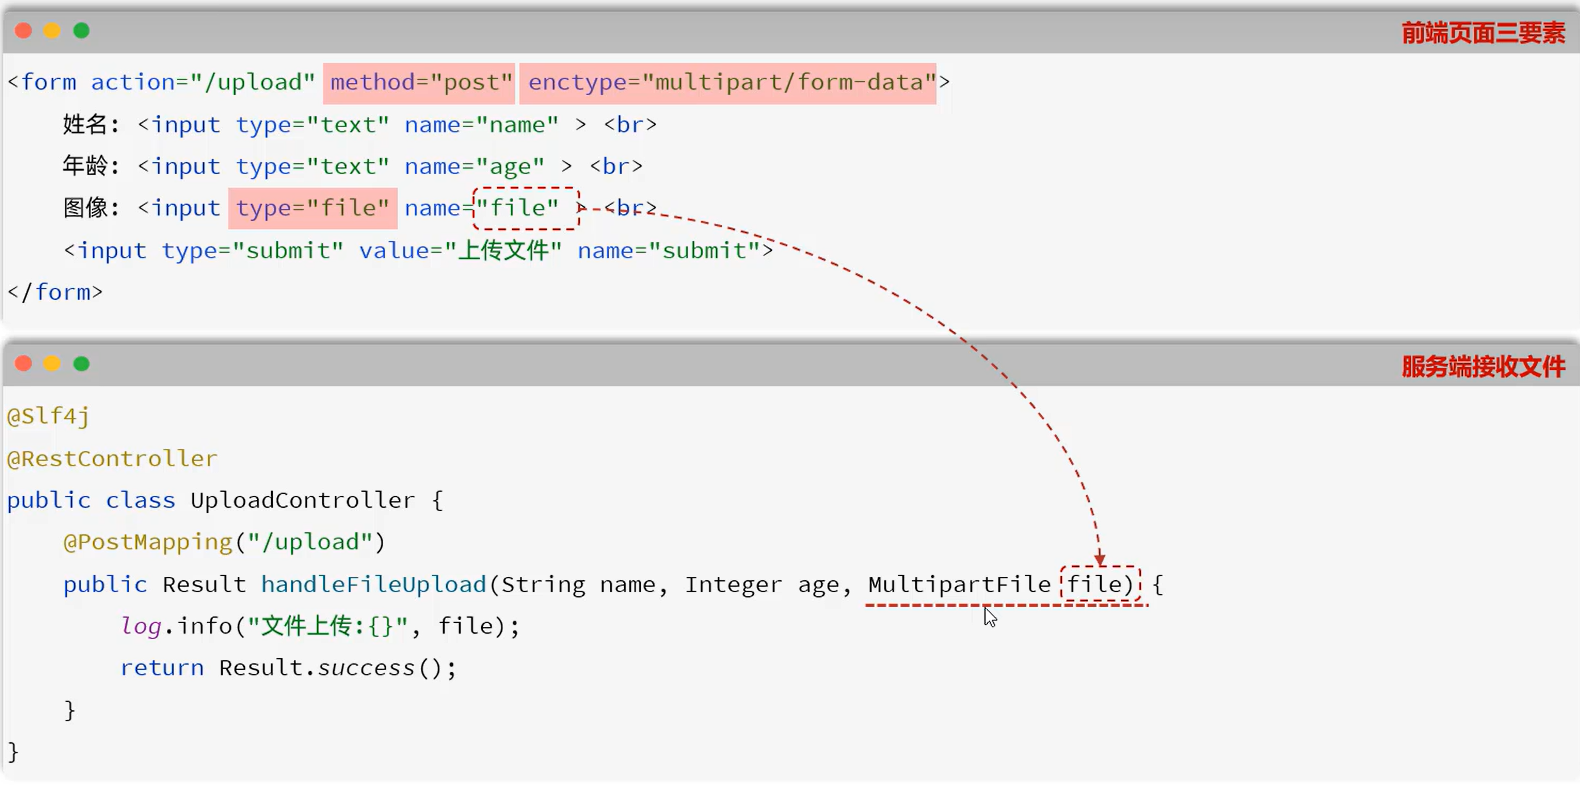
关键:
method必须为post,get方法大小不够,同时enctype必须为multipart/form-data否则只能上传文件名,type必须为file,才能选择要上传的文件
服务端接收在c盘的临时文件,之后要永久保存
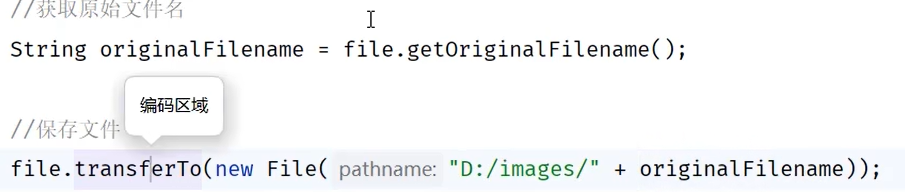
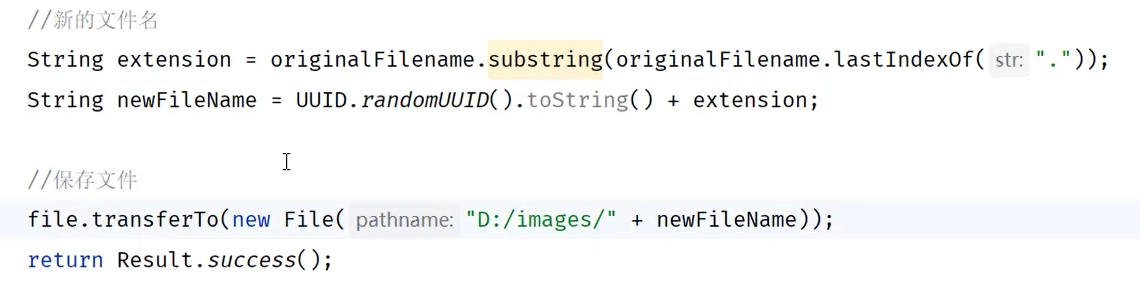
为了防止传上相同的文件名导致覆盖,可以用一个随机数来重写文件名
默认上传最大大小为1M
可以在.yml中配置
1 | servlet: |
1.4 删除员工
如何接收 ?ids=1,2,3
先写sql语句:
删除员工的同时要删除其工作经历
1 | -- 删除员工 |
现在就是第一大问题,如何在控制层接收:

解决:
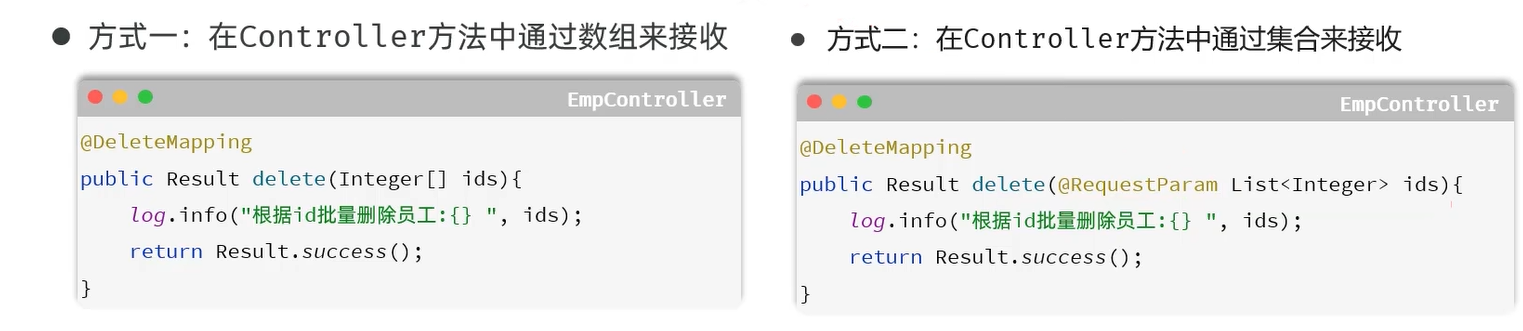
这下就好办了
代码:
控制层:
1 | /** |
服务层:
1 | @Transactional |
持久层:
1 | <delete id="deleteById"> |
1 | <delete id="deleteById"> |
成功自己实现
1.5 修改员工
根据id查询
点击修改按钮,首先我们需要他返回这个人数据库的数据,根据ID查询即可:
看接口文档:
Get方式
/emps/1–> @PathVariable
编写sql语句:
1 | select e.*,ee.* from emp e left join emp_expr ee on e.id=ee.emp_id where e.id=#{id} |
因为有重名的:改为:
1 | select |
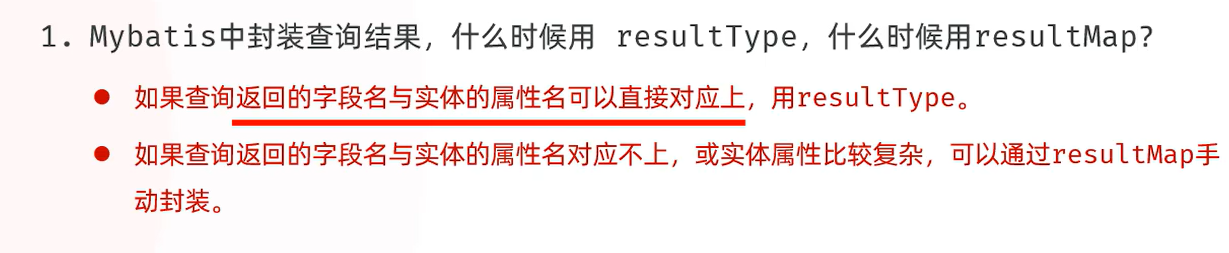
但是这样子做当一个人拥有两条工作经历时,mabatis无法将其自动封装成一个Emp类,只能我们自己手动结果封装,使用resultMap
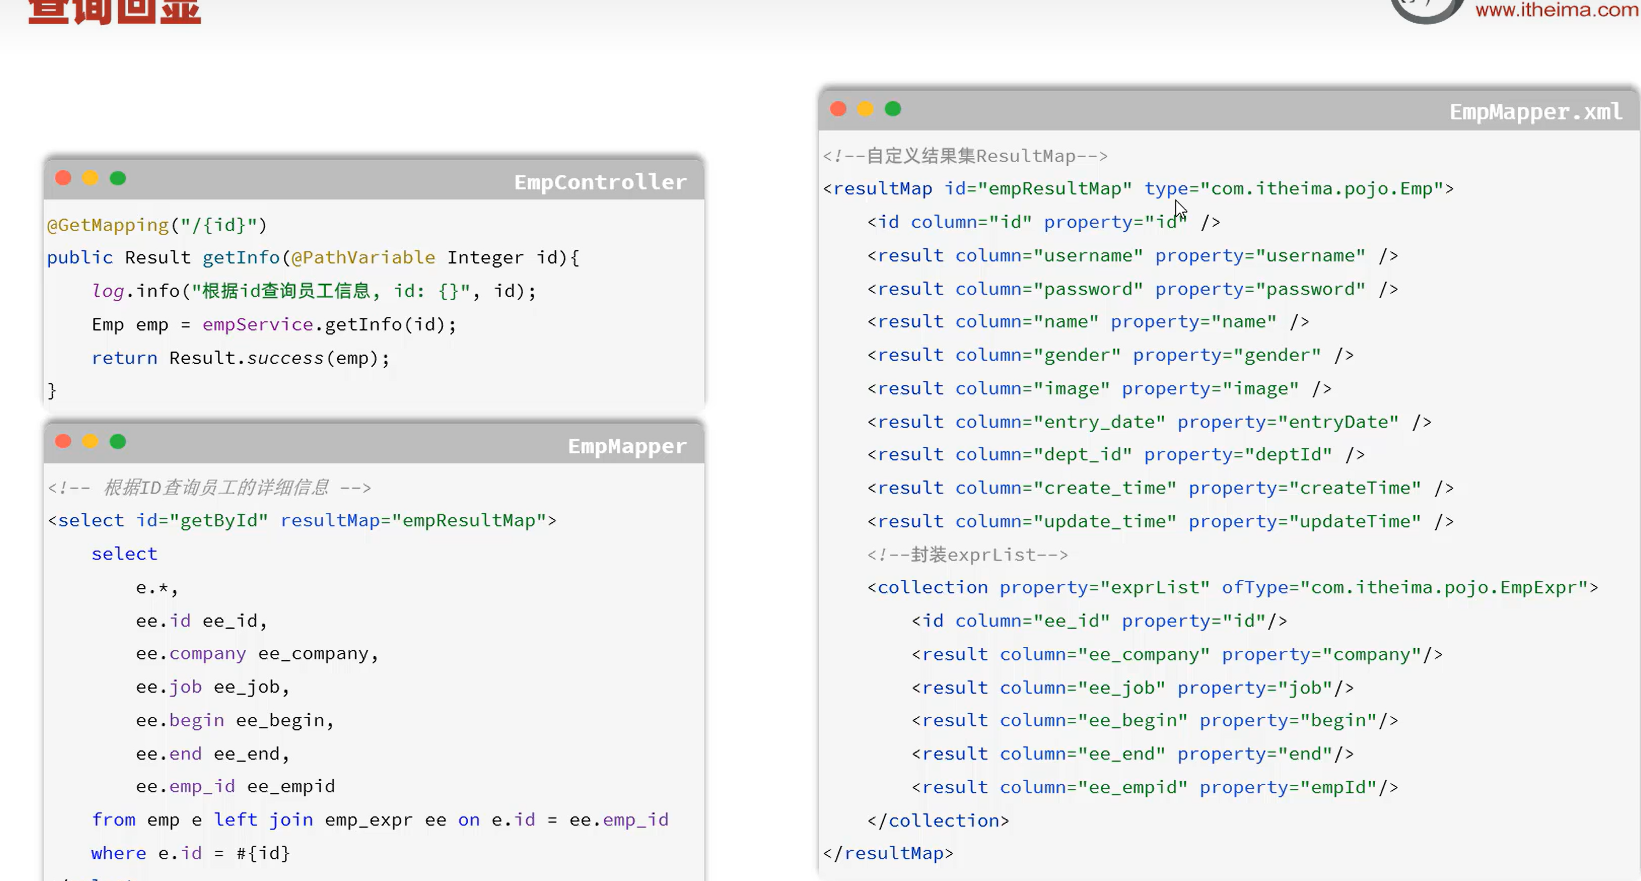
1 | <!-- 定义ResultMap--> |
修改
1 | Arrays.asList() |
首先具体SQL语句
1 | <!-- 根据id更新员工基本信息--> |
根据接口文档控制层:
1 | /** |
服务层:
1 | @Transactional(rollbackFor = Exception.class) |
持久层
1 | <!-- 根据id更新员工基本信息--> |
优化
set标签:
1 | 1. 自动生成set关键字 |
优化后持久层:
1 | <!-- 根据id更新员工基本信息--> |
全局异常处理器
格式如下
1 | @Slf4j |
1 | public Result handleDuplicateKeyException(DuplicateKeyException e){ |

参考视频:【全网首发AI+JavaWeb开发入门,Tlias教学管理系统项目实战全套视频教程,从需求分析、设计、前后端开发、测试、程序优化到项目部署一套搞定】 https://www.bilibili.com/video/BV1yGydYEE3H/?p=9&share_source=copy_web&vd_source=b2941ac430d9a6b02b476a1e91c98c42